mTLS Test
The mTLSTest repository contains tools and a package to help troubleshoot and test Mutual TLS (mTLS) connections from clients to a Neuron®. It contains a small content package that provides a web page and a web service that humans and/or machines can use to ping the Neuron® and get information about the connection, including information about any client certificate the Neuron was able to receive from the client.
The repository also contains:
- A communication library for the mTLS Ping API.
- Unit tests that can be used to automate testing of mTLS connectivity.
- A command-line tool for testing mTLS connectivity.
- A method for testing mTLS connectivity manually, using a browser.
- Information about requirements for client certificates.
- Instructions on how to install the package on a Neuron.
Using the Neuron to send and receive e-mail
The TAG Neuron® supports multiple protocols, among them, both the XMPP Protocol and the SMTP protocol. In XMPP, clients have accounts on brokers, and connect to their broker to connect to the federated XMPP network. Addresses in XMPP are called Jabber IDs, or JIDs for short. The Bare JIDs look like e-mail addresses, in the form: ACCOUNT@DOMAIN. Once connected, the connection is assigned a Full JID, in the form ACCOUNT@DOMAIN/RESOURCE.
The account can also interact using the SMTP protocol. This means, the client can send and receive e-mail seamlessly using the same XMPP account. E-mail messages sent to the account gets forwarded as messages to the client. The client can send messages back. The Neuron converts the messages into e-mail messages and forwards them to the recipient using the SMTP protocol.
There are some differences between how SMTP works on the Neuron®, and if you are using a traditional SMTP Server:
In order to be able to communicate with a client on the Neuron, you need a presence subscription. This is a requirement on XMPP. SMTP does not have such a feature, which is one of the reasons why e-mail is so ripe with spam. The Neuron enforces presence subscription on e-mail as well. It does this via a squence of e-mails that are sent to anyone trying to send e-mail to an account on the Neuron. The e-mails will contain links allowing the sender to request presence. Once the client has accepted the presence subscription, the sender of the e-mail gets notified that it is able to send e-mail to the indented recipient.
Outgoing messages are accumulated for a short time before being sent. In XMPP, messages are sent instantaneously to the recipient. If you use a chat program and write multiple rows of text, you want all rows to get into the same e-mail message. For this reason, the Neuron accumulates outgoing text messages, and forwards them once there is a silence for a minute (or an hour has passed since the first row).
Incoming e-mail messages are sent to the client encoded in multiple ways. First, the text of the message is extracted, and forwarded as Markdown, HTML and/or plain text, as appropriate. The original contents of the e-mail is also forwarded, but can only be processed by the client, if it understands a separate e-mail extensions. This means, you can e-mail to any XMPP client, using text content. But only XMPP clients understanding the e-mail extension will be able to receive more advanced concepts, such as embedded attachments, etc.
Outgoing messages from XMPP clients are typically of a simpler nature: Plain text, HTML and/or Markdown. This is transformed into multi-formatted e-mail messages accordingly, before being sent.
Example
As an example, following is a short interaction between an e-mail client using a hotmail e-mailing address, and an XMPP client, using an XMPP address. No Mail Relay was used on the Neuron used in this example.
Sending first mail to XMPP client
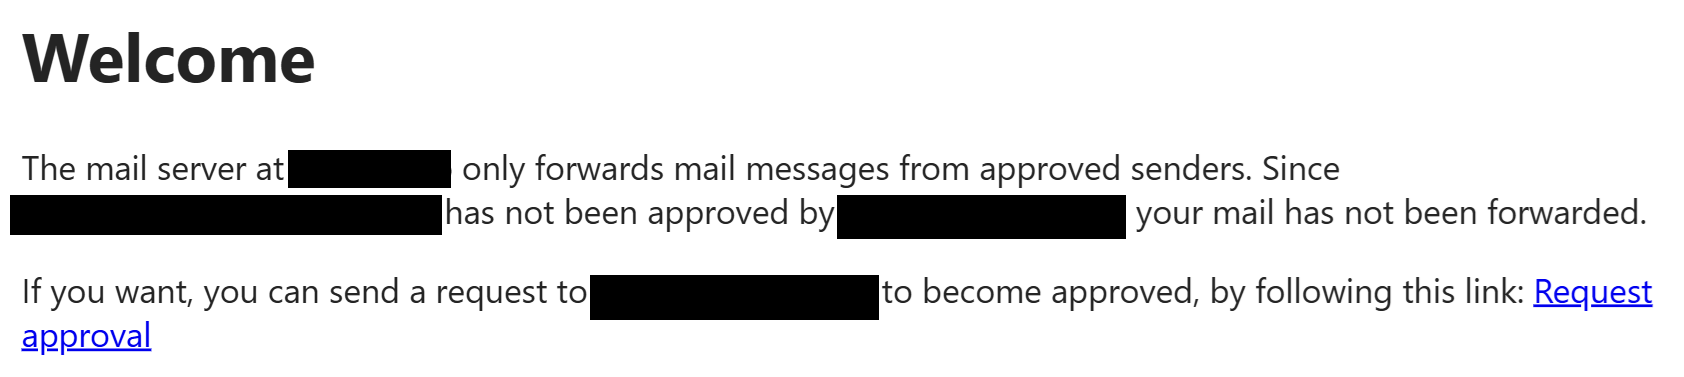
First step, that will trigger the approval process (or white-listing process), is to send an e-mail to the XMPP client you want to interact with. The contents of this e-mail will be ignored; it can be anything. When the Neuron receives this e-mail, it will check the roster of the recipient to see if an approved presence subscription is available. If not, it will immediately return an e-mail stating this fact.
Sending a presence subscription request
The e-mail will contain a link the recipient can click on, that will send a presence subscription request to the intended recipient. The link is cryptographically protected with the associated e-mail, and the sender and receiver identities. The sender will also receive an e-mail confirmation that the presence subscription request was sent to the recipient.

Receiving presence subscription acceptance confirmation
If the recipient accepts the presence subscription request, a two new e-mails are sent to the original sender, confirming this fact, and instructing the sender that it is now allowed to send e-mails to the intended recipient. The first e-mail shows the sender has been added to the white-list (roster in XMPP). The second, that the presence subscription request has been accepted.


Testing e-mail <-> XMPP link
The e-mail sender should now be able to communicate with the XMPP recipient. Sending a simple test message to the recipient, will make the text in the e-mail appear as a chat message in the XMPP client. The XMPP client can respond using chat, just as if the sender was another XMPP-client.
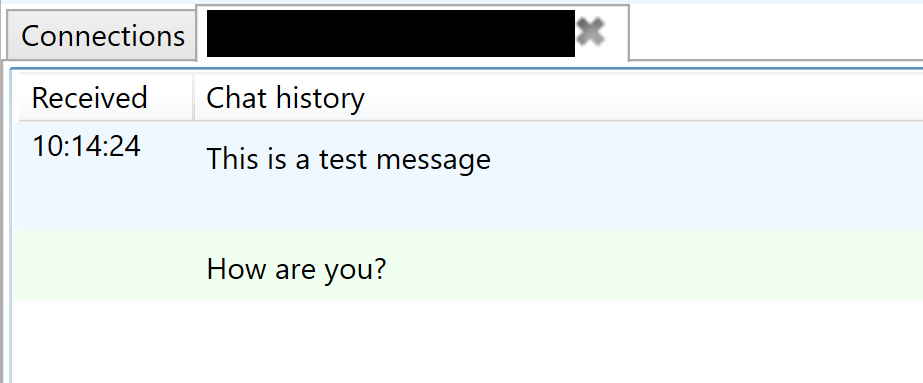
The XMPP chat response is transformed into an e-mail and sent to the original sender.

Troubleshooting SMTP Communication
A lot of problems can occur in SMTP communication. The principle reason is lack of cybersecurity in the original specifications, and security added on-top, as people became aware of threats. There is often no clear indication as to why there are problems sending or receiving e-mail.
The principle resource for troubleshooting e-mail is SMTP communication logs. These are stored in the SMTP subfolder in the Neuron Program Data Folder. The SMTP folder contains subfolders with communication logs for different senders and recipients. Input logs (containing information about incoming messages) are stored separately from Output logs (containing information about outgoing messages). To distinguish the two, Input logs are suffixed with IN and Output logs are suffixed with OUT.
When troubleshooting incoming logs, you need to know from where the message will be received. This can be learned from DNS SPF entries. When troubleshooting outgoing logs, you need to know to where the message will be sent. This can be learned from DNS MX entries. There are tools online for finding out both. You can also use the Script engine on the Neuron to get the relevant DNS records.
Also, you need to ensure the DNS has been configured correctly for the Neuron, especially those related to Sender Policy Framework SPF (TXT records) and Mail Exchange (MX records).
Creating broker accounts using script
One way to prepare a set of Neuro-Access accounts for a predefined set of users, is to pre-create them using script and then generate onboarding codes that can be sent to the users. Once they receive their corresponding code, they can download the app, scan the code, and connect directly to the predefined account. This method allows you to create accounts on a predefined Neuron for a known set of users, without having to create API keys, and minimizing the risk of the users creating accounts on other neurons. It also allows you to predefine the account names.
To try the following tutorial, you need access to the script prompt on your neuron. The script prompt is available from the administrative page via this option:

Creating the account
The main module of the XMPP broker, hosting the accounts, is Waher.Service.IoTBroker.XmppServerModule, or XmppServerModule for short. It has a property called PersistenceLayer that acts as an interface to the database for the XMPP server. This interface has a method called CreateAccount that allows us to create accounts. This method performs necessary checks to ensure the name is not occupied elsewhere, to protect integrity. Typing its fully qualified name into the prompt allows us to find its arguments:

Note: Finding the names of the types, properties and methods is a combination of using the Namespaces & Types option from the administrative portal, and/or using the script prompt together with the methods and properties functions. You can also use the Neuron Documentation with its DoxyGen code documentation site where you can search for classes and other relevant names.
We are now ready to create accounts. We will generate account names that are GUIDs, using the NewGuid() script function. Each account will receive a random password with sufficient entropy, generated using the RandomPassword() script function. We will not use an API Key (leaving it empty), making the account behave as a manually created account. We will not assign e-mail adddresses or phone numbers to the accounts either. To ensure the account object has a proper remote endpoint associated with its creation, we will use the Request.RemoteEndPoint value, which will contain the remote endpoint of the person executing the script function via the script prompt. (If executing the script via some other interface, you might have to change this reference to something else.) The result of calling the CreateAccount method, is a KeyValuePair<IAccount,string[]> result, where the Key portion contains the new account, if created (or null if not), and the Value portion any alternative name suggestions in case the account could not be created.
P:=Waher.Service.IoTBroker.XmppServerModule.PersistenceLayer.CreateAccount("",Str(NewGuid()),RandomPassword(),"","",Request.RemoteEndPoint);
Account:=P.Key;
AlternativeNames:=P.Value;
Note: You can call properties(Account) to review the properties of the account. You can also see that access to the generated password is protected to reduce the risk of unauthorized access to the account.
Note 2: If you want, you can create a separate API key, and reference it when you create the account. This way, you can separate the accounts from other manually created accounts. You can also control the amount of accounts that can be created.
Creating an onboarding code
Next step is to create an onboarding code. This is done in cooperation with the onboarding neuron configured for the neuron on which the account was created. The onboarding code is a URI with the obinfo: URI scheme, that references the onboarding neuron, and contains a key and a secret. The onboarding neuron on the other hand receives an encrypted BLOB containg the information necessary to access the account. This information can only be decrypted using the secret key available in the onboarding code. Furthermore, the onboarding code can only be used once. You can also define a point in time when the code expires, if it has not been used.
Note: Since the code can only be used once, it is important to transfer the code in a way where it cannot be previewed by mistake. Previewing it will result in the code automatically expiring.
To create the code, we will call the GetOnboardingUrl method on the Account object. It takes one argument: The point in time when the code will expire if not used before. In the following example, we create a code that will be valid for three days:
Code:=Account.GetOnboardingUrl(Now.AddDays(3));
The Code will contain a string representing the onboarding URI. It will be of the form:
obinfo:id.tagroot.io:14gsjgK56X6.................................:NKxDui0EMoLb1....................................
The Onboarding URI contains four parts, delimited by colons (:):
- The
obinfoURI scheme identifying the URI as an onboarding URI. - The onboarding neuron that contains the encrypted BLOB (but not the key).
- The identifier of the encrypted BLOB.
- The secret key necessary to decrypt the BLOB.
Creating an onboarding QR Code
The Neuron has a QR Code API that permits you to create QR codes for the onboarding URIs generated. The procedure is simple: A URL is generated pointing to the /QR resource on the neuron. After the resource name you add the contents you want to encode into the URI, prefixed by a /. The contents must be URL encoded. After the contents, you can add query parameters controlling how the QR code should be generated. This includes controlling the quality of the image, resolution and colors. Displaying a QR code on screen, or in an email requires less resolution, that including the image in print, for instance. A QR code for light mode displays (or white paper) should look different from QR codes for dark mode displays, for instance.
In the following example, we use the Waher.IoTGateway.Gateway.GetUrl(LocalResource) method to generate an absolute URL to an image containing a 400x400 pixel QR code encoding the onboarding URI just created. It uses a quality setting of 2, meaning 2x2 points are evaluated for every pixel generated, creating an anti-aliasing effect to create smoother edges.
CodeUrl:=Waher.IoTGateway.Gateway.GetUrl("/QR/"+UrlEncode(Code)+"?w=400&h=400&q=2");
For our example, this would result in a URL similar to the following:
https://lab.tagroot.io/QR/obinfo%3Aid.tagroot.io%3A14gsjgK56X6.................................%3ANKxDui0EMoLb1....................................?w=400&h=400&q=2
As an image, this QR code would look like:
The QR Code API documents parameters that can be used to control the colors used when generating the QR code. By appending &fg=white&bg=black&c=c0ffc0 to the URL, for instance, a QR code for dark-mode can be generated instead, as an example:
If higher resolution images are required, you can increase the w (width), h (height) and q (quality) settings. For example, an 800x800 image with 3x3 points per pixel quality would look like:
Batch creation of accounts
We are now ready to create script for the batch creation of accounts, and generate QR codes that can be distributed separately, for each account created. We will use the preview() function to display current progress in the prompt (and the batch procedure may require some time to execute, depending on the number of accounts and QR codes to create), the Get() function to retrieve the image from the generated QR Code URLs, and the SaveFile() function to save the QR codes generated, and the results of the batch procedure into a single JSON file. We will use the Waher.IoTGateway.Gateway.AppDataFolder property to save files in a location that is easily accessible, and where the Neuron has write-access. We will create a subfolder called Batch for the generated files. Finally, we generate an XML document with the same information, and store it as an XML file also. At the end we have a set of onboarding QR code image files, a JSON file with an index of all accounts created, and a similar XML file with the same information. We create the following batch account-creation function:
CreateAccounts([N]):=
(
	Created:=NowUtc;
	Accounts:=
	{
		"NrAccounts":N,
		"Created":Created
	};
	Records:=[];
	AccountNr:=1;

BatchFolder:=Waher.IoTGateway.Gateway.AppDataFolder+"Batch";
if !System.IO.Directory.Exists(BatchFolder) then
	System.IO.Directory.CreateDirectory(BatchFolder);

while AccountNr<=N do
(
	AccountNrStr:=Str(AccountNr);
	preview("Creating account "+Str(AccountNrStr)+"...");

do
(
	P:=Waher.Service.IoTBroker.XmppServerModule.PersistenceLayer.CreateAccount("",Str(NewGuid()),RandomPassword(),"","",Request.RemoteEndPoint);
	Account:=P.Key;
	AlternativeNames:=P.Value
)
while !exists(Account);

Code:=Account.GetOnboardingUrl(Now.AddDays(3));
CodeUrl:=Waher.IoTGateway.Gateway.GetUrl("/QR/"+UrlEncode(Code)+"?w=400&h=400&q=2");
QrCode:=Get(CodeUrl);

QrCodeFileName:=BatchFolder+"\\"+Left("00000000",9-len(AccountNrStr))+AccountNrStr+".png";
SaveFile(QrCode,QrCodeFileName);

Record:=
{
	"AccountNr":AccountNr,
	"UserName":Account.UserName,
	"OnboardingUrl":Code,
	"QrCodeUrl":CodeUrl,
	"QrCode":QrCodeFileName
};

PushLast(Record,Records);
AccountNr++;
);

Accounts["Records"]:=Records;

SaveFile(Accounts,BatchFolder+"\\Accounts.json");

AccountsXml:=<Accounts nrAccounts=N created=Created>
	<[[foreach Record in Records do
		<Account accountNr=(Record.AccountNr) userName=(Record.UserName) onboardingUrl=(Record.OnboardingUrl) qrCodeUrl=(Record.QrCodeUrl) qrCode=(Record.QrCode) />
	]]>
</Accounts>;

SaveFile(AccountsXml,BatchFolder+"\\Accounts.xml");
);
You can download the script file from the following link: CreateAccount.script
Killing a State Machine
If a state-machine associated with a token or set of tokens misbehaves, and needs to be stopped, an operator of Neuro-Features on the Neuron® that hosts the state-machine can kill it. This does not destroy the token or tokens associated with the state-machine, it just stops the state-machine. The event is also appropriately logged, with information about who took the responsibility to kill the machine.
In order to be able to kill a state machine, the operator needs to fullfil the following requirements:
- Be an operator on the Neuron hosting the state-machine (i.e. have an administrative account on the Neuron).
- Have a Digital ID associated with the account.
- Have sufficient access rights to administer Neuro-Features. (This means, having the
Admin.Notarius.NeuroFeaturesprivilege associated with one of its roles.) - Digitally sign an approval of the killing of the machine, where the user affirms to reviewing the token and taking the responsibility of killing the state-machine.
Accessing the Token
To access available tokens on the Neuron, go to the Neuro-Features section in the administrative portal:
Find the corresponding token, and open it by clicking on its ID. A link of the following type is opened:
https://DOMAIN/NeuroFeature.md?ID=TOKEN_ID
If you know the Token ID, you can open the page directly by replacing TOKEN_ID in the URL above with the correct Token ID. If you don’t know the Token ID, but you know the ID of the smart contract that created the token, you can use the script prompt, to find the Token ID, using the following SELECT statement:
select
	top 1 TokenId
from
	NeuroFeatureTokens
where
	CreationContract=CONTRACT_ID
Killing the state machine
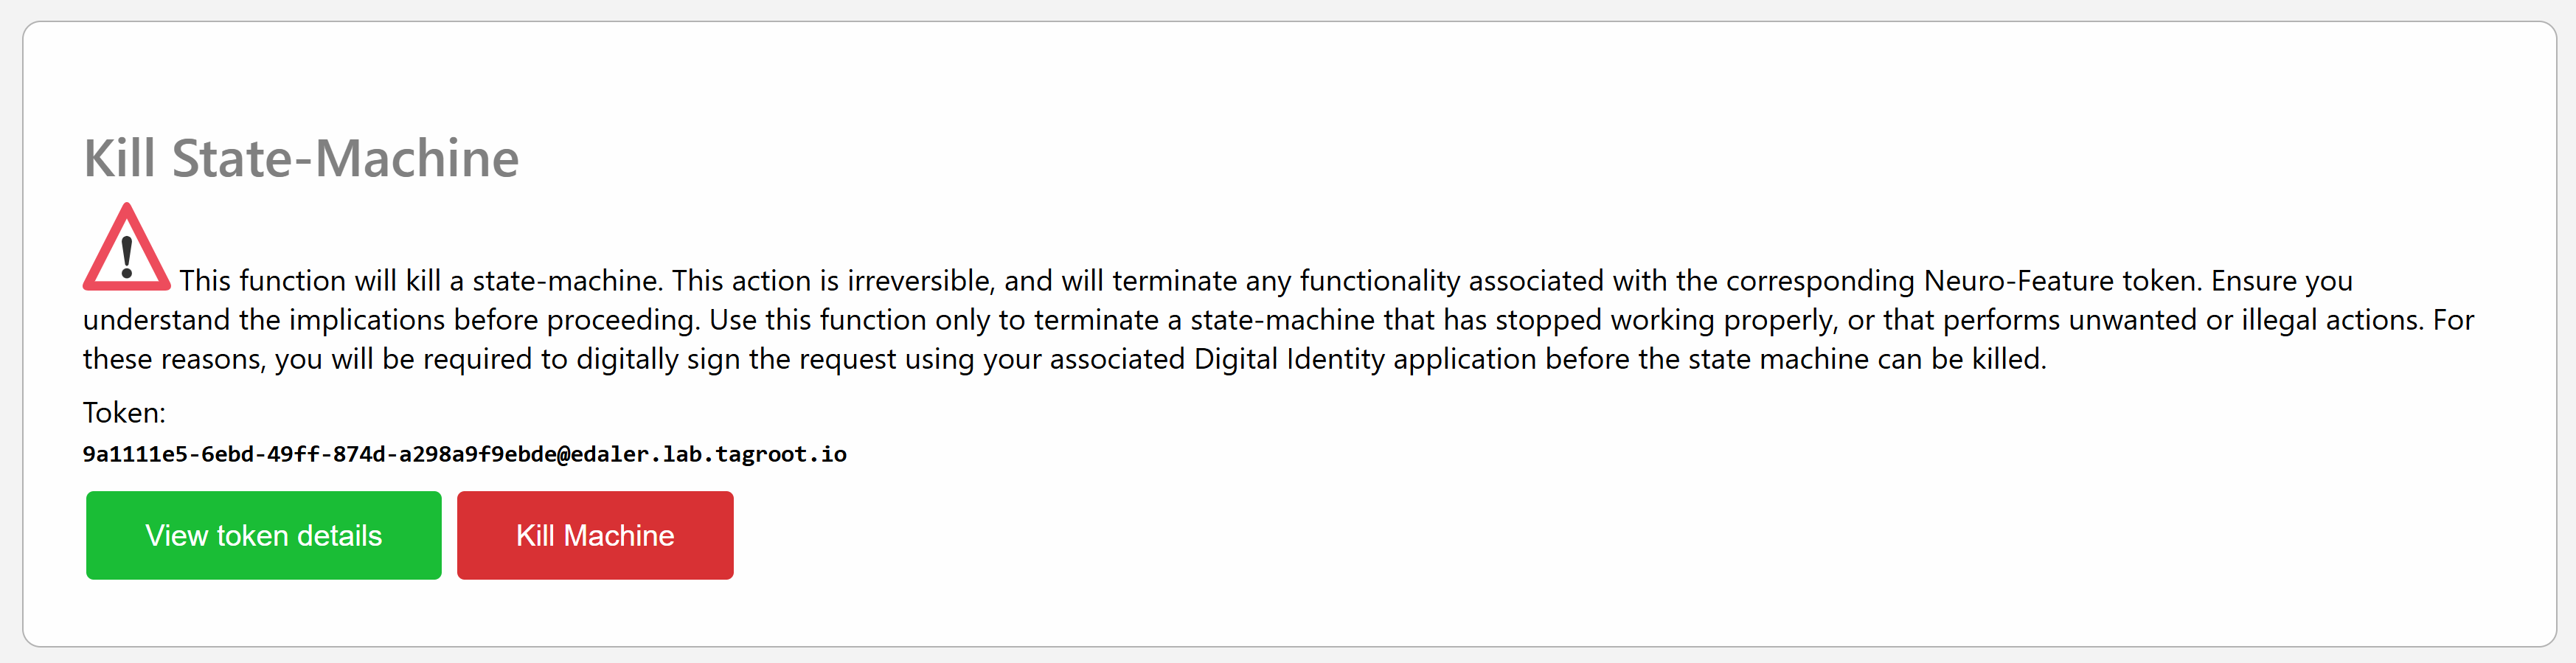
Once the Current State part of the Neuro-Feature page has loaded, it will present a Kill Machine button, if the token has an associated state-machine.
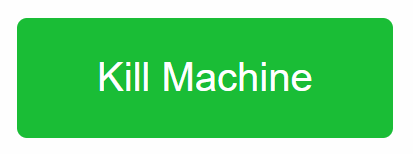
Press this button to open a new page where you can kill the machine. The page has the following URL. If you have the Token ID already, and cannot open the Neuro-Feature page associated with the token for some reason, you can enter this URL directly into the broker, replacing TOKEN_ID with the corresponding Token ID:
https://DOMAIN/KillMachine.md?ID=TOKEN_ID
The page that opens is simple and informs the user they need to approve the operation using their Digital ID, and that they will be responsible for the action:
Press the Kill Machine button to initiate the process by sending a petition to the Digital Identity of the currently logged in user:
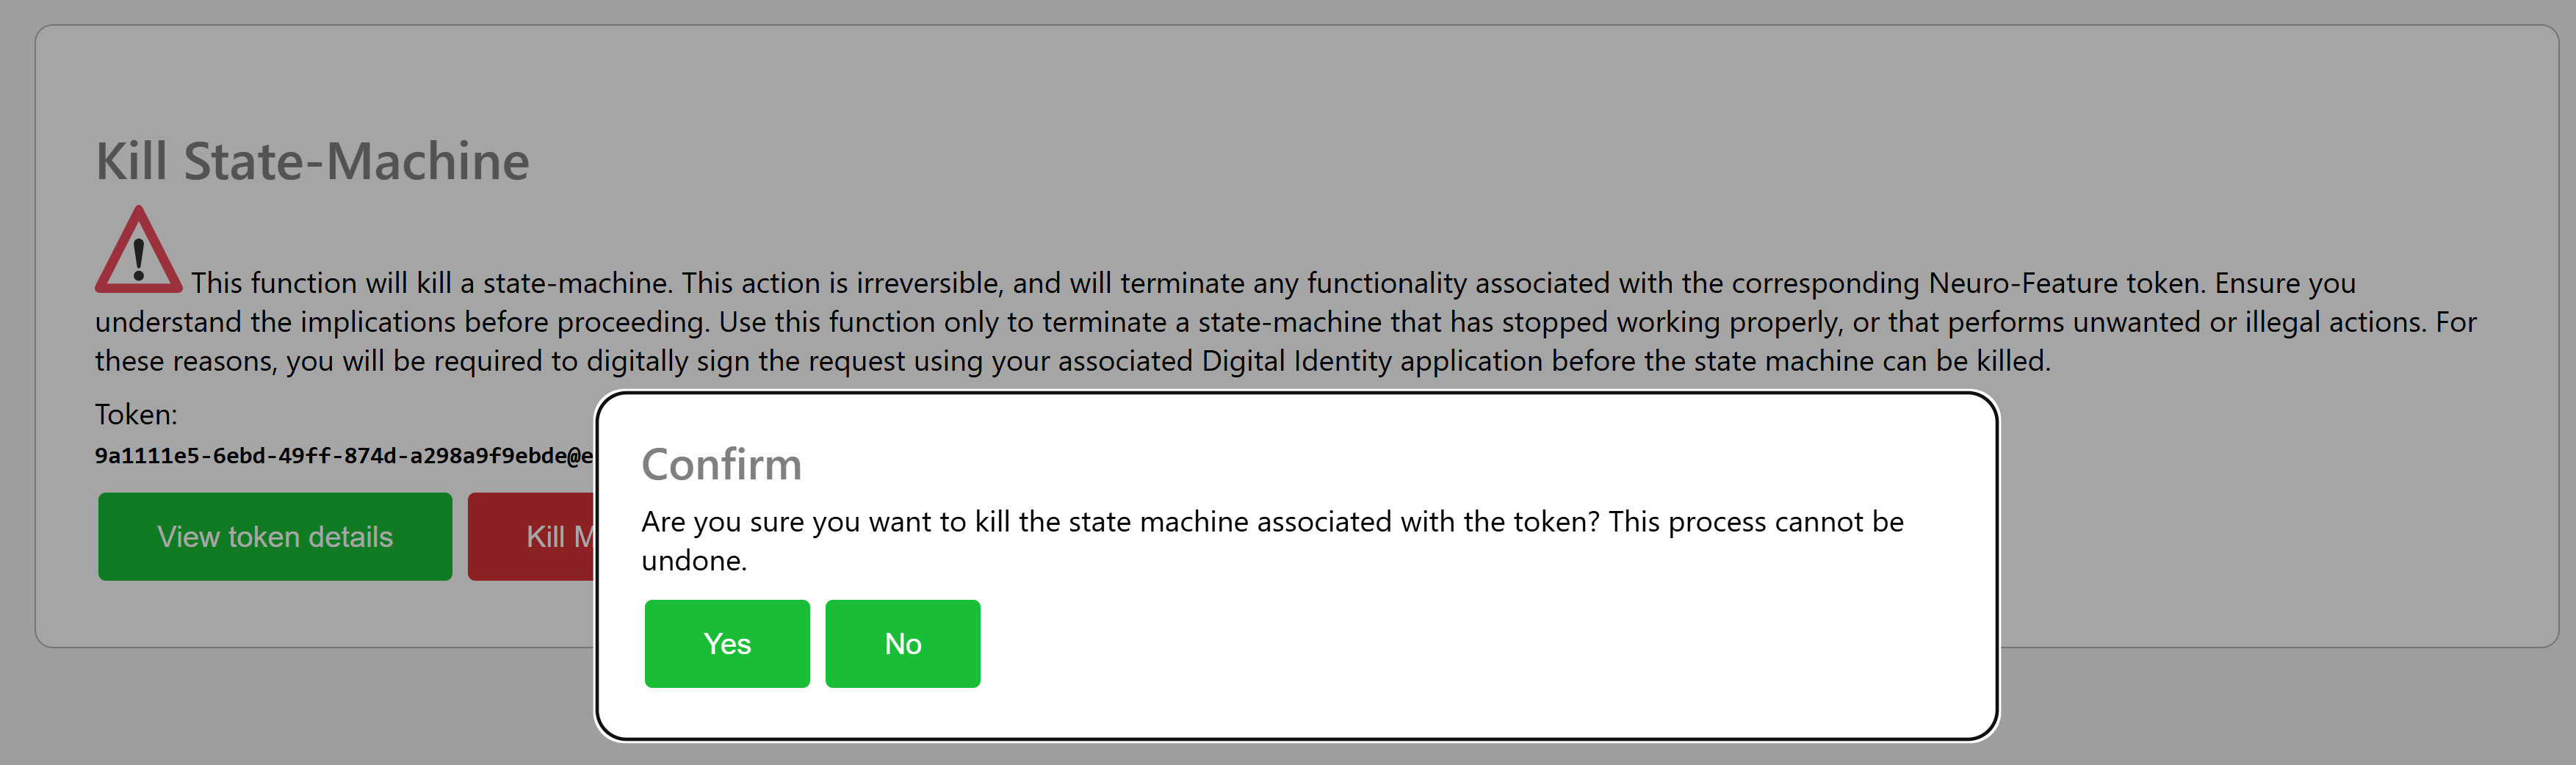
If a Legal Identity is associated with your account you will receive an acknowledgement that a petition has been sent.

You will see this petition in your Digital ID app, as follows:
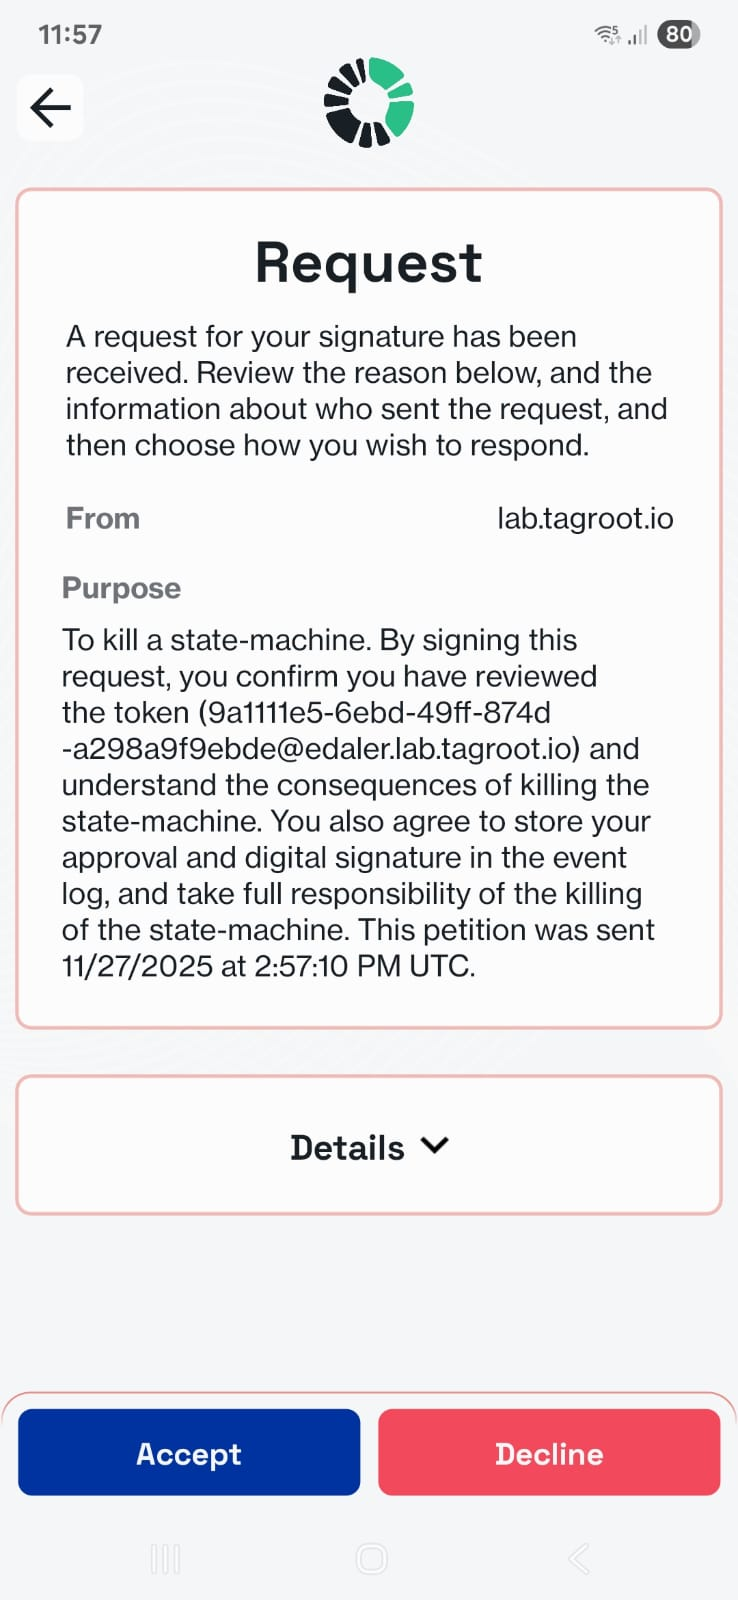
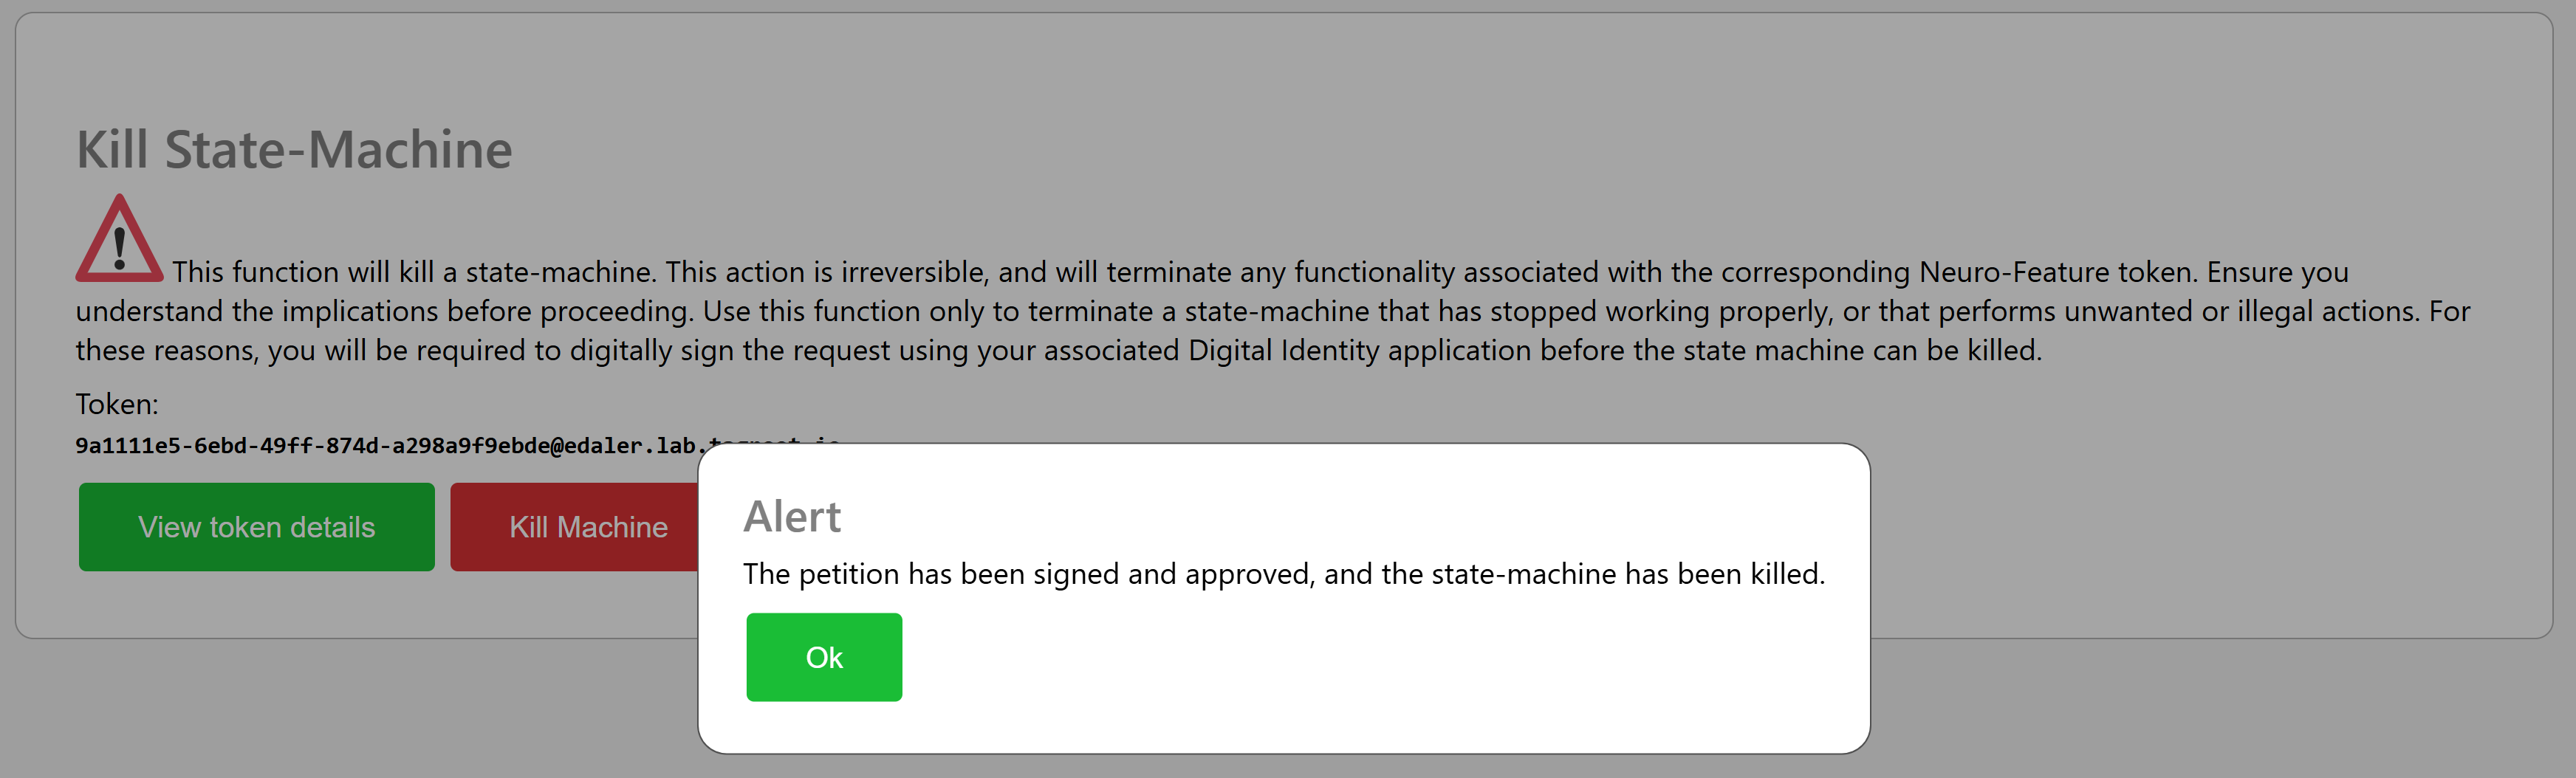
Take time to read through the purpose of the signature. If you agree, sign the petition, and the state-machine will be killed:
Geo-spatial contract parameters in LegalLab
LegalLab has been updated to support geo-spatial contract parameters. An example contract is also available showing how geo-spatial parameters in contracts can work. Make sure the Neuron® to which you are connected is updated to include support for geo-spatial parameters.
Adding to templates
A new button is available that you can click to add a geo-spatial parameter to a contract template you are designing:

Note: When editing geo-spatial parameter values, use GPS Coordinate syntax.
Geo-spatial Publish/Subscribe
When signing contracts with geo-spatial parameters, one of the parmeters can be used to give the contract a location. The example contract contains one such parameter. This means the contract, when signed, is assigned the geo-spatial coordinate provided in the parameter. The contract position is also published using the Neuron’s geo-spatial publish/subscribe service. If the visibility of the contract is set to Public & Searchable, the publication will be persisted. Otherwise, the publication will be ephemeral, i.e. shown only at the time of signature.
Posts tagged #tutorial
No more posts with the given tag could be found. You can go back to the main view by selecting Home in the menu above.