mTLS Test
The mTLSTest repository contains tools and a package to help troubleshoot and test Mutual TLS (mTLS) connections from clients to a Neuron®. It contains a small content package that provides a web page and a web service that humans and/or machines can use to ping the Neuron® and get information about the connection, including information about any client certificate the Neuron was able to receive from the client.
The repository also contains:
- A communication library for the mTLS Ping API.
- Unit tests that can be used to automate testing of mTLS connectivity.
- A command-line tool for testing mTLS connectivity.
- A method for testing mTLS connectivity manually, using a browser.
- Information about requirements for client certificates.
- Instructions on how to install the package on a Neuron.
HTTP-XMPP Bridge
The IoTBridgeHttp repository provides an IoT bridge between external devices that POST sensor data to the bridge using HTTP, for use in closed intra-networks or enterprise networks, or the public Internet, and the harmonized XMPP-based Neuro-Foundation network, for open and secure cross-domain interoperation on the Internet.

To run the bridge, you need access to an XMPP broker that supports the Neuro-Foundation extensions. You can use the TAG Neuron for XMPP.
Running and configuring the bridge
The code is written using .NET Standard, and compiled to a .NET Core console application that can be run on most operating systems. Basic configuration is performed using the console interface during the first execution, and persisted. You can also provide the corresponding configuration using environment variables, making it possible to run the bridge as a container. If an environmental variable is missing, the user will be prompted to input the value on the console.
| Environmental Variable | Type | Description |
|---|---|---|
XMPP_HOST |
String | XMPP Host name |
XMPP_PORT |
Integer | Port number to use when connecting to XMPP (default is 5222) |
XMPP_USERNAME |
String | User name to use when connecting to XMPP. |
XMPP_PASSWORD |
String | Password (or hashed password) to use when connecting to XMPP. Empty string means a random password will be generated. |
XMPP_PASSWORDHASHMETHOD |
String | Algorithm or method used for password. Empty string means the password is provided in the clear. |
XMPP_APIKEY |
String | API Key. If provided together with secret, allows the application to create a new account. |
XMPP_APISECRET |
String | API Secret. If provided together with key, allows the application to create a new account. |
REGISTRY_COUNTRY |
String | Country where the bridge is installed. |
REGISTRY_REGION |
String | Region where the bridge is installed. |
REGISTRY_CITY |
String | City where the bridge is installed. |
REGISTRY_AREA |
String | Area where the bridge is installed. |
REGISTRY_SRTEET |
String | Street where the bridge is installed. |
REGISTRY_STREETNR |
String | Street number where the bridge is installed. |
REGISTRY_BUILDING |
String | Building where the bridge is installed. |
REGISTRY_APARTMENT |
String | Apartment where the bridge is installed. |
REGISTRY_ROOM |
String | Room where the bridge is installed. |
REGISTRY_NAME |
String | Name associated with bridge. |
REGISTRY_LOCATION |
Boolean | If location has been completed. (This means, any location-specific environment variables not provided, will be interpreted as intensionally left blank, and user will not be prompted to input values for them. |
JWT_SECRET |
String | Secret used to create JWT tokens. If not provided, a random secret will be created. |
X509_FILENAME |
String | File name to X.509 certificate to use. If not provided, HTTPS will not be enabled. |
X509_PASSWORD |
String | Password to X.509 certificate. |
HTTP_PORT |
Integer | Port number to use for unencrypted HTTP. (default is 80) |
HTTPS_PORT |
Integer | Port number to use for encrypted HTTPS. (default is 443) |
ADMIN_NAME |
String | Administrator User name. |
ADMIN_PASSWORD |
String | Administrator Password. |
USER_COUNT |
Integer | Number of users to create. (Default is 0, which will trigger manual input of users.) |
USER_N_NAME |
String | User name for user N. (where N is a number between 1 and USERS_COUNT) |
USER_N_PASSWORD |
String | Password for user N. (where N is a number between 1 and USERS_COUNT) |
USER_N_PRIVILEGE |
String | Regular expression specifying the privilege or privileges held by the user. (Default is Admin.SensorData.Post.) |
Running in a Docker container
You can run the bridge in a Docker container. When doing so it is important to either configure all settings via the environment variables, or to redirect stdin and allocate a TTY. You do this using the -it switch to docker run. For example:
docker run -it iot-bridge-http
Setting up persistent storage
Persistent storage is required to store configuration, as well as data about the bridge, its nodes, and ownerships, etc. You can do this by mapping the local folder /var/lib/IoT Gateway to a Volume when creating the container.
Using an environment file
You can provide environment variables using an environment file. Create a new text file based on the IoTBridgeHttp.env file in the repository. Set the values you want to provide, and then use the --env-file switch when creating the container. For example:
docker run -it --env-file IoTBridgeHttp.env -v /my/local/folder:/var/lib/IoT\ Gateway iot-bridge-http
Note: If providing credentials, make sure the file is not accessible by others, and make sure it is not checked in to any repository. An alternative to providing credentials in an environment file, is to enable standard and terminal input, and provide it via the prompt (see above).
Claiming ownership of bridge
Once the bridge has been configured, it will generate an iotdisco URI, and save it to its programd data folder. It will also create a file with extension .url, containing a shortcut with the iotdisco URI inside. A .png file with a QR code will also be generated. All three files contain information about the bridge, and allows the owner to claim ownership of it. This can be done by using the Neuro-Access App. This app is also downloadable for Android and iOS. You scan the QR code (or enter it manually), and claim the device. Once the device is claimed by you, you will receive notifications when someone wants to access the deice. They will only be able to access it with the owner’s permission. For more information, see:
Configuring the bridge
The bridge can be configured in detail by a client that implements the concentrator interface. Concentrators consist of data sources, each containing tree structures of nodes. Nodes may be partitioned into partitions, which permits the nesting of subsystems seamlessly into container systems. Each node can be of different types, and have different properties and underlying functionality. They can each implement then sensor interface and actuator interface.
You can use the Simple IoT Client to configure concentrators and their nodes in detail. An initial setup is done using the initial configuration of the bridge. The client is also available in the IoTGateway repository, in the Clients folder.
Node Types
The bridge includes several different node types that can be used to configure its operation:
The
Local Web Server Noderepresents the local web server in the gateway. This node hosts the web service that allows external devices toPOSTsensor data to the bridge. It also acts as the root node for the subtree of nodes representing devices that receive sensor data via HTTPPOSTrequests.The
XMPP Brokermaintains a connection to an XMPP Broker. It allows the bridge to connect to other entities on the federated network and communicate with them. It supports communication with remote standalone sensors and actuators, as well as remote concentrators embedding devices into data sources and nodes. Such concentrators can be bridges to other protocols and networks.Note: The bridge has a client-to-server connection by default, setup during initial configuration. Through this connection, the bridge acts as a concentrator. Through the use of
XMPP Brokernodes you can setup additional XMPP connections to other brokers. In these cases the bridge will only act as a client, to connect to remove devices for the purposes of interacting with them.IP Hostnodes allow you to monitor network hosts accessible from the bridge.Scriptnodes allow you to create nodes with custom script logic. They can be used to interface bespoke devices in the network accessible from the bridge, for example.Virtualnodes are placeholders where external logic (or script logic) can aggregate information in a way that makes them accessible by others in the federated network.
API Reference
The local web service registers a series of web resources that external devices can use. Following is a brief overview, with references for more details.
Sensor Data Receptor
The Sensor data receptor resource /ReportSensorData is used by external devices to POST sensor data to the bridge. The device needs to authenticate with the bridge, before it can be authorized to access this resource. The device can use different mechanisms to authenticate itself with the bridge:
- Use of Mutual TLS (mTLS). This requires the bridge to be configured with a certificate.
- Use of
WWW-Authenticateweb login procedure. - Use of JSON Web Tokens (JWT) Bearer tokens for authentication. This requires the device to login first using the Login resource (see below).
For details on how the resource works, see the Sensor Data Receptor API endpoint on lab.tagroot.io as an example. The same page can be viewed on the bridge, once it is up and running.
Login resource
The Login resource /Login is used to login to the bridge. If successful, a Bearer JWT token is returned. External devices need to login to the bridge before they can POST sensor data to it. A token is valid for 1 hour. The external device needs to renew the token by loggin in again, if accessing the bridge for a longer period of time.
Input payload is expected to be a JSON object of the following type.
{
	"UserName": Required(Str(PUserName)),
	"PasswordHash": Required(Str(PPasswordHash)),
	"Nonce": Required(Str(PNonce))
}
The response is a JSON object of the following type:
{
	"Ok": Required(Bool(POK)),
	"Message": Required(Str(PMessage)),
	"Token": Optional(Str(PToken))
}
See the Web login procedure article for more details on how to compute the password hash and nonce values, and use them in the login process.
Root folder resource
The Root folder resource /. If no specific resource above is referenced, the default is to look for a file resource in the Root folder, and return it if found. This allows you to host custom web content on the bridge.
Web Page
The root resource / makes a temporary redirection to /Index.md, which is the landing page for the bridge. It contains basic information about the bridge, as well as a login-mechanism to access the setup of the bridge. Once logged in, you can manually edit roles and users.
Security
The HTTP bridge supports multiple levels of security:
Access to things published on the federated network is protected by provisioning. When the gateway starts, it generates an
iotdiscoURI, which can be used to claim ownership of the device. Once claimed, the owner receives notifications when someone wants to access the device, and can decide whether to allow access or not.The bridge supports a set of users and roles, each defining a set of privileges. During first start, the initial users and roles are configured. This can be done either using environment variables, or by providing input on the console. An administrator user is created, which will have all privileges. Once the bridge is up and running, the administrator can login and configure existing users and roles, and create new ones.
A Web-Application Firewall (WAF) is included in the bridge. The administrator can configure the WAF to block or allow access to specific resources, based on application-level rules. This can be used to restrict access to certain pages (such as the administrative pages) to certain IPs, for instance, or rate-limit access to certain resources, such as sensor-data publication resrouces.
The Web-Application Firewall is defined in the
WAF.xmlfile. It is an XML file that needs to validate against thehttps://waher.se/Schema/WAF.xsdnamespace. The default version restricts access to the administration pages to local area network IP addresses.
Validating Electronic Travel Documents & ICAO PKI Certificates
When validating electronic Travel Documents, applications need to validate against corresponding issuer certificates not managed by the operating system. To do that, the application needs to get access to these certificates somehow, and build custom X.509 chains during validation. To avoid having such an application to embed the entire list of all these issuer certificates, a list which also get regularly updated, a new repository and package is available that publishes these certificates on Neurons where the package gets installed. Applications can easily check with the corresponding neuron and download the required certificates, based on the Authority Key Identifiers available in the Electronic Travel Document certificates.
| Information about the ICAO PKI Certificate package | |
|---|---|
| Package | IcaoPkiCertificates.package |
| Installation key | vAa0l/iFHVogQYUzm+Zs6qPsw+7lYrnyFn4MNAGA7+Gso442gJJMKjknHqka/YjM6gZZSS65HL8Adbfba1067a1a27163b905869469d6f0d |
| More information | https://github.com/Trust-Anchor-Group/IcaoPkiCertificates |
#features, #id, #kyc, #neuron, #api, #repository, #package, #new
Testing WebHooks
When developing server-to-server applications, it is important to be able to test webhooks without leaking sensitive or private information. To avoid having to use 3rd party services, such as webhook.site a new package has been made available containing a service that can be installed on any Neuron®, that allows you to view incoming POST requests in a similar fashion.
Installable Package
The Web-Hook Tester service has been made into a package that can be downloaded and installed on any TAG Neuron. If your Neuron is connected to the TAG Neuron network, you can install the package using the following information:
| Package information | |
|---|---|
| Package | TAG.WebHookTester.package |
| Installation key | Mb9pim8FTjHBnju2f2ZVNHBRbOG3VHhM7iBn26mgcvc/uwjouWjHEF0OmcC/noKEuZAOWZY6Ka4A4abb4fc2a2596e04f047400e3218dcd2 |
| Repository | WebHookTester repository at GitHub |
Installing the package via the administrative console (Chat Admin), can be done using the following command:
install nobackup TAG.WebHookTester.package Mb9pim8FTjHBnju2f2ZVNHBRbOG3VHhM7iBn26mgcvc/uwjouWjHEF0OmcC/noKEuZAOWZY6Ka4A4abb4fc2a2596e04f047400e3218dcd2
Starting service
The WebHook tester service appears in the administrative portal, in the Software section:

Pressing it, opens the following page: https://lab.tagroot.io/WebHookTester/Show.md

Note: This page does not require client authentication, and can be used anonymously.
Note 2: You can also use the script prompt to make custom POST calls to the page. This requires elevated privileges however, and cannot be done anonymously.
Creating a Page
Enter an ID and press the Start button to create a new page you can POST to. Since the service can be accessible by anyone, use an ID that is difficult to guess, if you do not want others to get easy access to the information. Press the Randomize button to create a random ID. You can customize the random ID to remember the purpose of the page, if you have multiple pages open.

Test Page
When you press the Start button, a new page is opened. It contains instructions how you can POST to the page:
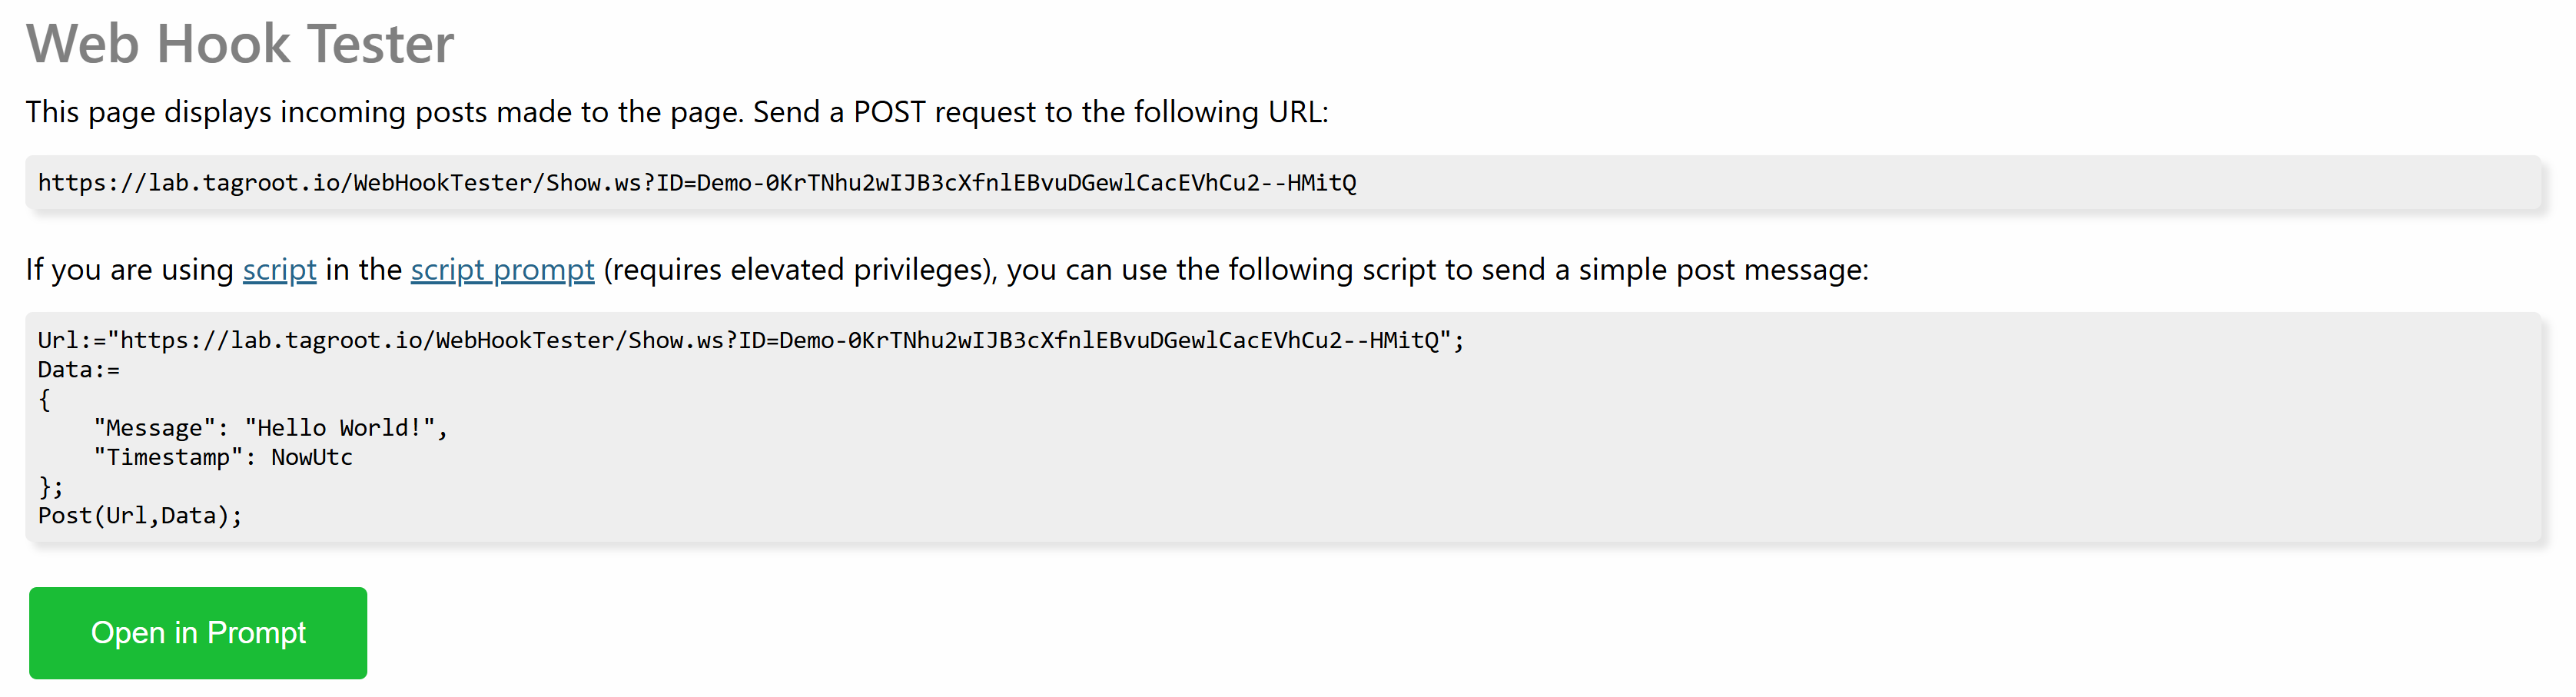
Use the URL presented to POST to the page. If you want to test a back-end service integration, this is the URL you provide as a webhook callback URL. Any POST made to this URL will be displayed on the page.
Note: Nothing is saved or persisted on the page. The page does not remember previous POSTs, so if you refresh the page you loose the information on the page.
Note 2: Make sure to differentiate between the URL of the page (which points to a resource with extension .md) and the URL to POST to (which points to a resource with extension .ws).
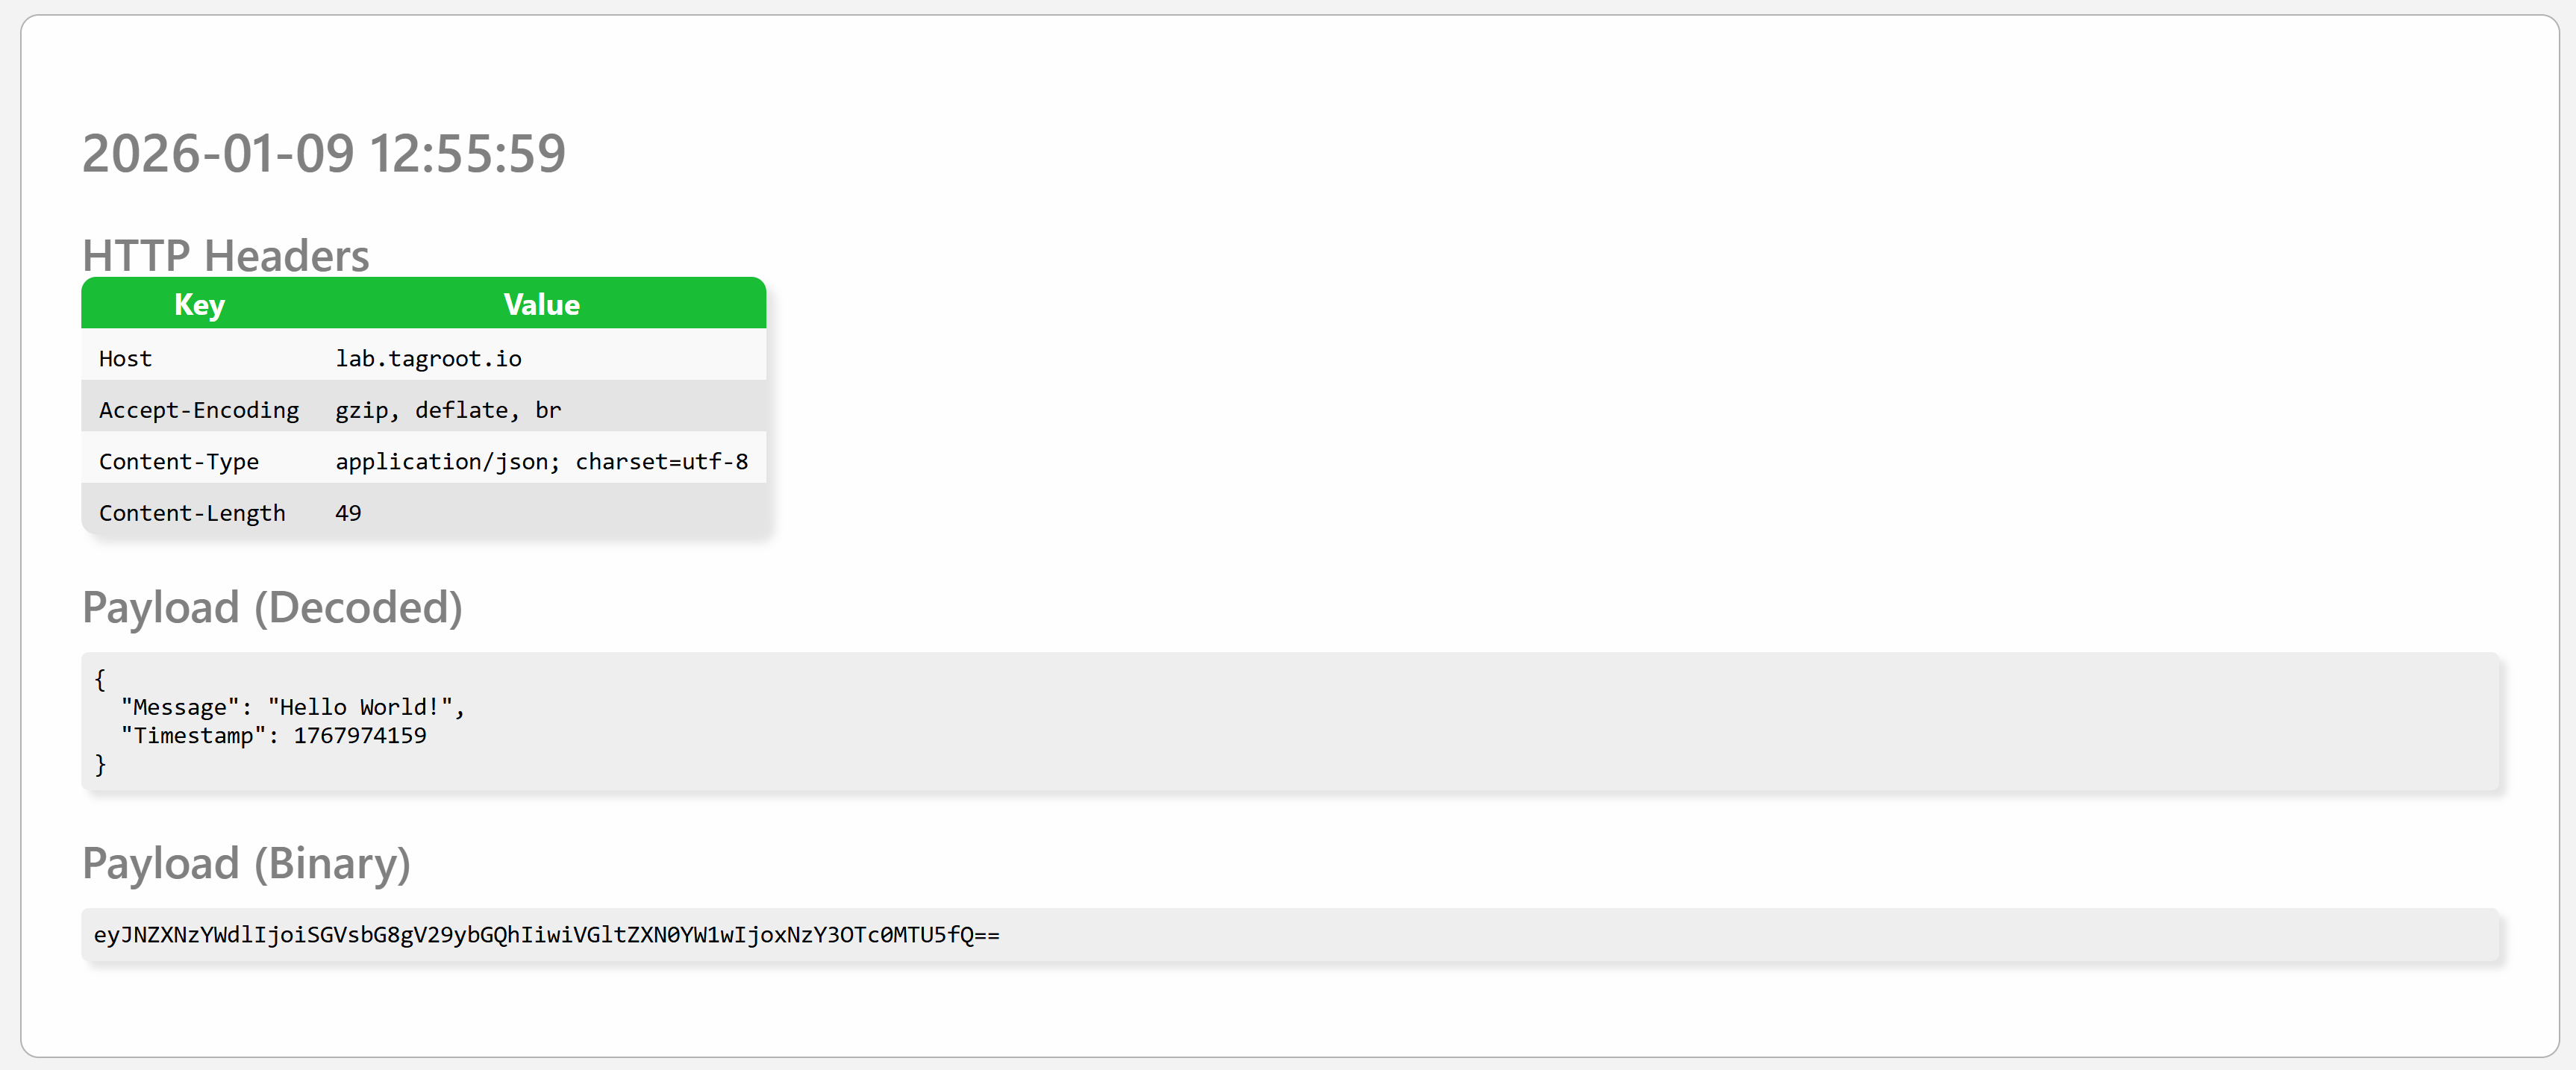
Incoming POSTs
As soon as an incoming POST is made, it is displayed on the page as follows. It displays the time of the event, any HTTP headers in the request, together with a textual representation of the payload (if content is text-based), as well as the binary payload, BASE64-encoded. Each POST is presented in its own SECTION tag on the page.
Responses
The response to a POST call to the resource will be a JSON object with one property called Forwarded, which indicate the number of pages the information was forwarded to. If this number is 0, the page has closed or lost contact with the Neuron. Example:
{
	"Forwarded":1
}
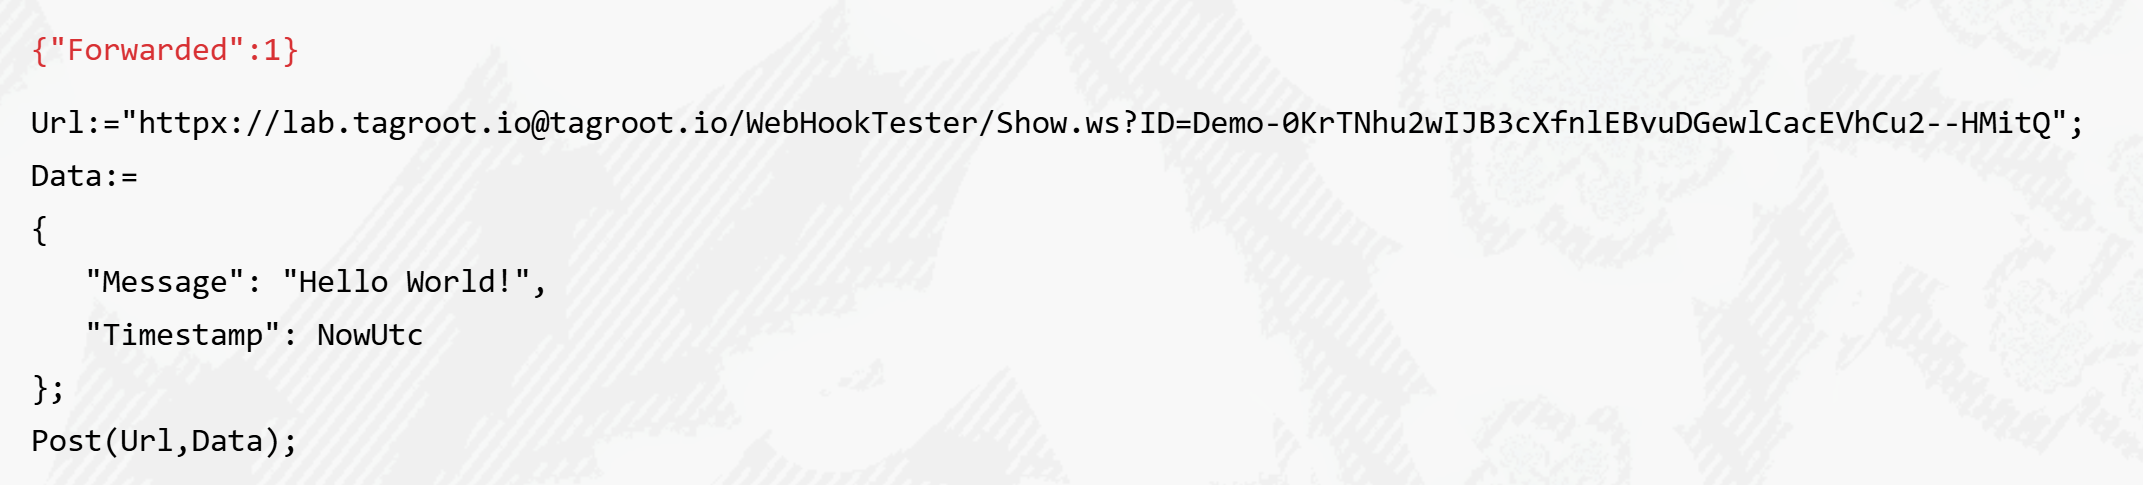
Tunneling POST request over XMPP
As the Neuron is connected to the XMPP network as well, since it is hosted on the IoT Gateway, the POST request can be tunneled over the XMPP network using the httpx:// URI scheme. This permits you to do callbacks to local development machines, or machines not accessible via the Internet.
To achieve this, you need to perform the call from another instance hosted on the IoT Gateway. It can be the IoT Gateway itself, Lil’Sis’ or another instance of the TAG Neuron, including a development version on a local machine. You replace the https scheme in the URI with the httpx URI scheme, and replace the host with the JID of the recipient. For the call to succeed, the sender and receiver need to be friends, i.e. have approved presence subscriptions, for the call over XMPP to be possible.
This can be easily tested using the script prompt:
Note: Any software using the Waher.Content Internet Content-Type abstraction, and the InternetContent content access methods, together with the Waher.Networking.XMPP.HTTPX library (containing the httpx URI scheme definition) will automatically support httpx URIs.
Note 2: Since the QuickLogin API and RemoteLogin API are both hosted on the TAG Neuron®, you can register httpx callback URIs with these APIs. This makes it possible to host the recipient service behind a firewall, as long as it supports the HTTP over XMPP protocol
Modbus-XMPP Bridge
The IoTBridgeModbus repository provides an IoT bridge between devices connected to Modbus, for use in closed intra-networks or enterprise networks, and the harmonized XMPP-based Neuro-Foundation network, for open and secure cross-domain interoperation on the Internet.

To run the bridge, you need access to both a Modbus gateway, and an XMPP broker, that supports the Neuro-Foundation extensions. You can use the TAG Neuron for XMPP.
Running and configuring the bridge
The code is written using .NET Standard, and compiled to a .NET Core console application that can be run on most operating systems. Basic configuration is performed using the console interface during the first execution, and persisted. You can also provide the corresponding configuration using environment variables, making it possible to run the bridge as a container. If an environmental variable is missing, the user will be prompted to input the value on the console.
| Environmental Variable | Type | Description |
|---|---|---|
XMPP_HOST |
String | XMPP Host name |
XMPP_PORT |
Integer | Port number to use when connecting to XMPP (default is 5222) |
XMPP_USERNAME |
String | User name to use when connecting to XMPP. |
XMPP_PASSWORD |
String | Password (or hashed password) to use when connecting to XMPP. Empty string means a random password will be generated. |
XMPP_PASSWORDHASHMETHOD |
String | Algorithm or method used for password. Empty string means the password is provided in the clear. |
XMPP_APIKEY |
String | API Key. If provided together with secret, allows the application to create a new account. |
XMPP_APISECRET |
String | API Secret. If provided together with key, allows the application to create a new account. |
MODBUS_HOST |
String | Modbus Gateway Host name |
MODBUS_TLS |
String | If TLS encryption is to be used when connecting to the Modbus gateway. |
MODBUS_PORT |
String | Port number to use when connecting to the Modbus gateway (default is 502). |
REGISTRY_COUNTRY |
String | Country where the bridge is installed. |
REGISTRY_REGION |
String | Region where the bridge is installed. |
REGISTRY_CITY |
String | City where the bridge is installed. |
REGISTRY_AREA |
String | Area where the bridge is installed. |
REGISTRY_SRTEET |
String | Street where the bridge is installed. |
REGISTRY_STREETNR |
String | Street number where the bridge is installed. |
REGISTRY_BUILDING |
String | Building where the bridge is installed. |
REGISTRY_APARTMENT |
String | Apartment where the bridge is installed. |
REGISTRY_ROOM |
String | Room where the bridge is installed. |
REGISTRY_NAME |
String | Name associated with bridge. |
REGISTRY_LOCATION |
Boolean | If location has been completed. (This means, any location-specific environment variables not provided, will be interpreted as intensionally left blank, and user will not be prompted to input values for them. |
Claiming ownership of bridge
Once the bridge has been configured, it will generate an iotdisco URI, and save it to its programd data folder. It will also create a file with extension .url, containing a shortcut with the iotdisco URI inside. A .png file with a QR code will also be generated. All three files contain information about the bridge, and allows the owner to claim ownership of it. This can be done by using the Neuro-Access App. This app is also downloadable for Android and iOS. You scan the QR code (or enter it manually), and claim the device. Once the device is claimed by you, you will receive notifications when someone wants to access the deice. They will only be able to access it with the owner’s permission. For more information, see:
Configuring the bridge
The bridge can be configured in detail by a client that implements the concentrator interface. Concentrators consist of data sources, each containing tree structures of nodes. Nodes may be partitioned into partitions, which permits the nesting of subsystems seamlessly into container systems. Each node can be of different types, and have different properties and underlying functionality. They can each implement then sensor interface and actuator interface.
You can use the Simple IoT Client to configure concentrators and their nodes in detail. An initial setup is done using the initial configuration of the bridge. The client is also available in the IoTGateway repository, in the Clients folder.
Node Types
The bridge includes several different node types that can be used to configure its operation:
The
Modbus Gatewaymaintains a connection to a Modbus Gateway using TCP/IP, and converts requests into binary Modbus TCP/IP communication.The
XMPP Brokermaintains a connection to an XMPP Broker. It allows the bridge to connect to other entities on the federated network and communicate with them. It supports communication with remote standalone sensors and actuators, as well as remote concentrators embedding devices into data sources and nodes. Such concentrators can be bridges to other protocols and networks.Note: The bridge has a client-to-server connection by default, setup during initial configuration. Through this connection, the bridge acts as a concentrator. Through the use of
XMPP Brokernodes you can setup additional XMPP connections to other brokers. In these cases the bridge will only act as a client, to connect to remove devices for the purposes of interacting with them.IP Hostnodes allow you to monitor network hosts accessible from the bridge.Scriptnodes allow you to create nodes with custom script logic. They can be used to interface bespoke devices in the network accessible from the bridge, for example.Virtualnodes are placeholders where external logic (or script logic) can aggregate information in a way that makes them accessible by others in the federated network.
Posts tagged #repository
No more posts with the given tag could be found. You can go back to the main view by selecting Home in the menu above.