HTTP Proxy
The TAG Neuron® now (from build 2026-05-12) has a new API: A generic HTTP Proxy at /HttpProxy. It allows clients to use the broker as a proxy to access resources on the Internet. This can be useful in multiple cases, for instance in environments where access to certain resources are limited, but the Neuron has free access. One such example is accessing HTTP-only resources from a smart phone environment, which requires use of HTTPS, and the remote web server does not have HTTPS enabled. (This is the case for certain ICAO Certificate Revocation Lists for example.)
Authentication
The HTTP Proxy resource requires authentication. The reason for this restriction is to avoid the broker to become a point for third parties to commit cyber-crime. The resource supports multiple form of authentication: Normal WWW-Authenticate is supported, mTLS (for brokers where this is enabled), or JWT Bearer tokens. Session login is also supported. This makes it possible to integrate the resource in web pages hosted by the Neuron.
JWT Bearer tokens is usedful in environments based on XMPP, where access to HTTP-based resources is required, but restricted by the operating system, such as the Neuro-Access smart phone app.
Since the app, in this case, has an XMPP connection to the broker, it can get a JWT token from the broker by using the HttpxClient class (HTTP over XMPP) in the Waher.Networking.XMPP.HTTPX library. Calling the GetJwtToken method returns a JWT token that can be used to make HTTP requests to the broker, authenticated as the XMPP account.
Redirecting HTTP links
If using InternetContent in the Waher.Content library to access content on the Internet, you can redirect HTTP-only links to a custom resource by providing an event handler to the WebGetter.HttpUriEventHandler event. Take the opportunity to provide a new URI in the event arguments, redirecting the request to the HTTP proxy resource of the Nueron to which the client is connected using XMPP. You also need to add the Bearer token to the Request headers available in the event arguments. The URI itself is then URI encoded and added as a sub-path to the /HttpProxy/ resource.
Example
The first step is to get a JWT token from the Neuron, identifying the XMPP connection the client has. We use the HttpxClient method GetJwtTokenAsync method, providing the number of seconds we want the token to be valid:
string Token = await this.httpxClient.GetJwtTokenAsync(60);
We then create an event handler to reroute HTTP-only requests to the HTTP proxy on the Neuron to which the client is using, using HTTPS. Creating an event handler for this purpose is simple (replacing DOMAIN in the example with the domain of the Neuron). We also need to add the Bearer JWT token by using an Authorization header:
private static void ViaProxy(object Sender, HttpUriEventArgs e)
{
	e.Uri = new Uri("https://DOMAIN/HttpProxy/" + WebUtility.UrlEncode(e.Uri.ToString()));
	e.Request.Headers.Add("Authorization", "Bearer " + Token);
}
We need to assign the event handler to the event:
WebGetter.HttpUriEventHandler += ViaProxy;
Later, when we do not need to redirect HTTP requests any longer, we need to unregister it:
WebGetter.HttpUriEventHandler -= ViaProxy;
While the event handler is registered, any access to web resources using HTTP, by using the static InternetContent class, will be seamlessly redirected to the HTTP proxy. Example:
ContentResponse Response = await InternetContent.GetAsync(
	new Uri("http://example.org/"),
	new KeyValuePair<string, string>("Accept", HtmlCodec.DefaultContentType));
Age-verification without leaking birth date
This article describes the process of how to create a Legal Identity that can be used to demonstrate you have reached a certain age, without having to disclose your actual birth date. This is an important mechanism to protect the integrity of personal information, especially if the person is a child.
Creating a Preview ID application
The first step is to create a Preview Legal Identity application containing sufficient personal information so that the age can be verified. This application will have to contain sensitive personal information, including birth date. But creating a Preview application ensures the data is not stored in a searchable database or logs. Instead it is stored in encrypted form, and only during the process to validate the information. Once the preview application has been validated, a new application can be created, containing a subset of the sensitive information, and once that is completed, the sensitive information will be removed.
The personal data necessary to include in the Preview application is:
| Property | Description |
|---|---|
BDAY |
Birth Day |
BMONTH |
Borth Month |
BYEAR |
Birth Year |
AGEABOVE |
Age above the stated number of years |
Creating real ID application
Once the Preview application has been approved, a new, real ID application is made. This new application has to have a reference to the Preview application, and should only contain a subset of the properties. At a minimum, the following properties should be included:
| Property | Description |
|---|---|
PREVIEW |
Reference to the earlier Preview application. |
AGEABOVE |
Age above the stated number of years |
Once this application has been approved, the sensitive personal information will be removed as the preview application is deleted.
Proving your age
Proving your age is as simple as performing a Quick Login with the new identity. If property filters are used, include the AGEABOVE property. As the new identity contains a reduced set of information, and no birth-date (if it was removed in the second step above), only the AGEABOVE property is received, together with proof the Neuron has validated the claim.
How to set AGEABOVE
The AGEABOVE property should not be set to the age of the user, as that can leak personal information. Instead, it should be set to a legal limit required for one or more specific purposes. If there’s an age requirement in a country for a particular purpose, that age should be encoded in the AGEABOVE property. The property will be accepted if the personal information provided in the preview can be validated, and the age of the person deduced is at or above the indicated number.
As there are different age limits for different purposes and countries (for instance, 13, 15, 16, 17, 18, 20 and 21 are common limits), the site that tests the age of a user should not expect the number to be a specific value. Instead, it should expect the number to be at least a specific number. If there’s an age requirement for a service of 16 years of age, identities with any number for AGEABOVE greater or equal to 16 should be accepted as proof ther person is at least 16 years old.
Ensuring you have reached a certain age to create an identity
The AGEABOVE property can also be used to ensure the user of the app attempting to create an identity, has reached a certain age. Adding the property ensures the identity attempted to be created only gets approved, if the person actually has reached the age.
If the person has not reached the corresponding age, the property will become invalid, and an error with error code AgeNotReached will be logged on the application.
Remote Login API
Since Build 2025-12-30, extended in Build 2025-12-31, a new API called the Remote Login API is available on the TAG Neuron®. It is a complement to the Quick Login API, in the following ways:
The Quick Login API is initiated by the client itself, for instance, by scanning a QR-code, clicking a link or logging in to a web site, for instance.
The Remote Login API on the other hand, is initiated by a remote service, that wants to use the digital identity of the user in a second (or multi) factor authentication process (2FA, or MFA).
The Quick Login API allows anonymous access (on the HTTP resource level), while the Remote Login API requires authorized access. This authorized access can be granted using
WWW-Authenticateor Mutual TLS (mTLS). Mutual TLS is recommended, as it avoids the use of passwords. In both cases, the administrator of the Neuron providing access to the API needs to create a corresponding user and grant the user the corresponding privileges. (See the API documentation for details.)
Web login procedure
There is a new web session login procedure available in the Neuron®. From build 2025-08-18, clients performing web session login must follow this new procedure. For users using the browser to login, this is accomplished by simply refreshing the page to ensure the most recent javascript file is loaded when logging in.
Note: Web session login is used to access the administrative page. Agent API uses another type of login, based on JWT bearer tokens.
The client calls the /Login web resource with a JSON object payload as follows:
{
	"UserName": Required(Str(PUserName)),
	"PasswordHash": Required(Str(PPasswordHash)),
	"Nonce": Required(Str(PNonce))
}
While the web resource is the same as before, the following is new:
- A
PasswordHashproperty is sent instead of aPasswordin clear text (albeit over an obligatory encrypted channel, i.e. basic authentication over HTTPS). How this password hash is computed is described below. - A
Noncevalue is available. This value must be unique, and cannot be reused. It is recommended this is a base64-encoding of a sufficiently large random number, for instance a 32-byte random number, to generate sufficient entropy. Reusing a nonce value will result in an error being returned. - The respone of the web resource is another JSON object, instead of the earlier redirection response if successful, and a session variable state change, if an error occurred.
The purpose of the change is twofold:
- Secure the login endpoint
- Allow third party clients to login using the web login.
The response to the call is a JSON object as follows:
{
	"ok": Required(Bool(POk)),
	"message": Optional(Str(PMessage))
}
If ok is false, the message will contain an error message. Note that the login will be available in the current session. To enable sessions, cookies must be enabled.
Hash Digest computation
The client needs to perform the following computations to generate the hash digest to send to the Neuron®:
Compute
H1 = SHA3-256(UserName + ":" + Domain + ":" + Password), whereDomainis the host name or main domain name of the Neuron®. It cannot be an alternative domain name, it must be the main domain name of the Neuron®.Compute
H2 = HMAC-SHA-256(UTF8Encode(Nonce),H1), where the UTF-8 encoded Nonce is used as key to the HMAC-SHA-256 algorithm, andH1is used as the data whose digest is to be computed. Note that the UTF-8 encoding must not include a preamble or byte-order-mark (BOM).Compute
PasswordHash = BASE64(H2).
Note: For a reference implementation, see the /Login.js javascript resource on an updated Neuron®.
FTP Server support
Support for FTP and FTPS in available in the Neuron® from build 2025-03-20. FTP is an old Internet technology, but with a lot of support in different software and libraries. By providing support for FTP it is now possible to:
Provide broker account holders with File Storage using FTP.
Provide developers and operators with a mechanism to copy, edit and manage files in a simpler way compared to using terminal prompts (chat admin), web pages or remote desktop connections.
Ensure files have consistent access rights in the operating system of the Neuron®. When using Remote Desktop or similar technologies to access the Neuron® for the purpose of copying files to the Neuron®, these might be copied using different access privileges than other types of content files. This might cause problems, such as inability to access the files from the Neuron®, or inability to update them via packages. Files copied to the Neuron® via the FTP interface will use the Neuron’s access rights (Local Service by default) when copying the files, ensuring that the Neuron® will be able to update the files in the future, as part of normal package distributions.
Protocol reference
The FTP protocol is mainly defined in a set of RFC published by the IETF. There are also some custom commands that commonly available, but not standardized. The main RFCs implemented are:
- RFC 959: FILE TRANSFER PROTOCOL (FTP)
- RFC 2228: FTP Security Extensions
- RFC 2389: Feature negotiation mechanism for the File Transfer Protocol
- REF 2428: FTP Extensions for IPv6 and NATs
- REF 3659: Extensions to FTP
- REF 4217: Securing FTP with TLS
- REF 7151: File Transfer Protocol HOST Command for Virtual Hosts
There are some limitations in the implementations (see more details, below):
- All FTP access requires authentication (i.e. login, or use of mTLS)
- All authentication and transfer require TLS encryption.
- Only broker accounts (i.e. XMPP accounts, not administrative user accounts) with FTP access rights explicitly set have access to FTP.
- Passive mode is limited to pre-defined ports.
Types of Channels
FTP was created in a time when establishing socket connections was cheaper than implementing streaming or embedding files over a single socket. For this reason, FTP, even for simple tasks requires two or more socket connections between a client (the uploader, downloader or manager of files) and a server (the file server). One connection is made for commands\ - the control channel. All file transfers or lengthy replies (such as a directory listing) are sent over a separate socket - one separate socket per transfer - the data channels. The server needs to manage available ports and provide them, as they are needed, to the different clients.
In the first versions of FTP, the server connected back to the client for each transfer, i.e. each data channel. But as the Internet evolved, and Firewalls were introduced, it became apparent that such an infrastructure is not particularly useful (in spite of NAT). A new type of data channel was introduced: The passive data channel (where the first was considered active, from the server’s point of view). A passive data channel is created by the client connecting to the FTP server using a second connection, establishing a new data connection, on which the transmission of the lengthy response or the file can occur.
TCP/IP Ports
FTP traditionally uses TCP/IP port 21. This port starts unencrypted, but the Neuron® requires the client to switch to TLS before it can authenticate itself. This process is called explicit encryption in some clients. Apart from explicit encryption, there is also an implicit encryption that can be used, often referred to as FTPS (not to be confused with SFTP, which is something else). The default port for FTPS is 990. FTPS works much like HTTPS, in that TLS is used directly upon connecting, and not negotiated through the protocol.
The recommended method to transfer data is through passive data channels. The original definition of passive channels allows for the opening of any port for listening on the server. This is not a good approach, from a security point-of-view, as a very large range of ports must be opened in the firewall for this to work. The Neuron® insteads allows for a limited set of passive data channel ports to be defined (by default 50000 - 50009). The Neuron® then alternately provides access to these ports to the FTP clients that are connected. The Neuron® also ensures the correct client accesses the correct ports. It also ensures to delay access to these passive ports, in case all are used.
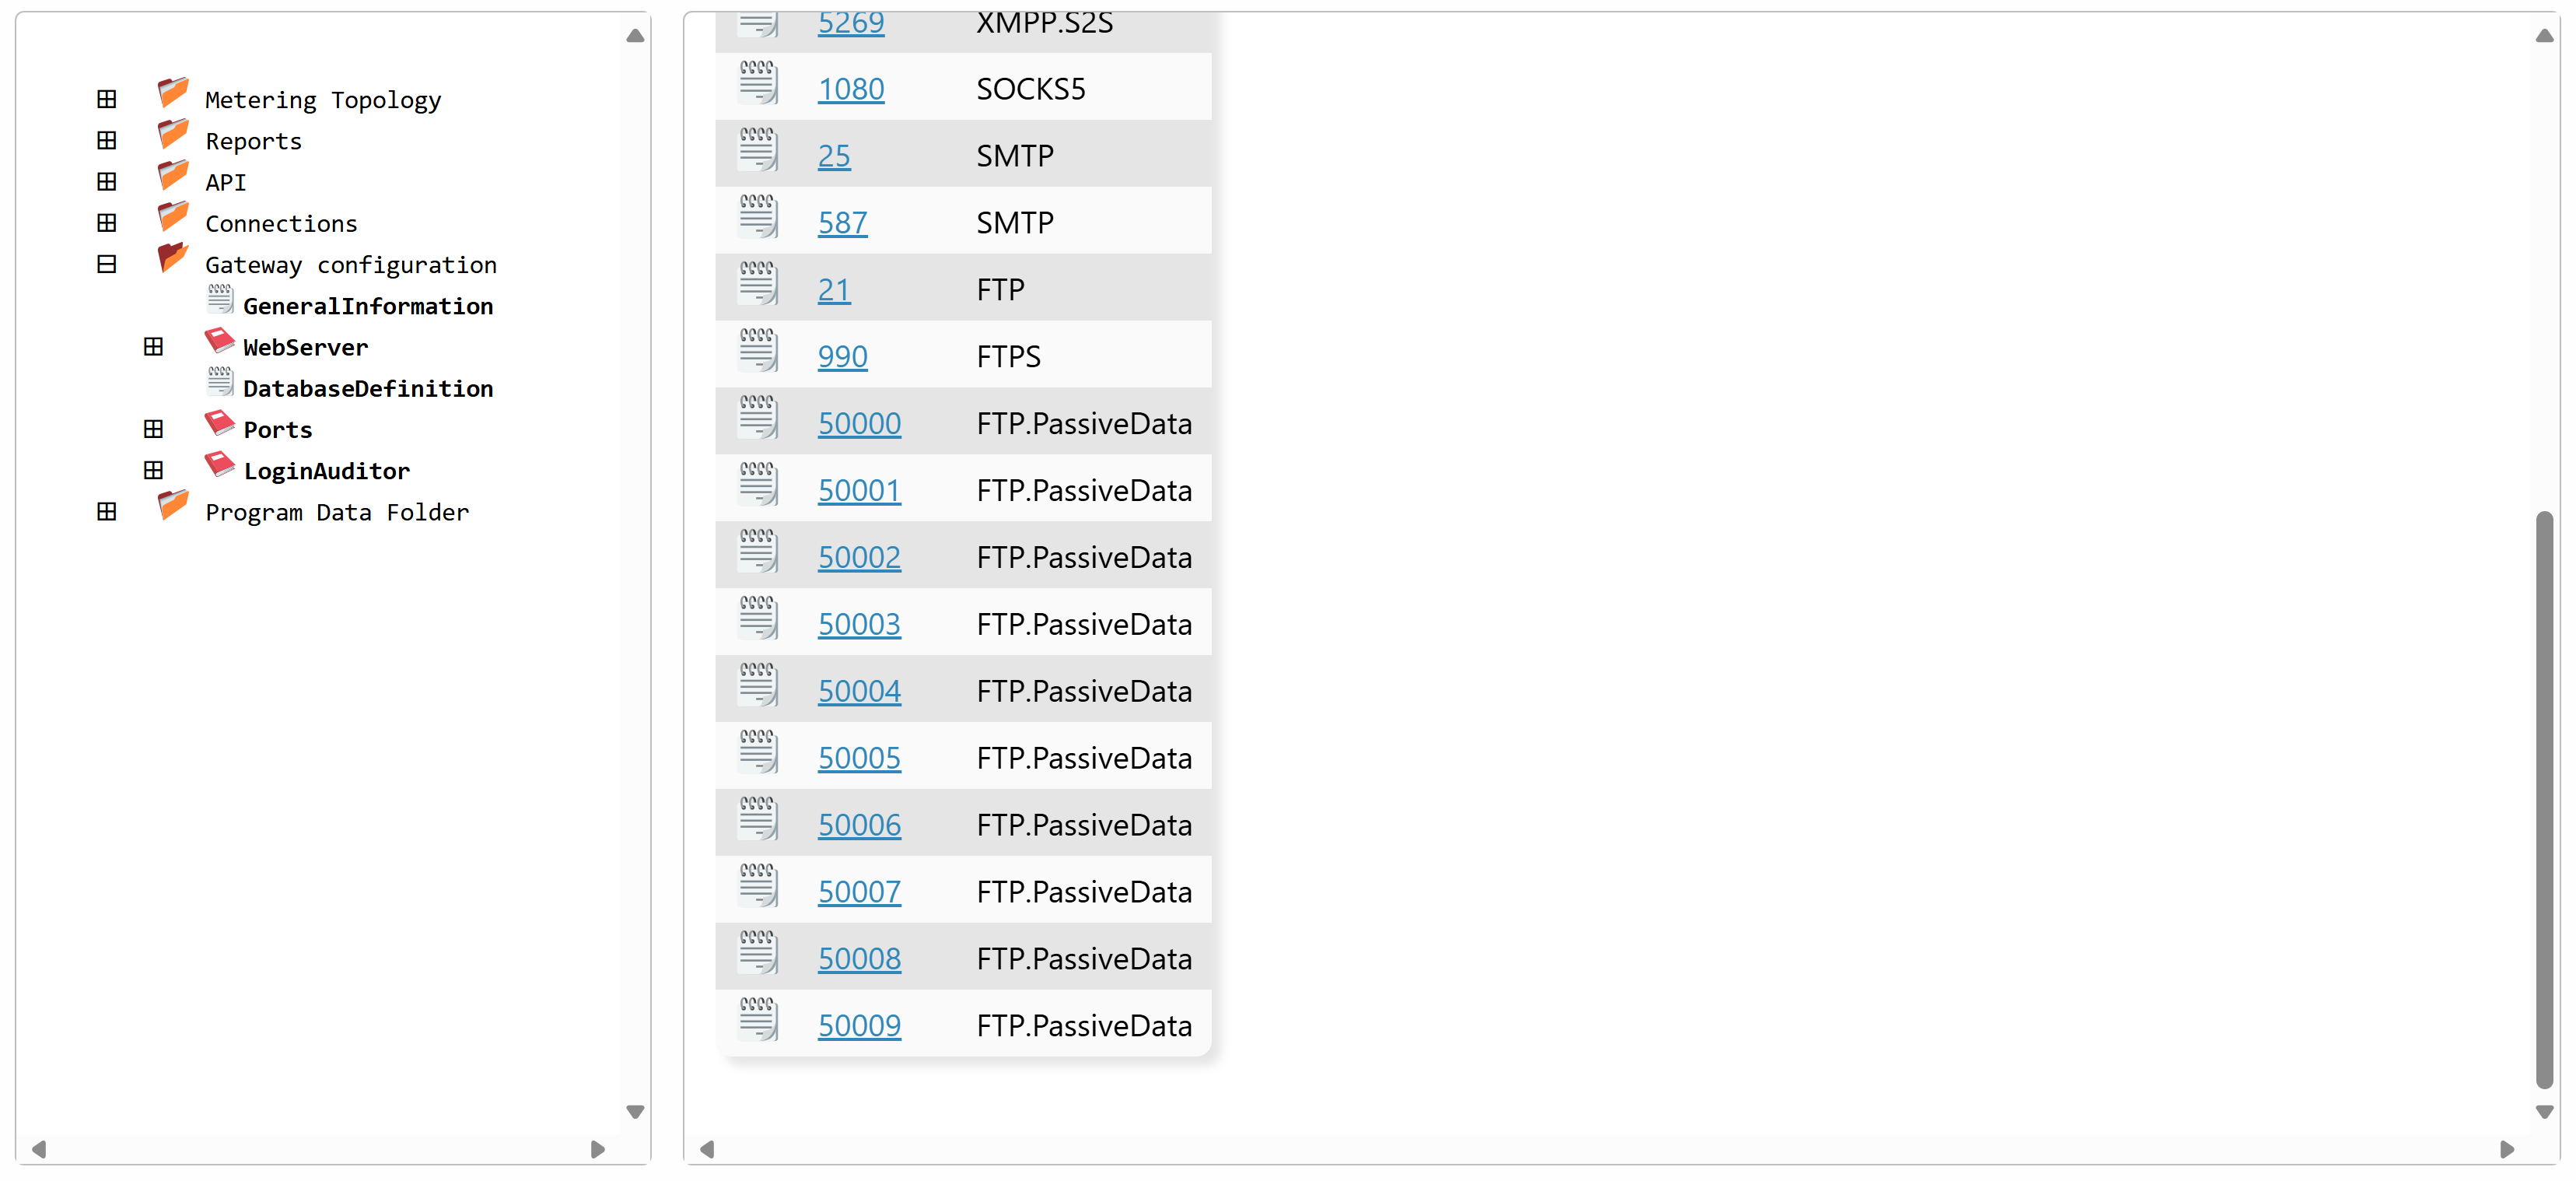
The ports used, must be defined defined in the Gateway.config file on the Neuron®. You can change, add or remove ports as you see fit. Every change to the gateway.config file however, requires the Neuron® to be restarted. Example of the Ports section of a Gateway.config file:
<Ports>
	<Port protocol="HTTP">80</Port>
	<Port protocol="HTTPS">443</Port>
	<Port protocol="XMPP.C2S">5222</Port>
	<Port protocol="XMPP.S2S">5269</Port>
	<Port protocol="SOCKS5">1080</Port>
	<Port protocol="SMTP">25</Port>
	<Port protocol="SMTP">587</Port>
	<Port protocol="FTP">21</Port>
	<Port protocol="FTPS">990</Port>
	<Port protocol="FTP.PassiveData">50000</Port>
	<Port protocol="FTP.PassiveData">50001</Port>
	<Port protocol="FTP.PassiveData">50002</Port>
	<Port protocol="FTP.PassiveData">50003</Port>
	<Port protocol="FTP.PassiveData">50004</Port>
	<Port protocol="FTP.PassiveData">50005</Port>
	<Port protocol="FTP.PassiveData">50006</Port>
	<Port protocol="FTP.PassiveData">50007</Port>
	<Port protocol="FTP.PassiveData">50008</Port>
	<Port protocol="FTP.PassiveData">50009</Port>
</Ports>
You can also edit the ports from the Admin menu, under Sources & Nodes:
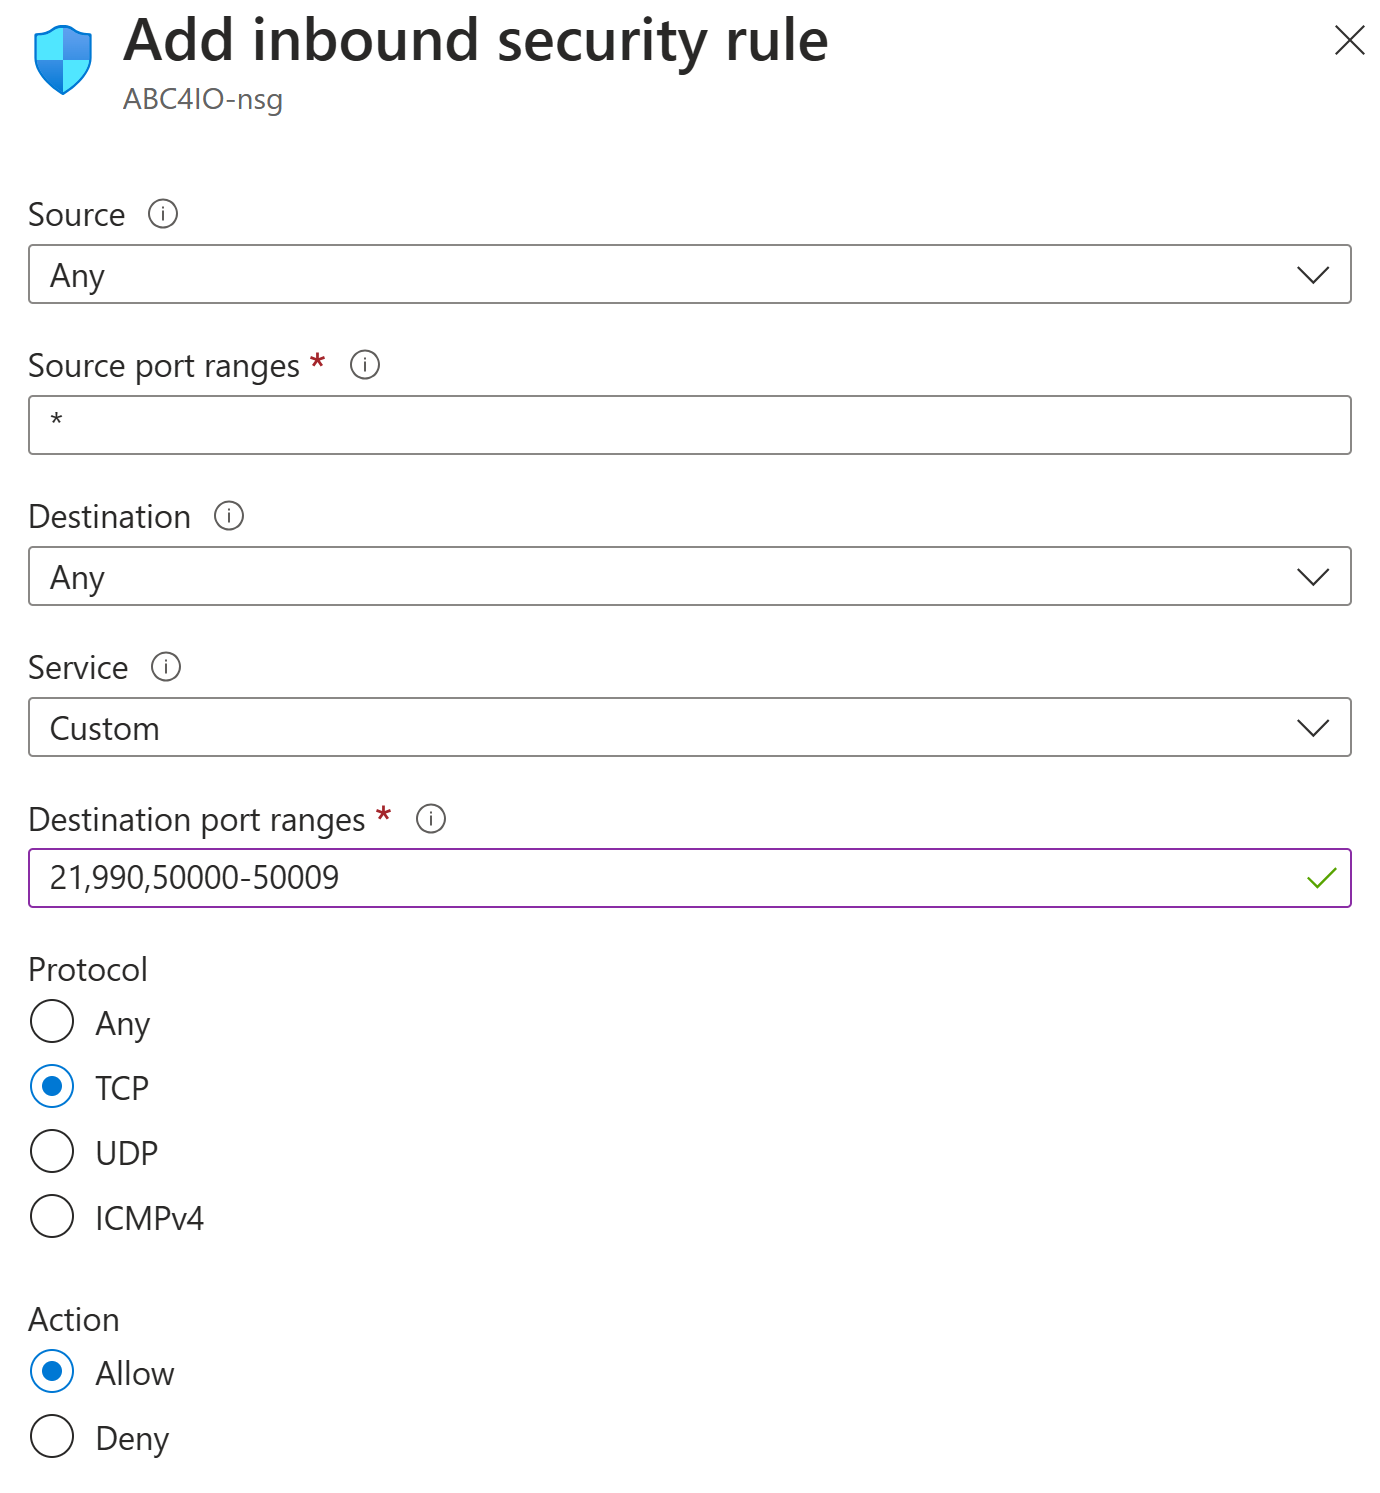
Note that the ports you define here must also be opened in the Firewall, for incoming TCP/IP connections to be permitted. If you use Azure to host your Neuron®, a firewall entry might look as follows:
Encryption
TLS encryption is mandatory for accessing the Neuron® using FTP. The Neuron® supports both implicit and explicit encryption. The Neuron® also supports Mutual TLS. This means you need to enable Client Certificates for the corresponding port in Gateway.config, and use a valid certificate on the client side when connecting to the Neuron®. If there is an account with FTP access rights having an account name corresponding to the Common Name in the subject field of a valid certificate, there is no need to use a password to access the account. The client will be authenticated as soon as it has provided the user name to the Neuron® FTP server.
Security Note: The weakest link in FTP is the matching of Control Channel with corresponding Data Channels. In active mode (not suitable for Internet use due to firewalls), this problem is not as big, since a third party cannot attempt to hijack a data channel. In passive mode, the client connects to the server twice, first for the control channel where it sends the commands, and secondly for the data channel, where a file transfer will occur. Hypothetically, a third party can hijack this data channel and receive a file not aimed for it. The controls to limit this are basic: First, the data channel is only open for listening exactly after the command has been issued, and only for as long as to receive one connection. This typically generates a window counted in milliseconds. Secondly, the server matches the Remote IP Address of both connections, and closes any data channel connection attempt from another IP address. It is therefore very unlikely that the data channel can be hijacked, but it is possible. To protect against this, it is recommended FTP conections be made using Mutual TLS (mTLS). When mTLS is used, the server also ensures the client certificate used is valid in both connections, and use the same public key. With this added level of protection, FTP becomes very secure.
Account Access Privileges
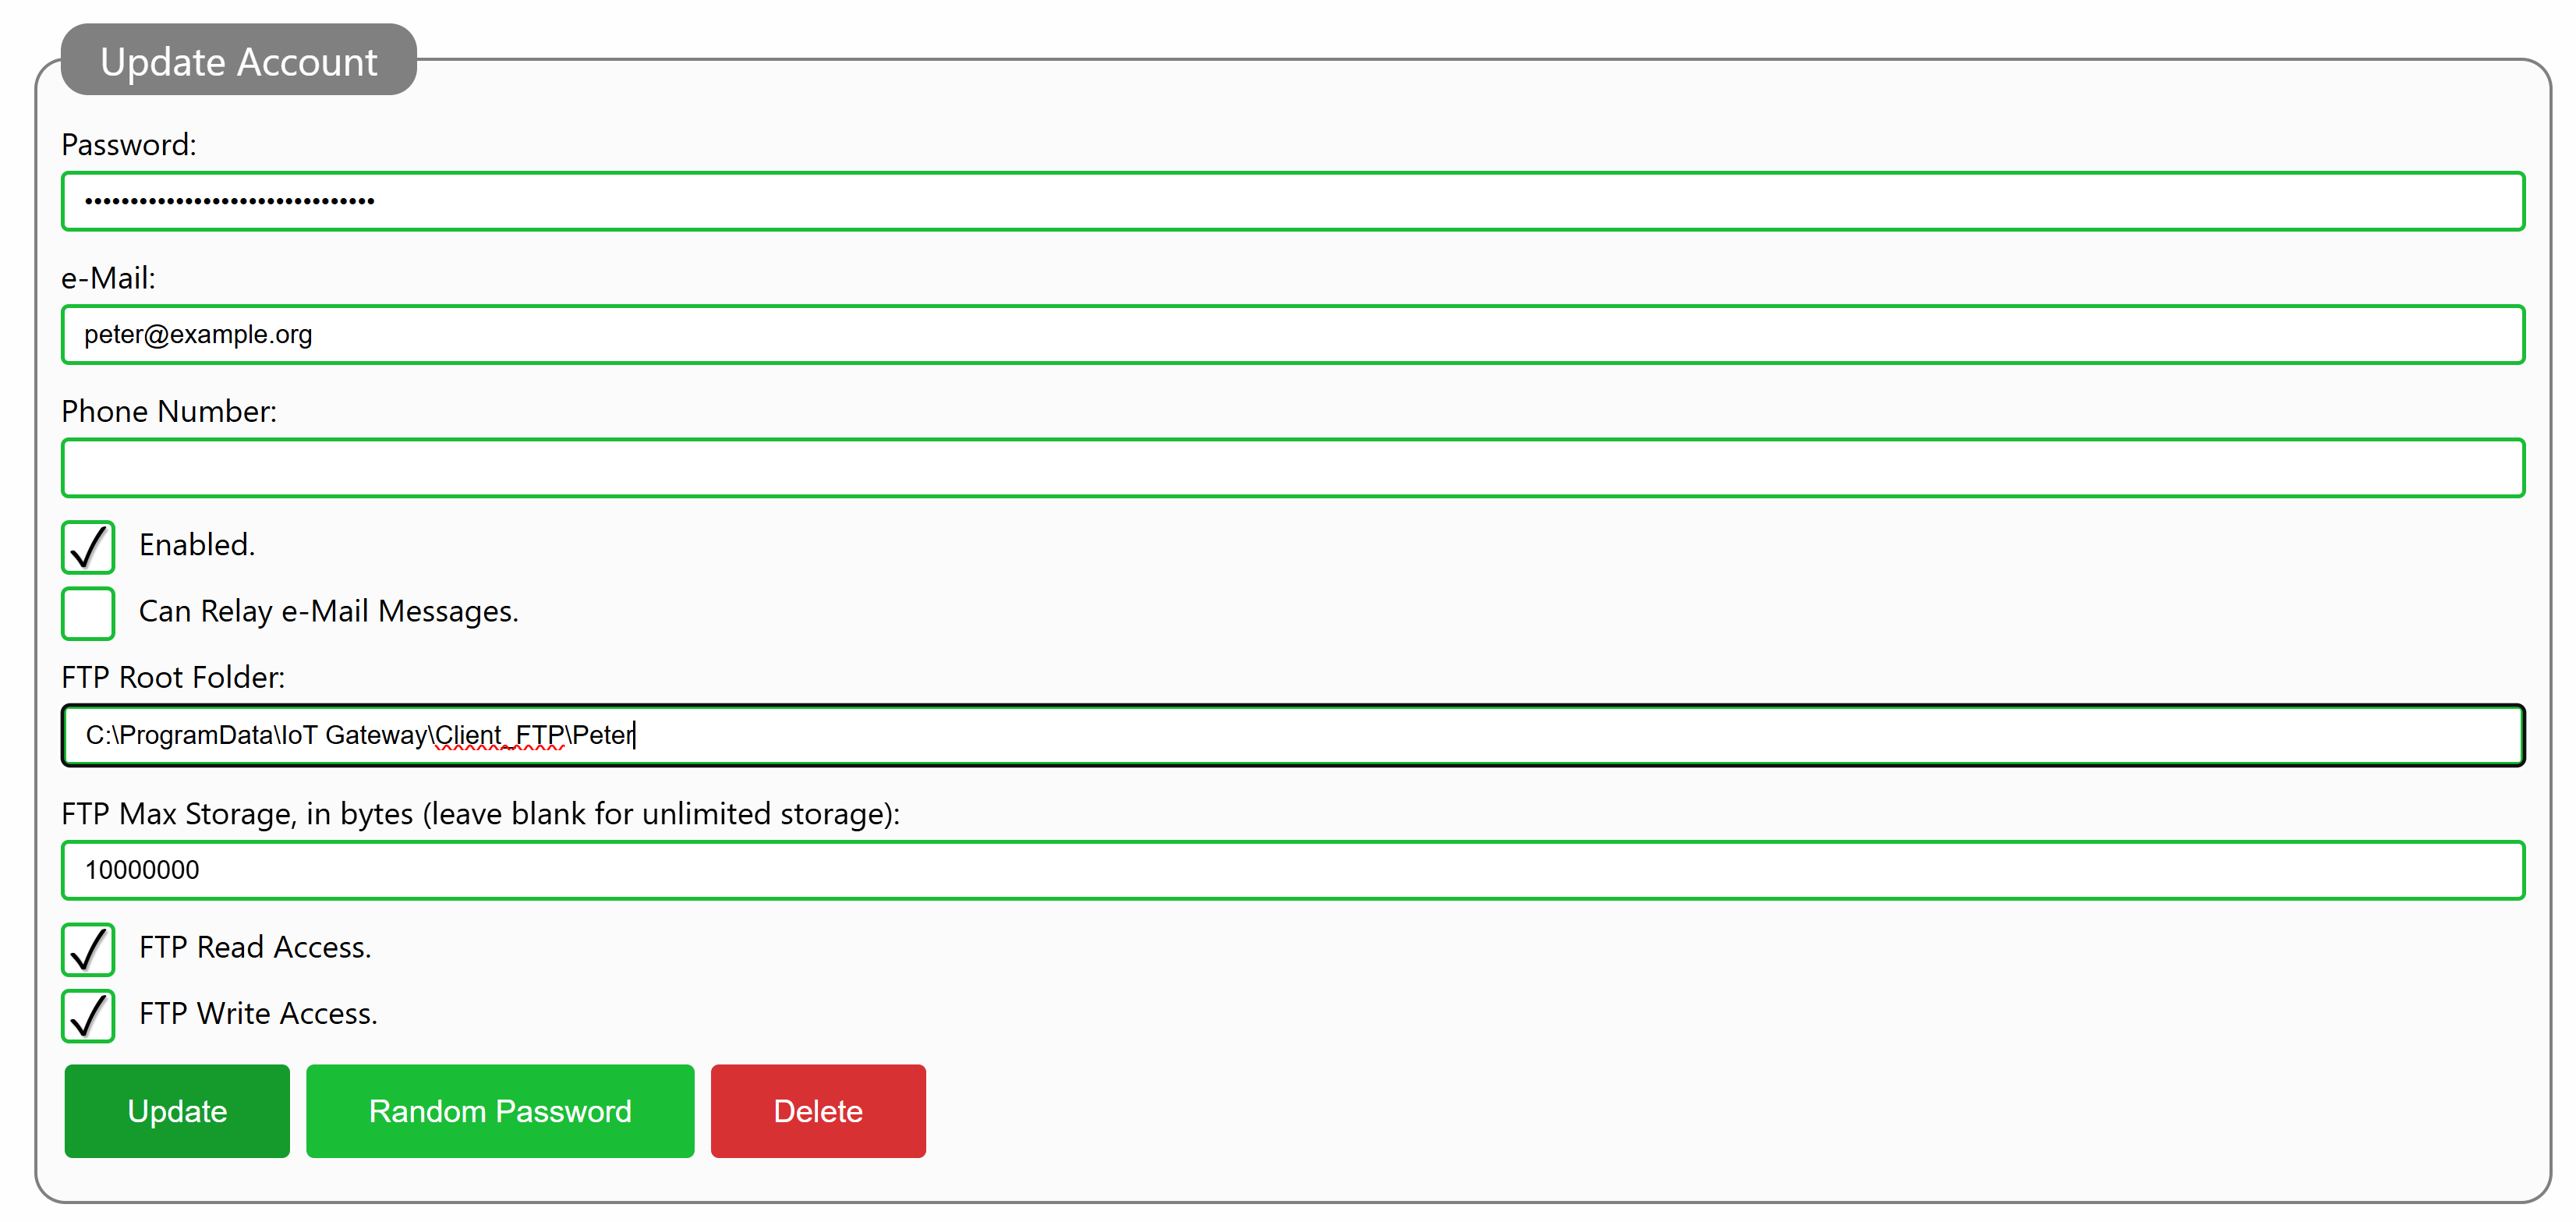
To give a broker account access rights on a Neuron®, you need to edit the account from the administrative page. At the bottom of the account, you need to provide a Root Folder for the account. This root folder does not have to be unique for the account, but it must exist. You also define whether the account as no access rights (default), read access rights, write access rights or both read and write access rights. You can also provide an optional maximum storage, counted in number of bytes. If you don’t provide a value for the maximum storage, the client will have unlimited access (i.e. until storage runs out). Once the account has been updated, the client can use FTP for file storage, within the folder provided in the configuration (and any of its subfolders). Write-access rights gives the account the right to create new subfolders recursively within the folder provided.
Using an FTP Client
If you want to use the Neuron® for file storage or management from your desktop. you will need an FTP Client to access the Neuron®. FTP support in Windows is limited to unencrypted access, which is not permitted by the Neuron®. WinSCP is an FTP client that works well with the Neuron® and is commonly used on different platforms. When using WinSCP to connect, remember to use either explicit encryption on the FTP port (21 by default) or implicit encryption on the FTPS port (990 by default). SFTP is something else in WinSCP. You then connect, and once you are connected you can access the assigned folder, using the logical folder /.
Troubleshooting using sniffers
You can troubleshoot the FTP communication on the Neuron® in two ways: In the Program Data Folder, there exists an FTP subfolder, where communication logs will be stored in XML format, for 7 days. You can also create a web sniffer from the administrative page (under Communication/FTP Sniffer) that can be used to sniff on the communication for a maximum of an hour. The content of the files will not be displayed in these sniffers, only what connections are made, what commands are sent, and their responses.
#new, #neuron, #features, #api, #protocol, #ftp, #security, #mtls
Posts tagged #security
No more posts with the given tag could be found. You can go back to the main view by selecting Home in the menu above.