Remote Login API
Since Build 2025-12-30, extended in Build 2025-12-31, a new API called the Remote Login API is available on the TAG Neuron®. It is a complement to the Quick Login API, in the following ways:
The Quick Login API is initiated by the client itself, for instance, by scanning a QR-code, clicking a link or logging in to a web site, for instance.
The Remote Login API on the other hand, is initiated by a remote service, that wants to use the digital identity of the user in a second (or multi) factor authentication process (2FA, or MFA).
The Quick Login API allows anonymous access (on the HTTP resource level), while the Remote Login API requires authorized access. This authorized access can be granted using
WWW-Authenticateor Mutual TLS (mTLS). Mutual TLS is recommended, as it avoids the use of passwords. In both cases, the administrator of the Neuron providing access to the API needs to create a corresponding user and grant the user the corresponding privileges. (See the API documentation for details.)
Simulating Identity and Signature Petitions
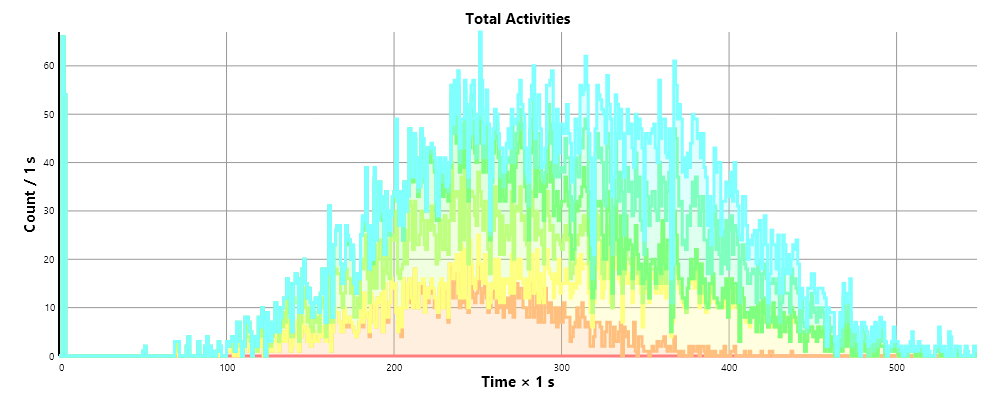
A new ComSim simulation called LegalIdentities.xml simulates a series of XMPP-connected devices that apply for digital identities, and automatically respond to identity and digital signature requests. This simulation can be used for test purposes, to test function and load, as well as measure performance. It can also be used during development of other services interacting with users of digital identities for the purposes of Multi-Factor authentication. By using the digital identities of the simulated users, automatic signatures are created, which simplifies the development life-cycle, as the developer does not need to manually sign each time the MFA procedure takes place.
Report
To review the simulation model, check out the XML definition. It contains references to both the XMPP and XMPP Legal modules of ComSim. Each actor checks if they have a digital identity. If not, the actor applies for a new simple digital identity. From Build 2026-01-07 of the Neuron®, such digital identities are automatically approved. Once such approved digital identities exist, the actors stochastically send identity and signature petitions to each other. They also accept each other’s petitions automatically. This means that they will approve external requests also. This allows them to be used for other purposes as well, as mentioned earlier. You can use this simulation together with integration of the QuickLogin API and RemoteLogin API for instance.


Also review the full report generated by one simulation of the model, for more information.
Resending Verification Codes during Onboarding
The TAG ID Onboarding API has been updated to allow for resending verification codes, without generating new codes. There are two parts of this API:
For clients that access an onboarding Neuron®, the
/ID/SendVerificationMessage.wsresource has been updated to allow for resending codes, by providing anResendproperty in the request. If set totrue, the resource will resend any existing code to the registered components, otherwise an error will be returned.For clients using the Agent API, a new resource is available, permitting the resending of verification codes:
/Agent/Account/ResendVerificationCodes.
Onboarding API
The /ID/SendVerificationMessage.ws now accepts payload having the following format:
{
	Nr:Optional(Str(PNr like "\\+[1-9]\\d+")),
	EMail:Optional(Str(PEMail like "[\\w\\d](\\w|\\d|[_\\.-][\\w\\d])*@(\\w|\\d|[\\.-][\\w\\d]+)+")),
	AppName:Optional(Str(PAppName)),
	Language:Optional(Str(PLanguage)),
	Resend:Optional(Bool(PResend))
}
If the Resend property is available, and is true, the method will resend any existing code to the existing number or e-mail address provided. It is not possible to send an existing code to a new number or e-mail address.
Agent API
The Agent API (from build 2025-06-02) now has a new resource: /Agent/Account/ResendVerificationCodes. This resource allows for the resending of verification codes for the account currently being created. In order to access it, the JSON Web Token (JWT) provided in the response when creating the resource must be provided. The caller also needs to provide the phone number and/or e-mail address to which codes should be resent.
Security Notice: It is not possible to resend codes for accounts, numbers or e-mail addresses that have been verified. You can only resend codes for accounts still pending verification. This includes partially verified accounts. If the phone number has been verified, but the e-mail address has not, or vice versa, you can resend the code for the unverified part, but not for the verified part. Attempting to resend codes that have been verified, will be flagged, and repetetive calls to resend codes for verified accounts, numbers or addresses may result in the temporary and then permanent blocking of the endpoint making the call.
#new, #api, #onboarding, #id
IP Location Information during Onboarding
The Onboarding API has been updated to provide some additional IP Location information during onboarding, to help clients prefill fields in ID applications.
When calling the https://id.tagroot.io/ID/CountryCode.ws web service (using POST, and Accept header set to application/json), the following information will now be available in the response:
{
    "RemoteEndPoint": string,
    "CountryCode": string,
    "PhoneCode": string,
    "Country": string,
    "Region": string,
    "City": string,
    "Latitude": double,
    "Longitude": double
}
The IP Location information is provided by IP2Location.
Note: The information provided in the response may be incorrect, so users will need to verify the information provided, before including it in any ID applications.
#new, #api, #onboarding, #id
Integrating Serpro into Neuron®-based services
You can use Serpro in Neuron®-based services, by installing the TAG.Serpro.package, available in the Packages page in the Admin menu, and use the examples provided in your own services. Serpro provides an identity application authenticator, that can be used to automate the approval of identity applications on the Neuron® where it is installed. You will need to provide a key when installing. Use the following public key:
| Some more information | |
|---|---|
| Package | TAG.Serpro.package |
| Installation key | 0WMoLBoAObn+SPgJ6Zfl6iJTxhnW8050o0sHba37z+51BUHjRm3dyL08qqQ+n4iTFDL6PYVOWeAA4bda1f2a8fb0d70921434eed848e39e7 |
| Configuring Service | /Serpro/Settings.md on the Neuron® on which the service is installed. |
| More information | <https://github.com/Trust-Anchor-Group/NeuronSerpro> |
Posts tagged #id
No more posts with the given tag could be found. You can go back to the main view by selecting Home in the menu above.