Broker Notification Configuration
As of build 2026-07-25, you can control what broker-events generate operator notifications, and which are only logged to the event log. It is a new system configuration page. This means the configuration will be part of the installation procedure of the Neuron as well. Each configuration have an associated environment parameter.
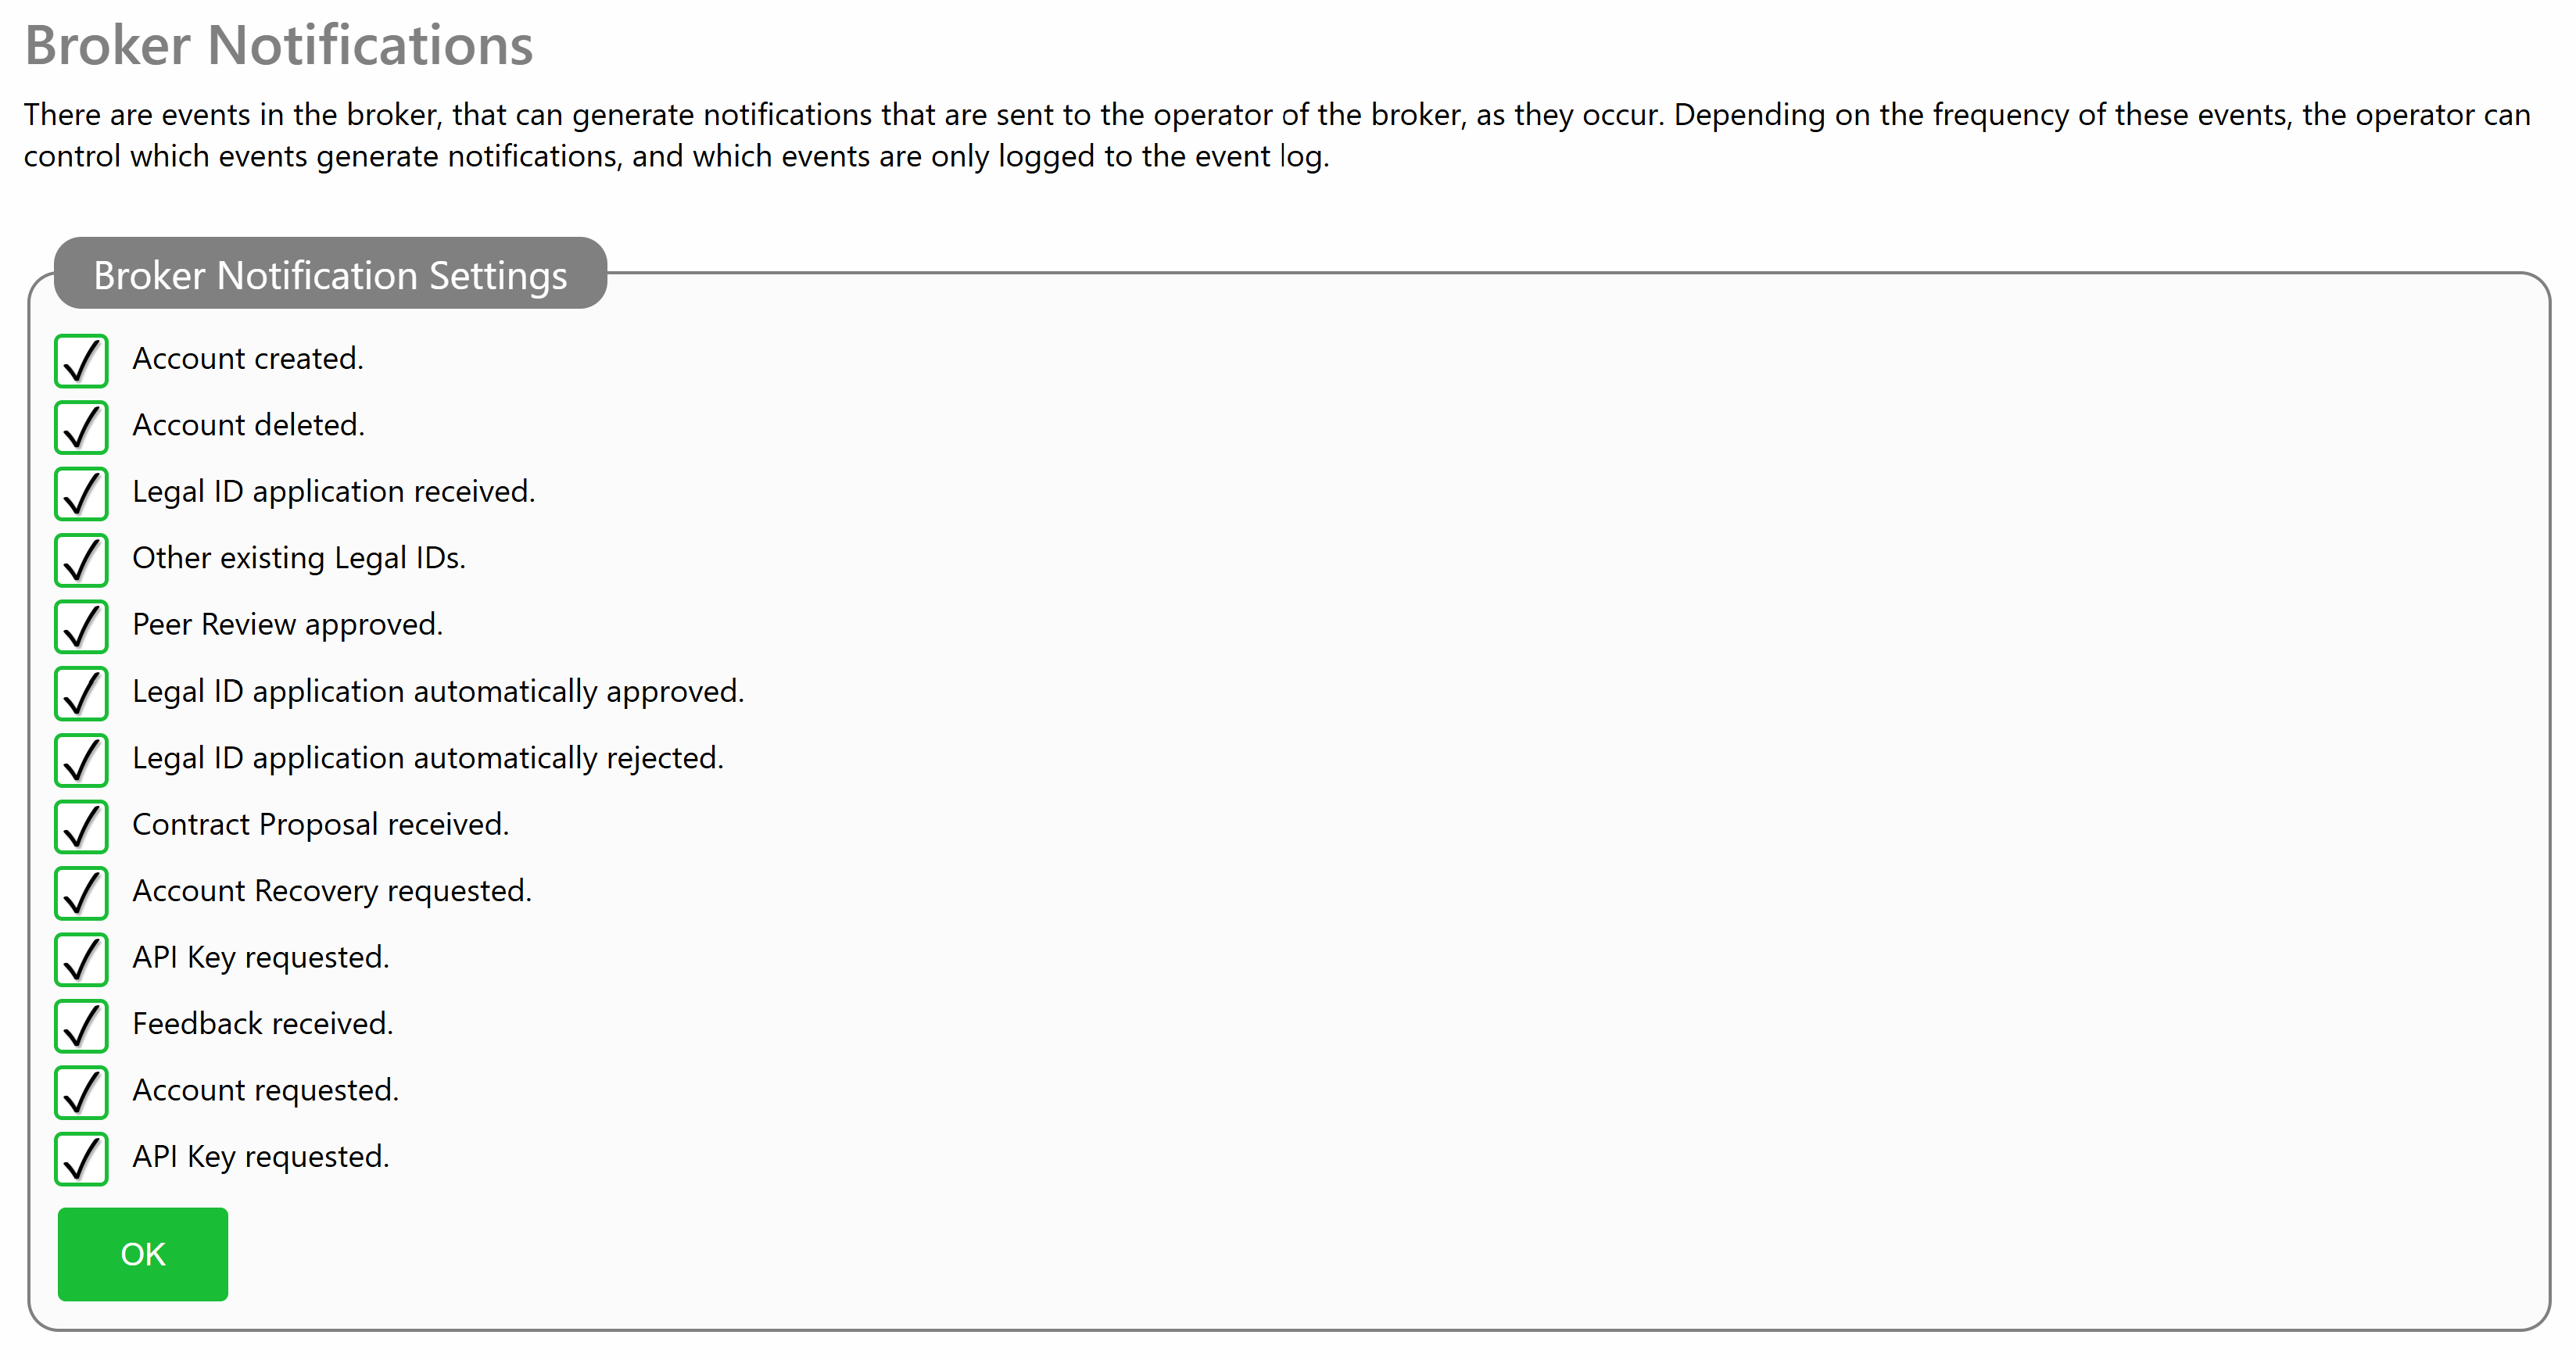
You find the new configuration page from the administration page, under Notarius Electronicus and Notifications.

Pressing the button (or opening the page via the drop-down menu), opens a page where individual event notifications can be enabled or disabled. For nodes with a lot of events, it might be more efficient and less distracting to disable certain notifications, and process them in bulk regularly instead of managing them individually.
Environment Variables
The following table lists environment variables that can be used to control the configuration of notifications:
| Environment Variable | Description |
|---|---|
BROKER_NOT_ACCOUNT_CREATED |
If a notification should be sent when a new account is created. |
BROKER_NOT_ACCOUNT_DELETED |
If a notification should be sent when a new account is deleted. |
BROKER_NOT_LEGAL_ID_RECEIVED |
If a notification should be sent when a new a Legal ID application is received. |
BROKER_NOT_OTHER_LEGAL_IDS |
If a notification should be sent for every existing valid Legal ID that exists when a new Legal ID application is received. |
BROKER_NOT_PEER_REVIEW_APPROVED |
If a notification should be sent when a peer review of a Legal ID has been approved. |
BROKER_NOT_LEGAL_ID_AUTO_APPROVED |
If a notification should be sent when a Legal ID application has been automatically approved. |
BROKER_NOT_LEGAL_ID_AUTO_REJECTED |
If a notification should be sent when a Legal ID application has been automatically rejected. |
BROKER_NOT_CONTRACT_PROPOSAL_RECEIVED |
If a notification should be sent when a contract proposal has been received. |
BROKER_NOT_ACCOUNT_RECOVERY_REQUEST |
If a notification should be sent when an account recovery request has been received. |
BROKER_NOT_API_KEY_CREATED |
If a notification should be sent when an API key has been created. |
BROKER_NOT_FEEDBACK_RECEIVED |
If a notification should be sent when feedback has been received. |
BROKER_NOT_ACCOUNT_REQUESTED |
If a notification should be sent when an account has been requested. |
BROKER_NOT_API_KEY_REQUESTED |
If a notification should be sent when an API key has been requested. |
OAUTH 2 support in the Neuron
The Neuron® now supports OAUTH 2.0, and can be used as an authorization server in OAUTH-compliant systems (from build 2026-07-13). The OAUTH 2 environment available in the Neuron includes the following resources:
- An authorization resource (RFC 6749) at
/oauth/authorize. - A token resource (RFC 6749) at
/oauth/token. - A dynamic client registration resource (RFC 7591 and RFC 7592), supporting both public and confidential client registrations, at
/oauth/register. - A management resource for dynamic client registrations (RFC 7591) at
/oauth/registration. - A resource providing support for the device authorization flow (RFC 8628) at
/oauth/device - A token introspection resource, in accordance with RFC 7662 at
/oauth/introspect - A server OAUTH meta-data resource (RFC 8414) at
/.well-known/oauth-authorization-serverallowing external parties a way to find available resources and features. - A resource providing meta-data for protected resources (RFC 9728) at
/.well-known/oauth-protected-resource.
Apart from the resources defined, there are some notable features and extensions that are supported, and merit mentioning:
- Proof Key for Code Exchange by OAuth Public Clients (PKCE) (RFC 7636), securing the authorization flow.
- Support for refresh tokens (RFC 6749)
- Implicit token generation from traditional Neuron authentication, or Mutual TLS (mTLS).
- OAUTH clients (services) that want to use the Neuron as an OAUTH authorization server, should register themselves with the Neuron using the dynamic client registration interface, and provide a human-readable name, logotype and corresponding URIs for more information.
- Dynamic login forms generated by the OAUTH environment are generated first in Markdown, and then transformed to HTML before being returned to the user. This allows opertors of the Neuron to customize the look & feel of the login form, by customizing the
MasterOAuth.mdfile available in the web root folder. The dynamic form is embedded in this master file, before being rendered as HTML.
Authentication, scopes and privileges are related as follows:
- Scopes in OAUTH, are translated into Privileges in the Neuron, having the prefix
OAUTH.Scope.followed by the scope, where colons (:) are replaced by periods (.). - An external party can authenticate itself with the OAUTH environment, and be authorized to receive a JWT token, which it should provide in subsequent requests using a
Bearertoken in anAuthorizationHTTP header. - Dynamic client registrations, and clients that authenticate themselves using credentials for an XMPP account, have no privileges by default. Attempts to authorize access to specific scopes using such accounts will be rejected.
- Administrative user accounts will have the privileges provided to them via the Roles defined for the corresponding user accounts.
Dynamic client registration has been integrated into the Neuron using the following principles:
- The Neuron enables dynamic client registration by creating an API Key with the name
OAUTH. If there is no such API key on the Neuron, dynamic client registration is not permitted. - A remote endpoint can register at most 2 clients (public or confidential).
- Registered clients receive a corresponding XMPP account with the same
client_id. These accounts are disabled for XMPP communication by default, but can be enabled manually. (Future work may provide a mechanism to automatically enable such accounts, by validating e-mail and/or phone numbers provided in client registration.)
Security Note: You can limit access to OAUTH using the Web-Application Firewall (or WAF), by restricting access to any resource that starts with /oauth/.
Queue Event Sink
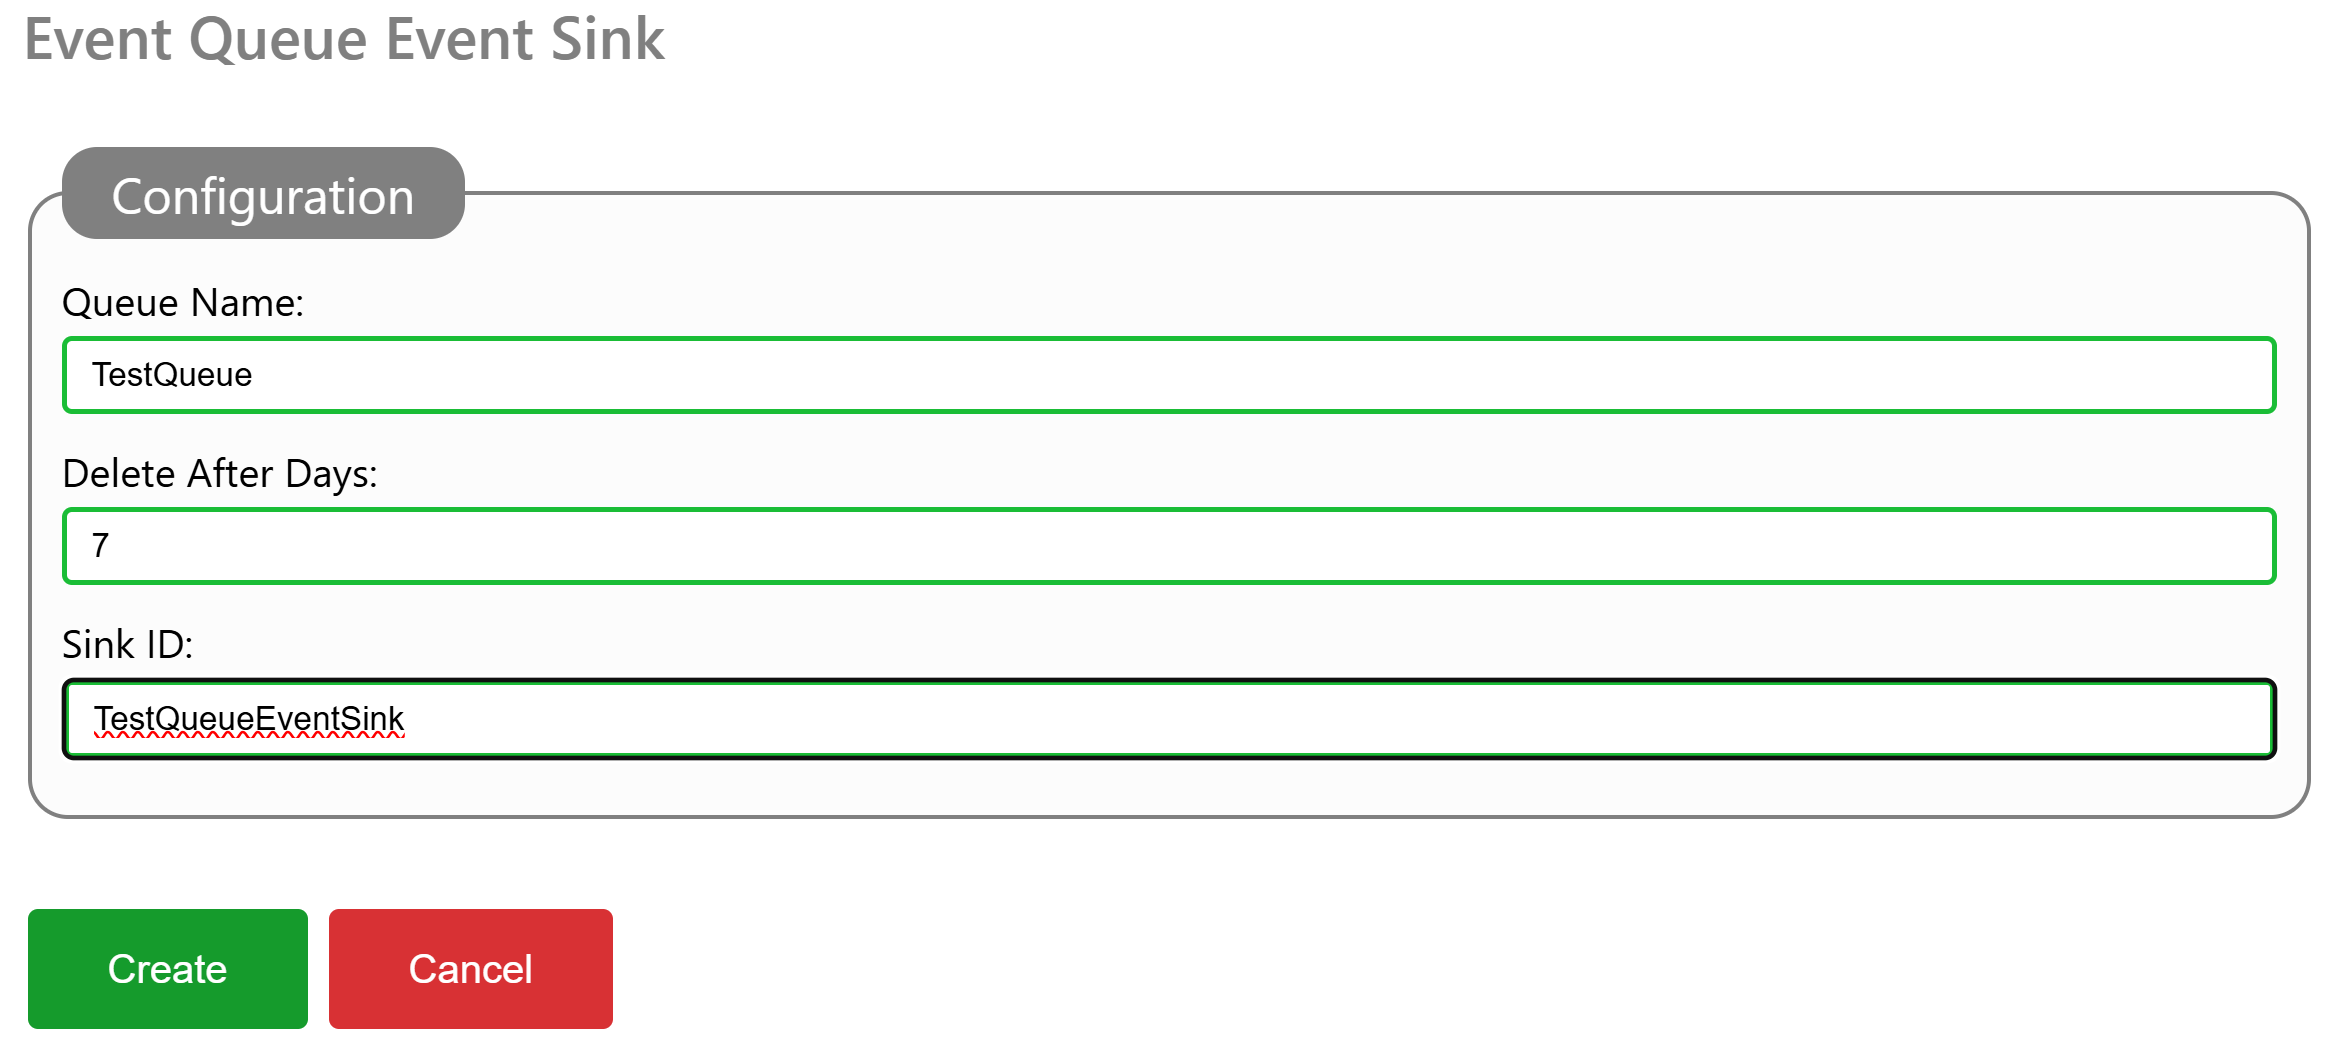
A new Event Sink is available (from build 2026-06-01), permitting the temporary storage of logged events into a local Queue. Queues perist elements in an encrypted manner, and processes them in accordance with FIFO (First-In-First-Out) order. A queue frees processes that generate items from processes that process these items. They can work in different paces, and can be updated/run on different times.
To configure a Queue for temporary encrypted storage, you add a EventQueue element to the event sinks section of the Gateway.config file, and restart the Neuron®. You can also add such an event sink, via the administrative interface, under Sources & Nodes, and the Gateway configuration source.
You need to provide a Name for the Queue. This Name is later used to dequeue items that have been enqueued by the event sink. You also provide a number of days which items are stored in the queue. Older items are regularly purged from the queue, to avoid it growing indefinitely. A Sink ID must also be provided. This ID appears in event logs, in case something related to the event sink needs reporting.
To access enqueued events, you can either dequeue them in local services, or use the Queue API. If you are using Postman, there’s a public repository containing a Postman collection for the Queue API.
#new, #features, #neuron, #gateway, #events, #eventsink, #api, #queue
Using the Neuron to send and receive e-mail
The TAG Neuron® supports multiple protocols, among them, both the XMPP Protocol and the SMTP protocol. In XMPP, clients have accounts on brokers, and connect to their broker to connect to the federated XMPP network. Addresses in XMPP are called Jabber IDs, or JIDs for short. The Bare JIDs look like e-mail addresses, in the form: ACCOUNT@DOMAIN. Once connected, the connection is assigned a Full JID, in the form ACCOUNT@DOMAIN/RESOURCE.
The account can also interact using the SMTP protocol. This means, the client can send and receive e-mail seamlessly using the same XMPP account. E-mail messages sent to the account gets forwarded as messages to the client. The client can send messages back. The Neuron converts the messages into e-mail messages and forwards them to the recipient using the SMTP protocol.
There are some differences between how SMTP works on the Neuron®, and if you are using a traditional SMTP Server:
In order to be able to communicate with a client on the Neuron, you need a presence subscription. This is a requirement on XMPP. SMTP does not have such a feature, which is one of the reasons why e-mail is so ripe with spam. The Neuron enforces presence subscription on e-mail as well. It does this via a squence of e-mails that are sent to anyone trying to send e-mail to an account on the Neuron. The e-mails will contain links allowing the sender to request presence. Once the client has accepted the presence subscription, the sender of the e-mail gets notified that it is able to send e-mail to the indented recipient.
Outgoing messages are accumulated for a short time before being sent. In XMPP, messages are sent instantaneously to the recipient. If you use a chat program and write multiple rows of text, you want all rows to get into the same e-mail message. For this reason, the Neuron accumulates outgoing text messages, and forwards them once there is a silence for a minute (or an hour has passed since the first row).
Incoming e-mail messages are sent to the client encoded in multiple ways. First, the text of the message is extracted, and forwarded as Markdown, HTML and/or plain text, as appropriate. The original contents of the e-mail is also forwarded, but can only be processed by the client, if it understands a separate e-mail extensions. This means, you can e-mail to any XMPP client, using text content. But only XMPP clients understanding the e-mail extension will be able to receive more advanced concepts, such as embedded attachments, etc.
Outgoing messages from XMPP clients are typically of a simpler nature: Plain text, HTML and/or Markdown. This is transformed into multi-formatted e-mail messages accordingly, before being sent.
Example
As an example, following is a short interaction between an e-mail client using a hotmail e-mailing address, and an XMPP client, using an XMPP address. No Mail Relay was used on the Neuron used in this example.
Sending first mail to XMPP client
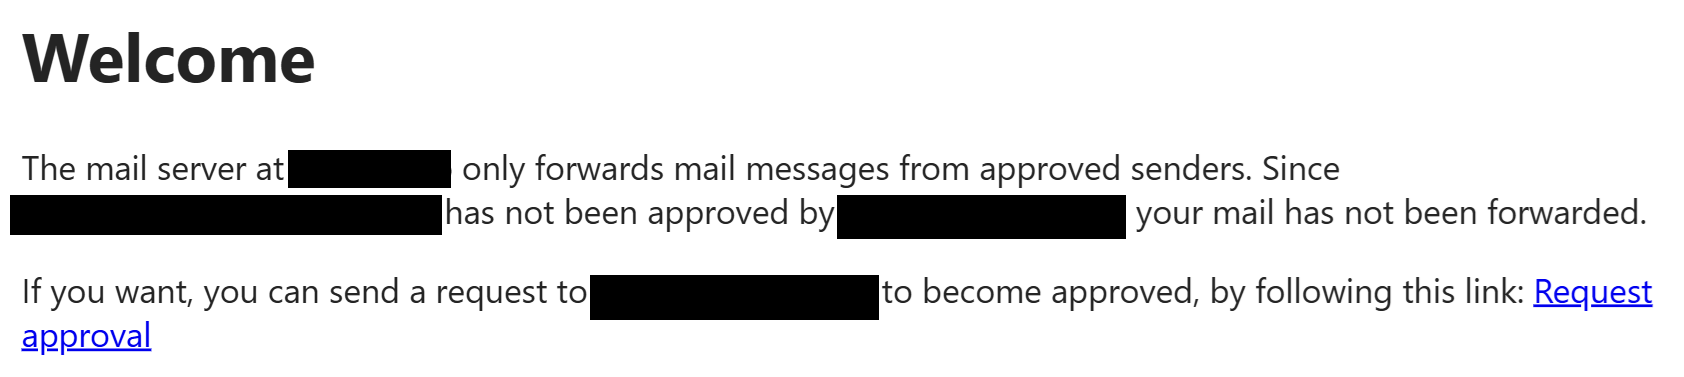
First step, that will trigger the approval process (or white-listing process), is to send an e-mail to the XMPP client you want to interact with. The contents of this e-mail will be ignored; it can be anything. When the Neuron receives this e-mail, it will check the roster of the recipient to see if an approved presence subscription is available. If not, it will immediately return an e-mail stating this fact.
Sending a presence subscription request
The e-mail will contain a link the recipient can click on, that will send a presence subscription request to the intended recipient. The link is cryptographically protected with the associated e-mail, and the sender and receiver identities. The sender will also receive an e-mail confirmation that the presence subscription request was sent to the recipient.

Receiving presence subscription acceptance confirmation
If the recipient accepts the presence subscription request, a two new e-mails are sent to the original sender, confirming this fact, and instructing the sender that it is now allowed to send e-mails to the intended recipient. The first e-mail shows the sender has been added to the white-list (roster in XMPP). The second, that the presence subscription request has been accepted.


Testing e-mail <-> XMPP link
The e-mail sender should now be able to communicate with the XMPP recipient. Sending a simple test message to the recipient, will make the text in the e-mail appear as a chat message in the XMPP client. The XMPP client can respond using chat, just as if the sender was another XMPP-client.
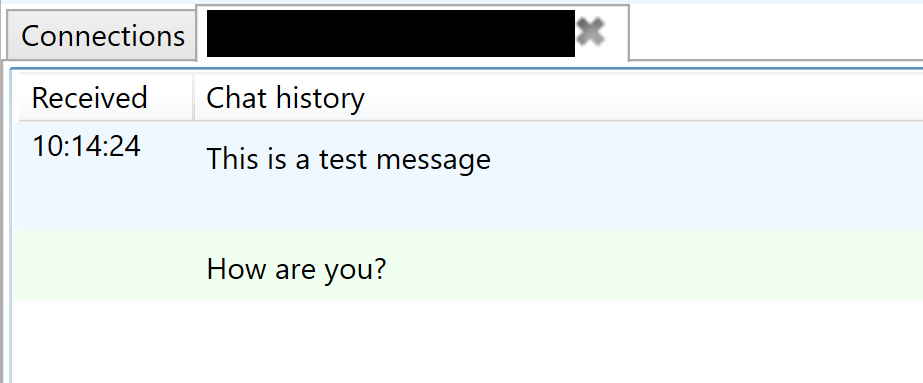
The XMPP chat response is transformed into an e-mail and sent to the original sender.

Troubleshooting SMTP Communication
A lot of problems can occur in SMTP communication. The principle reason is lack of cybersecurity in the original specifications, and security added on-top, as people became aware of threats. There is often no clear indication as to why there are problems sending or receiving e-mail.
The principle resource for troubleshooting e-mail is SMTP communication logs. These are stored in the SMTP subfolder in the Neuron Program Data Folder. The SMTP folder contains subfolders with communication logs for different senders and recipients. Input logs (containing information about incoming messages) are stored separately from Output logs (containing information about outgoing messages). To distinguish the two, Input logs are suffixed with IN and Output logs are suffixed with OUT.
When troubleshooting incoming logs, you need to know from where the message will be received. This can be learned from DNS SPF entries. When troubleshooting outgoing logs, you need to know to where the message will be sent. This can be learned from DNS MX entries. There are tools online for finding out both. You can also use the Script engine on the Neuron to get the relevant DNS records.
Also, you need to ensure the DNS has been configured correctly for the Neuron, especially those related to Sender Policy Framework SPF (TXT records) and Mail Exchange (MX records).
HTTP Proxy
The TAG Neuron® now (from build 2026-05-12) has a new API: A generic HTTP Proxy at /HttpProxy. It allows clients to use the broker as a proxy to access resources on the Internet. This can be useful in multiple cases, for instance in environments where access to certain resources are limited, but the Neuron has free access. One such example is accessing HTTP-only resources from a smart phone environment, which requires use of HTTPS, and the remote web server does not have HTTPS enabled. (This is the case for certain ICAO Certificate Revocation Lists for example.)
Authentication
The HTTP Proxy resource requires authentication. The reason for this restriction is to avoid the broker to become a point for third parties to commit cyber-crime. The resource supports multiple form of authentication: Normal WWW-Authenticate is supported, mTLS (for brokers where this is enabled), or JWT Bearer tokens. Session login is also supported. This makes it possible to integrate the resource in web pages hosted by the Neuron.
JWT Bearer tokens is usedful in environments based on XMPP, where access to HTTP-based resources is required, but restricted by the operating system, such as the Neuro-Access smart phone app.
Since the app, in this case, has an XMPP connection to the broker, it can get a JWT token from the broker by using the HttpxClient class (HTTP over XMPP) in the Waher.Networking.XMPP.HTTPX library. Calling the GetJwtToken method returns a JWT token that can be used to make HTTP requests to the broker, authenticated as the XMPP account.
Redirecting HTTP links
If using InternetContent in the Waher.Content library to access content on the Internet, you can redirect HTTP-only links to a custom resource by providing an event handler to the WebGetter.HttpUriEventHandler event. Take the opportunity to provide a new URI in the event arguments, redirecting the request to the HTTP proxy resource of the Nueron to which the client is connected using XMPP. You also need to add the Bearer token to the Request headers available in the event arguments. The URI itself is then URI encoded and added as a sub-path to the /HttpProxy/ resource.
Example
The first step is to get a JWT token from the Neuron, identifying the XMPP connection the client has. We use the HttpxClient method GetJwtTokenAsync method, providing the number of seconds we want the token to be valid:
string Token = await this.httpxClient.GetJwtTokenAsync(60);
We then create an event handler to reroute HTTP-only requests to the HTTP proxy on the Neuron to which the client is using, using HTTPS. Creating an event handler for this purpose is simple (replacing DOMAIN in the example with the domain of the Neuron). We also need to add the Bearer JWT token by using an Authorization header:
private static void ViaProxy(object Sender, HttpUriEventArgs e)
{
	e.Uri = new Uri("https://DOMAIN/HttpProxy/" + WebUtility.UrlEncode(e.Uri.ToString()));
	e.Request.Headers.Add("Authorization", "Bearer " + Token);
}
We need to assign the event handler to the event:
WebGetter.HttpUriEventHandler += ViaProxy;
Later, when we do not need to redirect HTTP requests any longer, we need to unregister it:
WebGetter.HttpUriEventHandler -= ViaProxy;
While the event handler is registered, any access to web resources using HTTP, by using the static InternetContent class, will be seamlessly redirected to the HTTP proxy. Example:
ContentResponse Response = await InternetContent.GetAsync(
	new Uri("http://example.org/"),
	new KeyValuePair<string, string>("Accept", HtmlCodec.DefaultContentType));
Posts tagged #neuron
No more posts with the given tag could be found. You can go back to the main view by selecting Home in the menu above.