mTLS Test
The mTLSTest repository contains tools and a package to help troubleshoot and test Mutual TLS (mTLS) connections from clients to a Neuron®. It contains a small content package that provides a web page and a web service that humans and/or machines can use to ping the Neuron® and get information about the connection, including information about any client certificate the Neuron was able to receive from the client.
The repository also contains:
- A communication library for the mTLS Ping API.
- Unit tests that can be used to automate testing of mTLS connectivity.
- A command-line tool for testing mTLS connectivity.
- A method for testing mTLS connectivity manually, using a browser.
- Information about requirements for client certificates.
- Instructions on how to install the package on a Neuron.
Validating Electronic Travel Documents & ICAO PKI Certificates
When validating electronic Travel Documents, applications need to validate against corresponding issuer certificates not managed by the operating system. To do that, the application needs to get access to these certificates somehow, and build custom X.509 chains during validation. To avoid having such an application to embed the entire list of all these issuer certificates, a list which also get regularly updated, a new repository and package is available that publishes these certificates on Neurons where the package gets installed. Applications can easily check with the corresponding neuron and download the required certificates, based on the Authority Key Identifiers available in the Electronic Travel Document certificates.
| Information about the ICAO PKI Certificate package | |
|---|---|
| Package | IcaoPkiCertificates.package |
| Installation key | vAa0l/iFHVogQYUzm+Zs6qPsw+7lYrnyFn4MNAGA7+Gso442gJJMKjknHqka/YjM6gZZSS65HL8Adbfba1067a1a27163b905869469d6f0d |
| More information | https://github.com/Trust-Anchor-Group/IcaoPkiCertificates |
#features, #id, #kyc, #neuron, #api, #repository, #package, #new
Testing WebHooks
When developing server-to-server applications, it is important to be able to test webhooks without leaking sensitive or private information. To avoid having to use 3rd party services, such as webhook.site a new package has been made available containing a service that can be installed on any Neuron®, that allows you to view incoming POST requests in a similar fashion.
Installable Package
The Web-Hook Tester service has been made into a package that can be downloaded and installed on any TAG Neuron. If your Neuron is connected to the TAG Neuron network, you can install the package using the following information:
| Package information | |
|---|---|
| Package | TAG.WebHookTester.package |
| Installation key | Mb9pim8FTjHBnju2f2ZVNHBRbOG3VHhM7iBn26mgcvc/uwjouWjHEF0OmcC/noKEuZAOWZY6Ka4A4abb4fc2a2596e04f047400e3218dcd2 |
| Repository | WebHookTester repository at GitHub |
Installing the package via the administrative console (Chat Admin), can be done using the following command:
install nobackup TAG.WebHookTester.package Mb9pim8FTjHBnju2f2ZVNHBRbOG3VHhM7iBn26mgcvc/uwjouWjHEF0OmcC/noKEuZAOWZY6Ka4A4abb4fc2a2596e04f047400e3218dcd2
Starting service
The WebHook tester service appears in the administrative portal, in the Software section:

Pressing it, opens the following page: https://lab.tagroot.io/WebHookTester/Show.md

Note: This page does not require client authentication, and can be used anonymously.
Note 2: You can also use the script prompt to make custom POST calls to the page. This requires elevated privileges however, and cannot be done anonymously.
Creating a Page
Enter an ID and press the Start button to create a new page you can POST to. Since the service can be accessible by anyone, use an ID that is difficult to guess, if you do not want others to get easy access to the information. Press the Randomize button to create a random ID. You can customize the random ID to remember the purpose of the page, if you have multiple pages open.

Test Page
When you press the Start button, a new page is opened. It contains instructions how you can POST to the page:
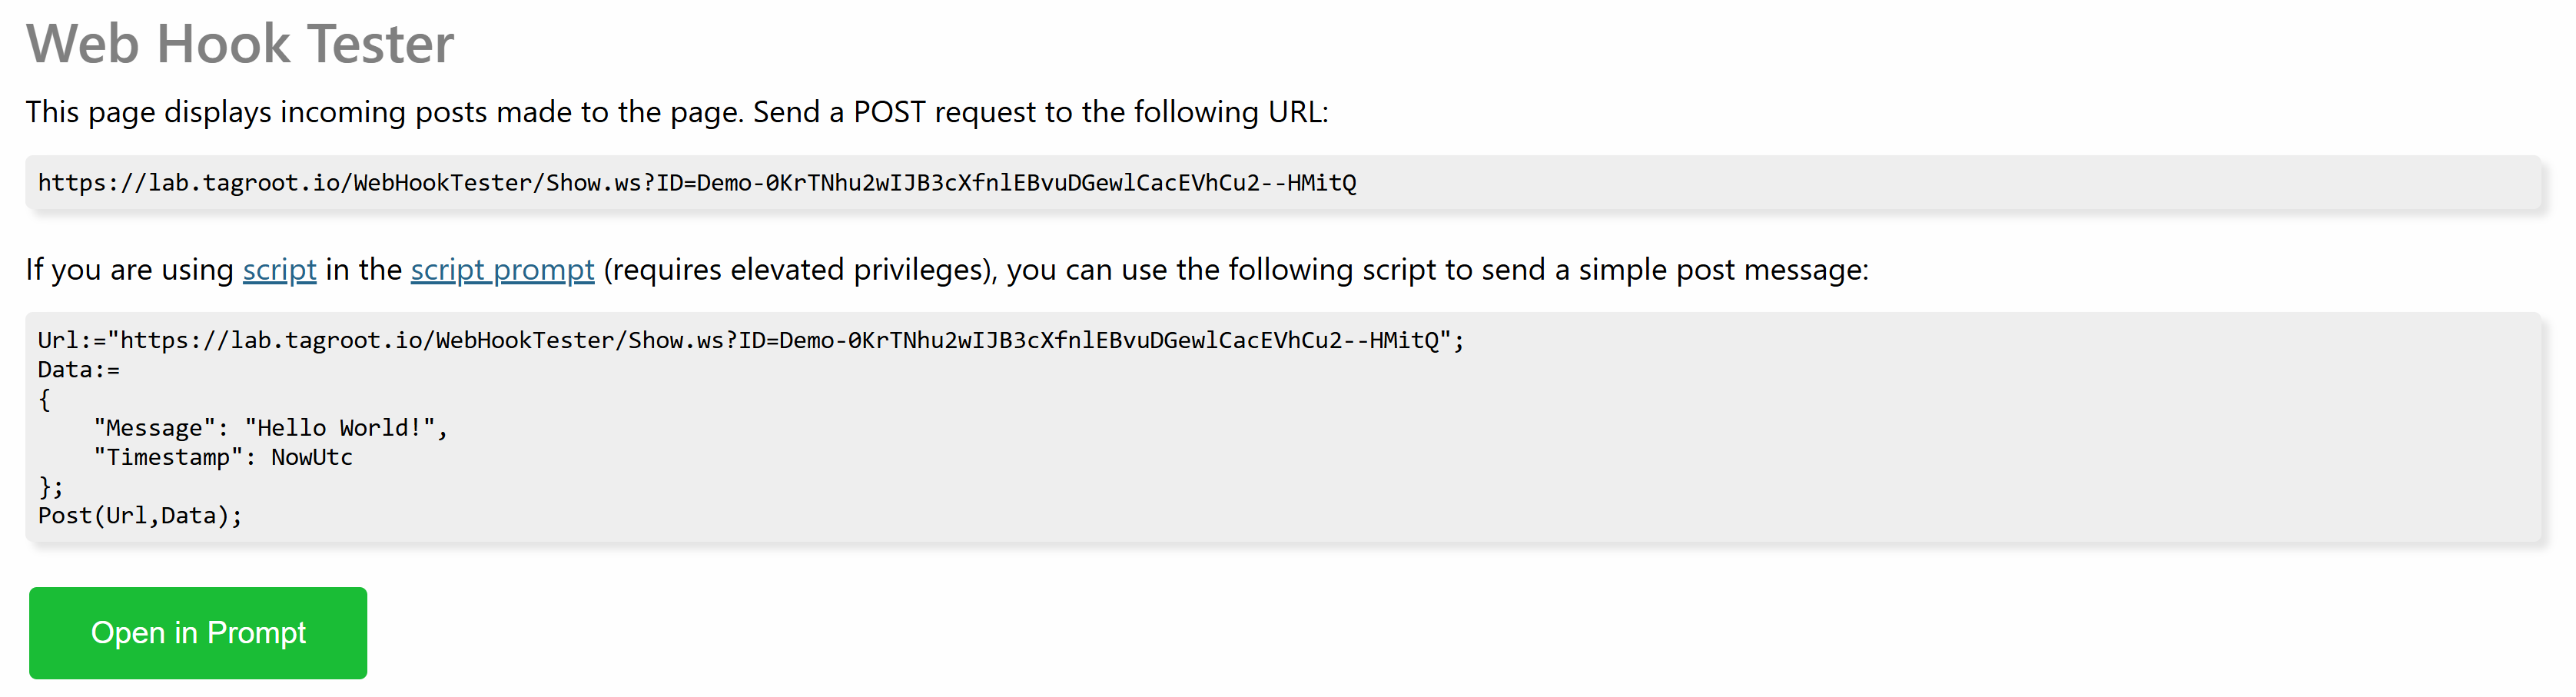
Use the URL presented to POST to the page. If you want to test a back-end service integration, this is the URL you provide as a webhook callback URL. Any POST made to this URL will be displayed on the page.
Note: Nothing is saved or persisted on the page. The page does not remember previous POSTs, so if you refresh the page you loose the information on the page.
Note 2: Make sure to differentiate between the URL of the page (which points to a resource with extension .md) and the URL to POST to (which points to a resource with extension .ws).
Incoming POSTs
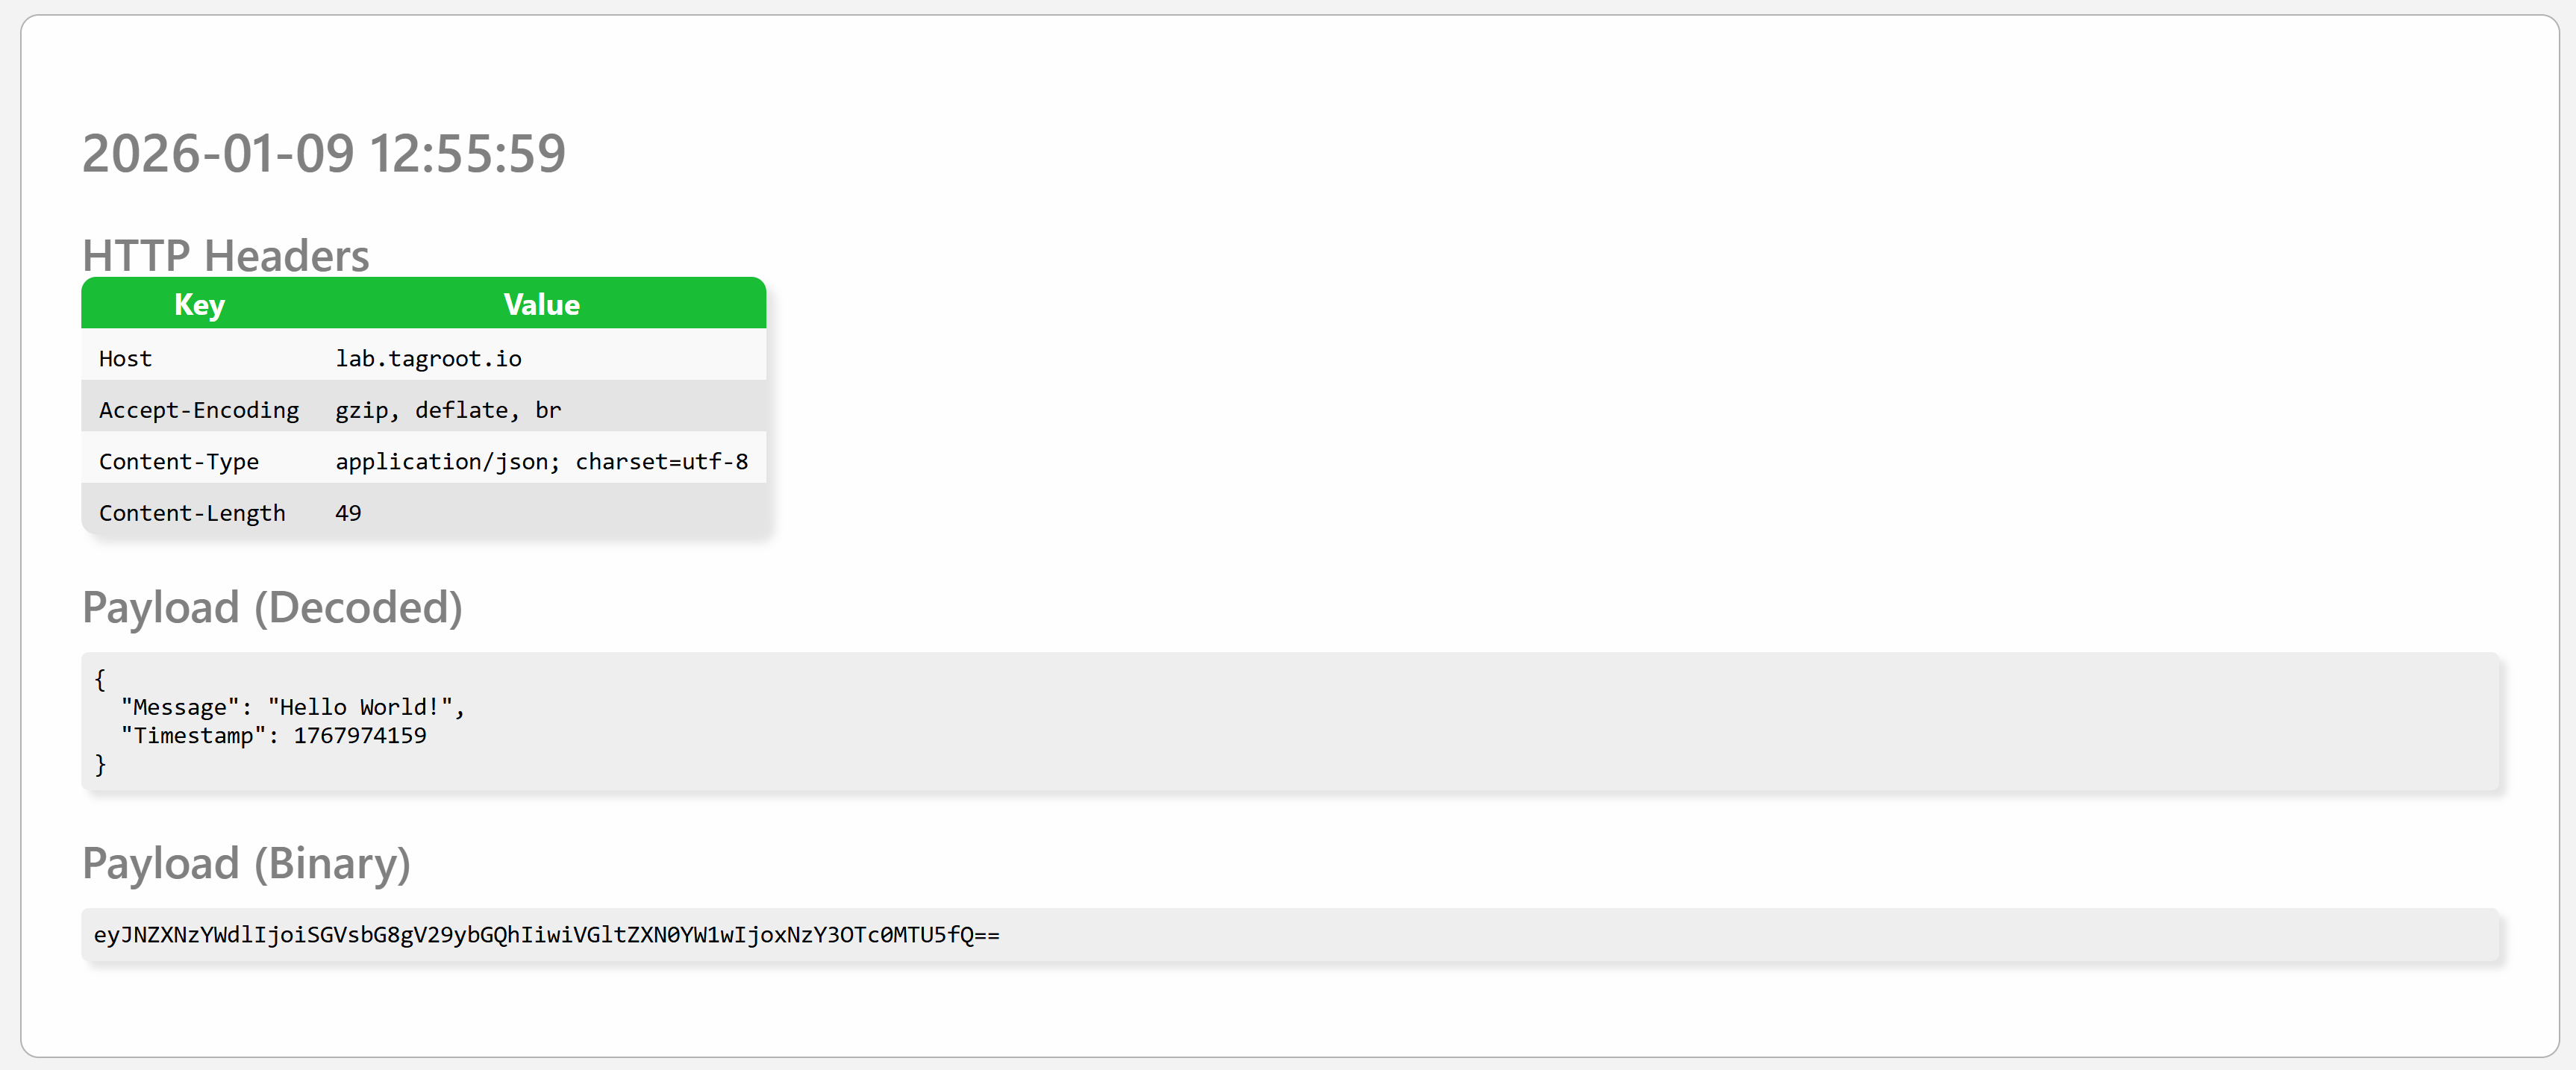
As soon as an incoming POST is made, it is displayed on the page as follows. It displays the time of the event, any HTTP headers in the request, together with a textual representation of the payload (if content is text-based), as well as the binary payload, BASE64-encoded. Each POST is presented in its own SECTION tag on the page.
Responses
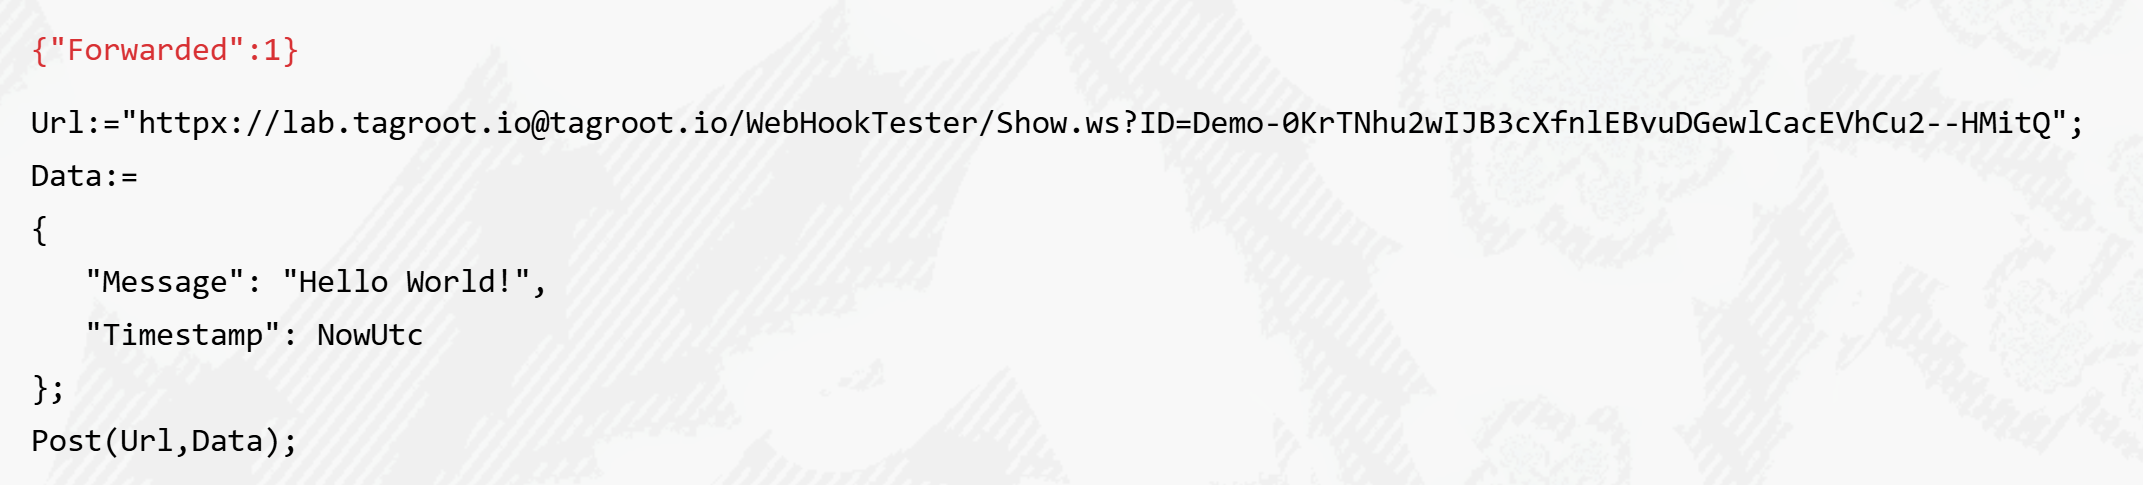
The response to a POST call to the resource will be a JSON object with one property called Forwarded, which indicate the number of pages the information was forwarded to. If this number is 0, the page has closed or lost contact with the Neuron. Example:
{
	"Forwarded":1
}
Tunneling POST request over XMPP
As the Neuron is connected to the XMPP network as well, since it is hosted on the IoT Gateway, the POST request can be tunneled over the XMPP network using the httpx:// URI scheme. This permits you to do callbacks to local development machines, or machines not accessible via the Internet.
To achieve this, you need to perform the call from another instance hosted on the IoT Gateway. It can be the IoT Gateway itself, Lil’Sis’ or another instance of the TAG Neuron, including a development version on a local machine. You replace the https scheme in the URI with the httpx URI scheme, and replace the host with the JID of the recipient. For the call to succeed, the sender and receiver need to be friends, i.e. have approved presence subscriptions, for the call over XMPP to be possible.
This can be easily tested using the script prompt:
Note: Any software using the Waher.Content Internet Content-Type abstraction, and the InternetContent content access methods, together with the Waher.Networking.XMPP.HTTPX library (containing the httpx URI scheme definition) will automatically support httpx URIs.
Note 2: Since the QuickLogin API and RemoteLogin API are both hosted on the TAG Neuron®, you can register httpx callback URIs with these APIs. This makes it possible to host the recipient service behind a firewall, as long as it supports the HTTP over XMPP protocol
NodeJs installable package
github: https://github.com/Trust-Anchor-Group/TAG.NodeJs
Free package which installs Node JS version 24.11.1 on the running TAG Neuron® at $AppDataFolder/Packages/nodejs/node\.exe
Installable Package
The Node JS installer has been made into a package that can be downloaded and installed on any TAG Neuron. To create a package, that can be distributed or installed, you begin by creating a manifest file. This repository contains a manifest file called TAG.NodeJs.manifest. It defines the content files included in the package. You then use the Waher.Utility.Install and Waher.Utility.Sign command-line tools in the IoT Gateway repository, to create a package file and cryptographically sign it for secure distribution across the Neuron network.
The Node JS installer is published as a package on TAG Neurons. If your Neuron is connected to this network, you can install the package using the following information:
| Package information | |
|---|---|
| Package | TAG.Nodejs.package |
| Installation key | aKY7N1VcoNeDvWXRTyLSoP1ZmrkPkIrh6nIgffiOrjM9Ix+qkT9C7lWn8O2NCcZ/PmuSO9T6S/uA1535b7c39de3bfd6f8f762ce76c92053 |
| More Information | |
Usage
The package does not set the machines PATH environment variable to enable use of
node index.js
in a terminal, you have to specify the full path (eg: C:/Program Data/IoT Gateway/Packages/nodejs/node.exe) or use the runtime setting using web script (.ws)
exec := GetSetting("NodeJS.Executable.Path", "");
ShellExecute(exec, "index.js", "");
or in c#
string ExecPath = await RuntimeSettings.GetAsync("NodeJS.Executable.Path", string.Empty);
Settings Page
The settings page is /NodeJs/Settings.md.
Neuro Exchange Theme
The Neuro Exchange theme has been made into a package that can be downloaded and installed on any TAG Neuron. You can configure to use this theme in the Theme menu accessible from the admin dashboard.
| Package information | |
|---|---|
| Package | TAG.NeuroExchange.Theme |
| Installation key | BGVWw9FYGj6+mY8nxScZgoKRC8SiV80mWJhHXfUZL3ASrwZSab5PdEwmyfwpJVUEWEMNST4HWayA1640d45c2eae16ecf48e883c75dd25f7 |
| More Information | https://github.com/Trust-Anchor-Group/TAG.NeuroExchange.Theme |

Posts tagged #package
No more posts with the given tag could be found. You can go back to the main view by selecting Home in the menu above.