Performance Reports
A new set of reports are available to operators of a Neuron® (since build 2025-02-12). The performance of the neuron, such as CPU, free internal memory and free hard disk space is sampled. Statistics, such as Mean, Min, Max, Variance and Standard Deviation is calculated in windows of one minute and then stored. The new performance reports allows operators to view historically how these parameters change.
The performance reports are available in a new data source called Reports. (Apart from the performance reports, the new data source also houses previous reports available in the Protocols and Data data sources, which have now been removed.) You can access the Reports data source via any harmonized interface used to administer the Neuron®, or using the Node Explorer (available from the administration page, under Sources & Nodes.

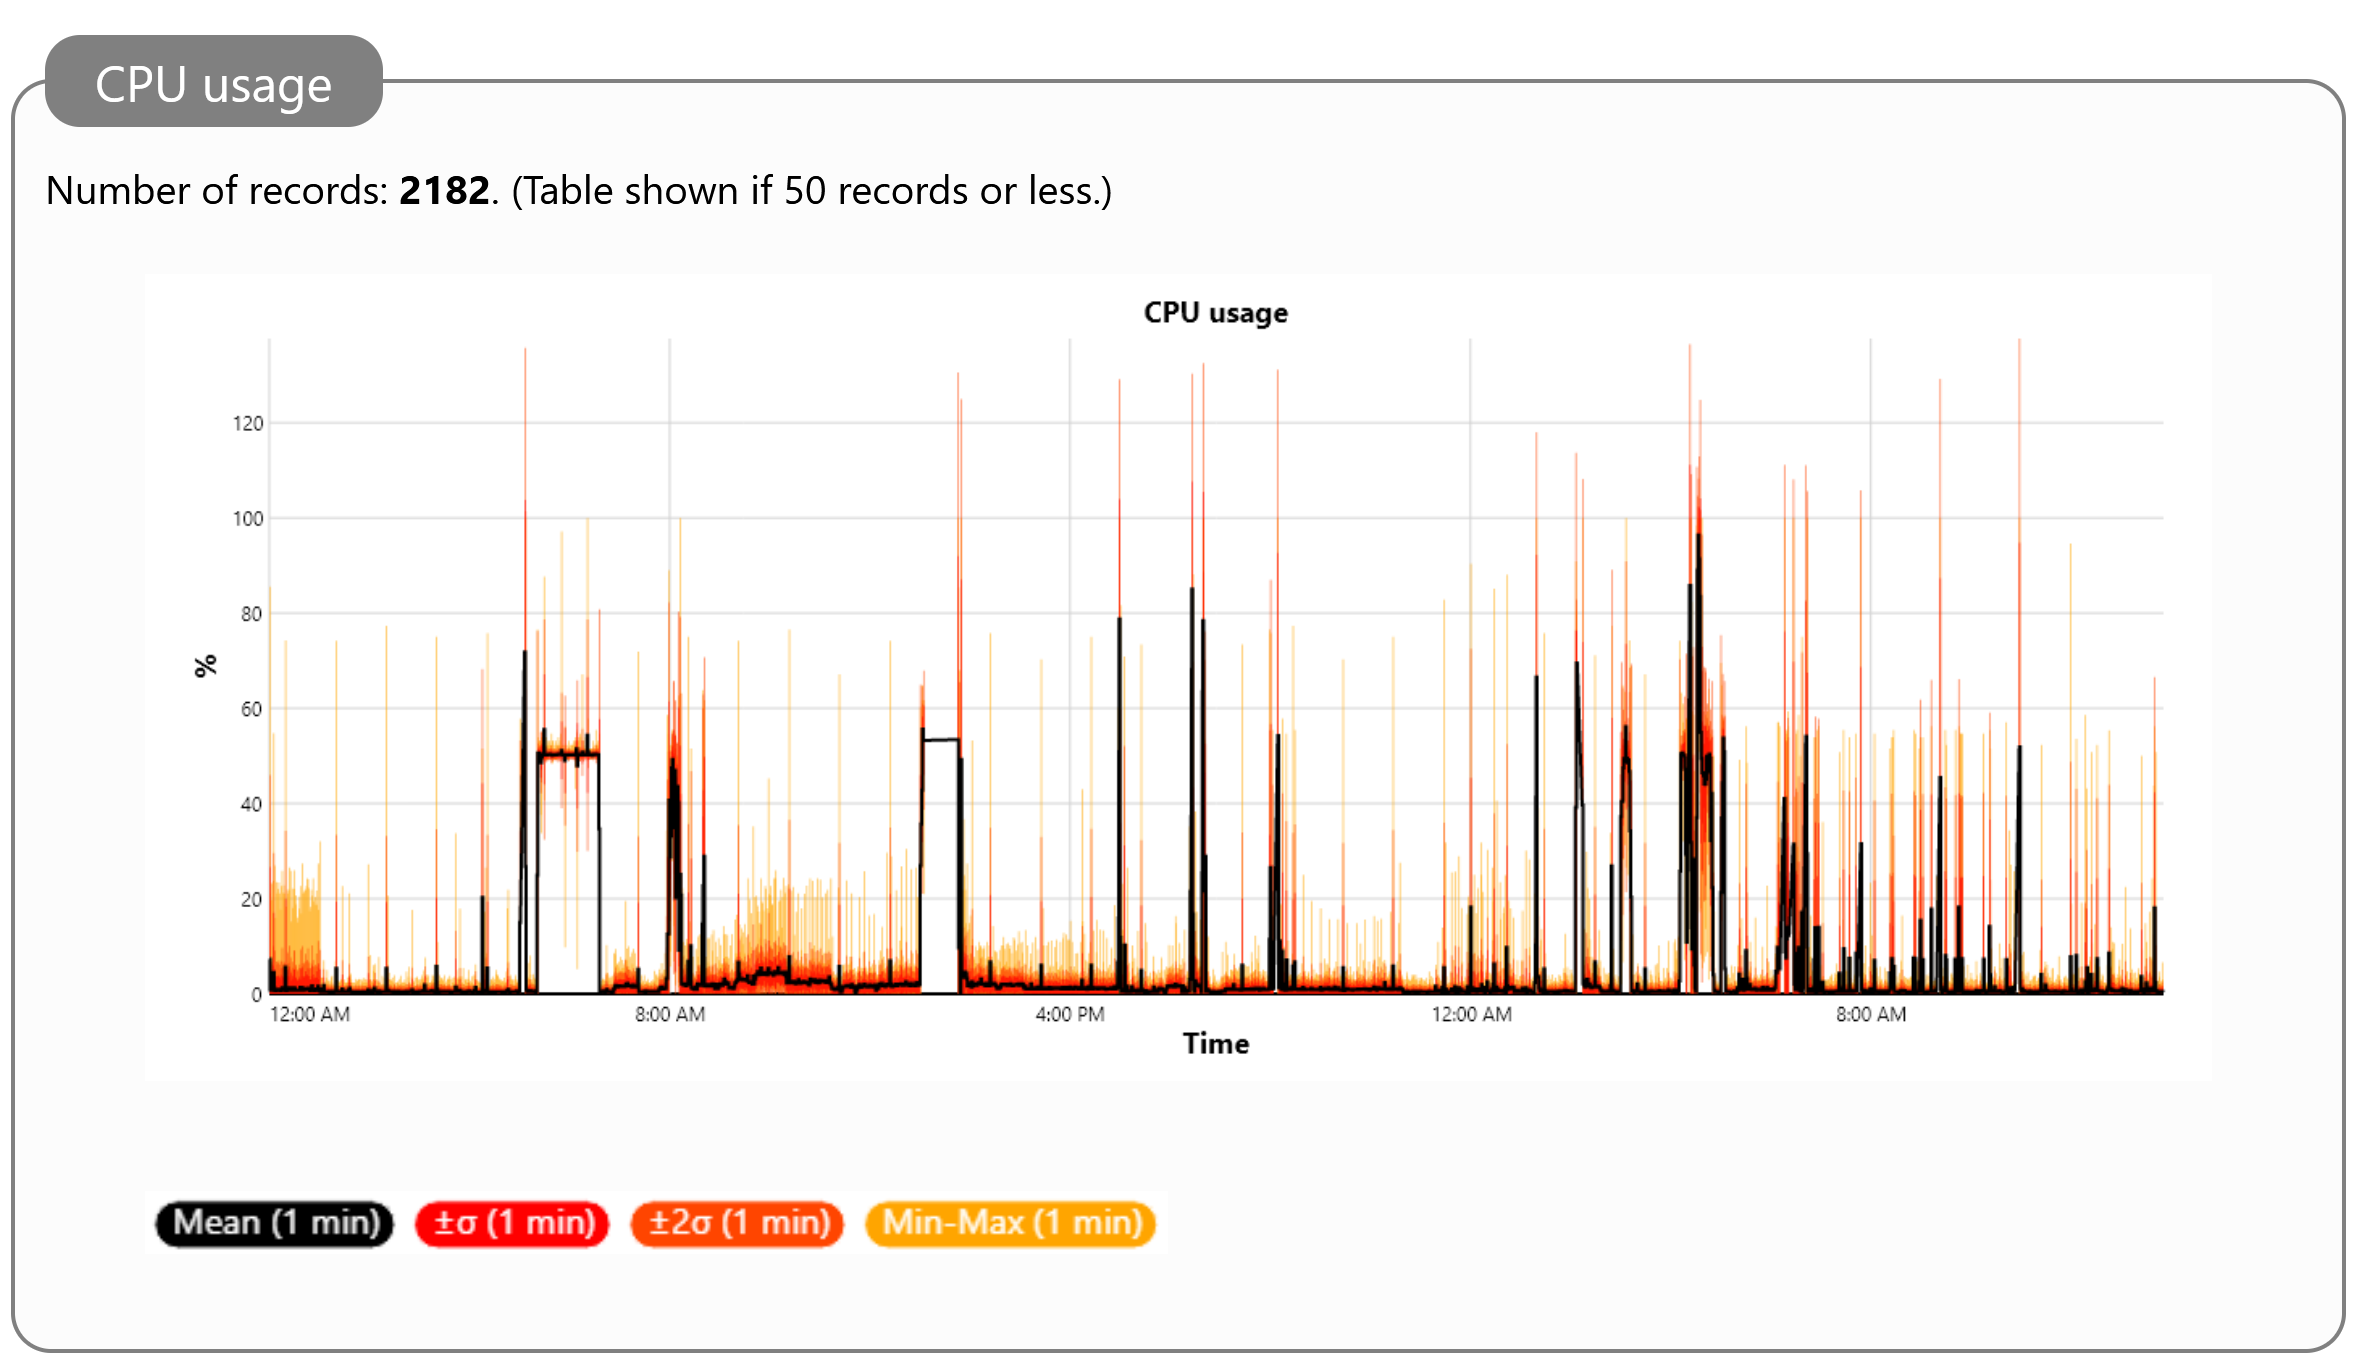
By executing the CPU Usage report, you can see if there’s sufficient CPU power, or if the service is under pressure during certain times, for instance:
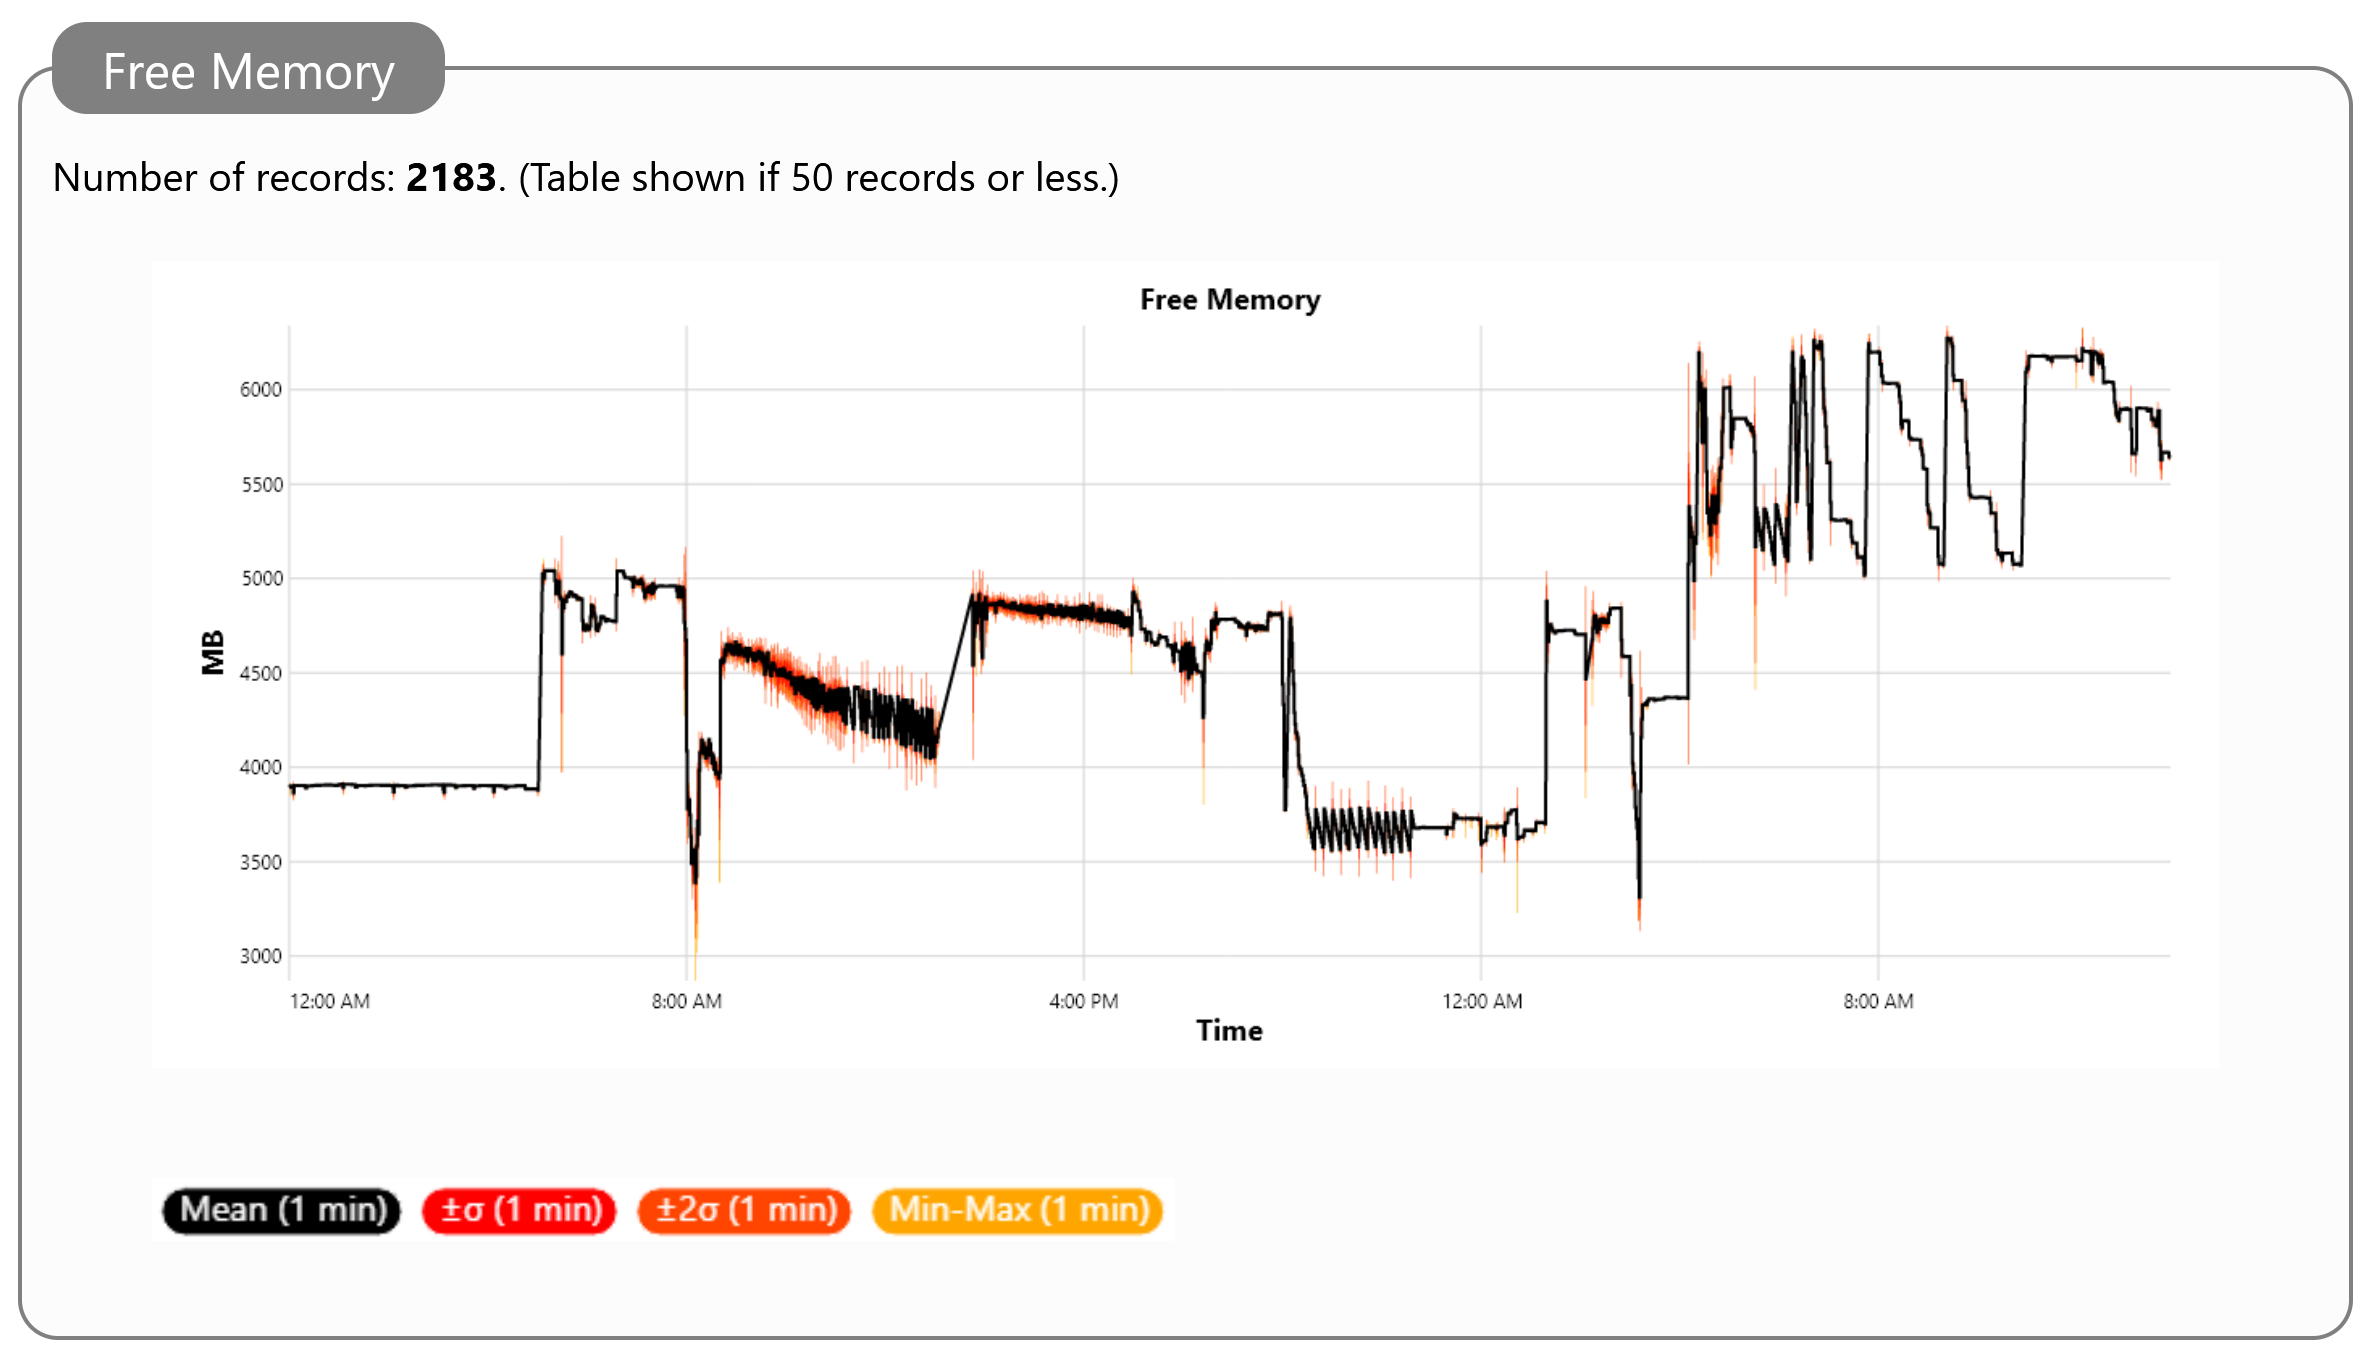
The Free Memory report lets you know if the computer hosting the Neuron® has sufficient internal memory (RAM) for the processes that runs on it:
The Free HD report shows available Hard Disk space on the drive that hosts the application data folder for the Neuron®.

Performance Monitoring
While sampling the performance parameters, monitors also check if the values indicate resources are running out. If CPU usage is elevated, or free internal memory or hard disk space is low, alerts are generated to notify operators about the situation. If conditions worsen, emergencies are logged to alert the operators, before the machine stops working.
Configuring HTTP/2 settings on a Neuron
From build 2025-01-24 it is possible to configure HTTP/2 settings in the Nueron®. These are settings that are available in the gateway.config file. They are applied during startup of the Neuron®, and require a restart of the Neuron®, if changed.
You can also edit the settings from the Sources & Nodes option in the administrative menu. In the screen that appears, you select the Gateway configuration source, and the WebServer node:

Pressing the Edit... button shows the properties of the WebServer node. Scrolling down, you find the HTTP/2 header, and the corresponding HTTP/2-related attributes you can configure. After setting the values, press the Apply button. This will update the gateway.config file. You have to restart the Neuron® for the changes to take effect.
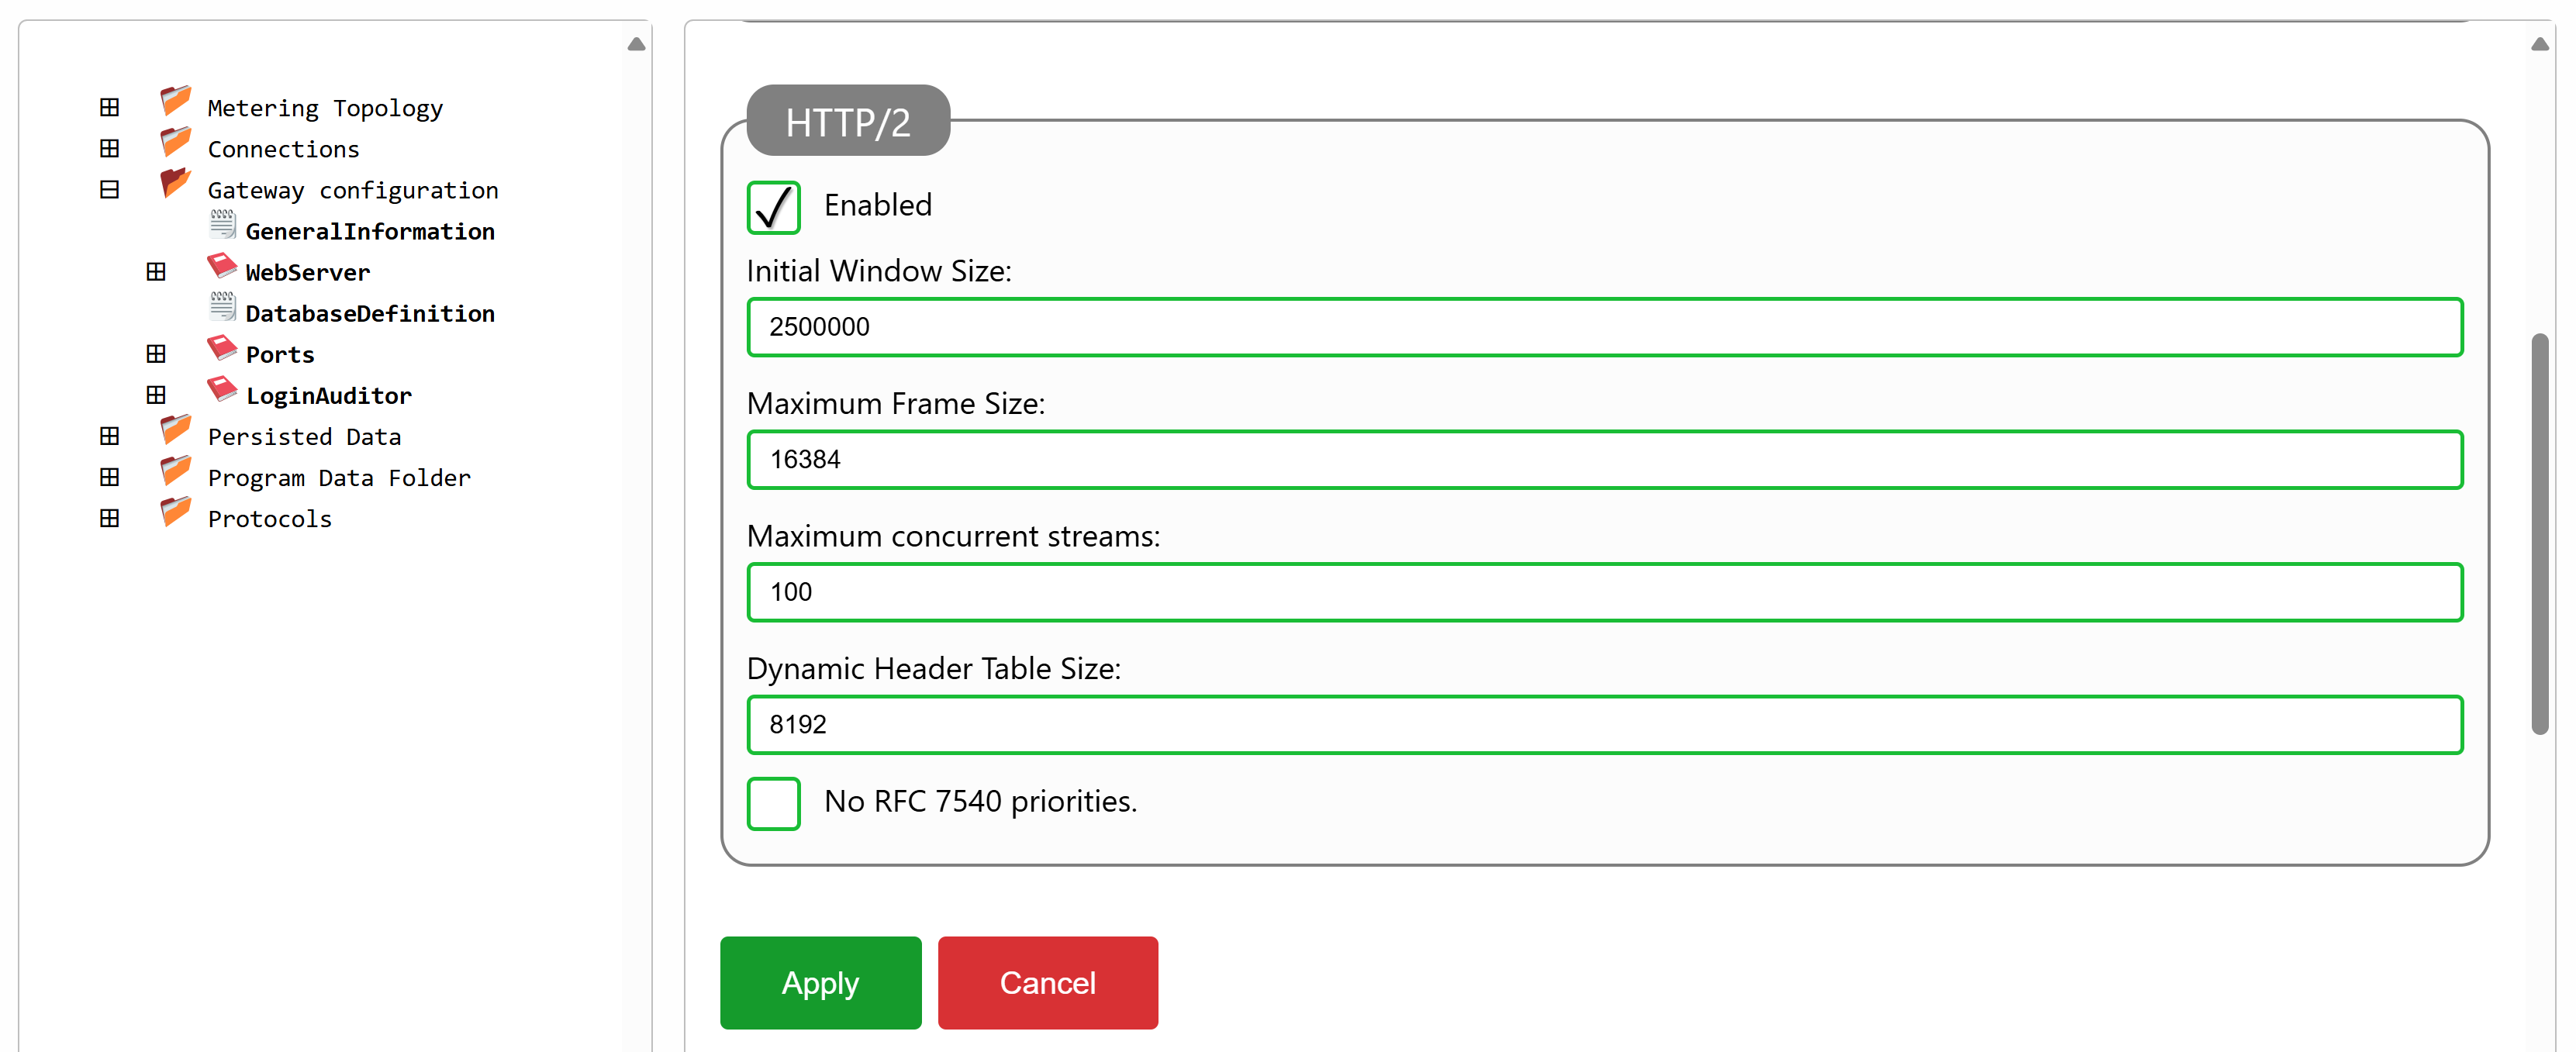
For a reference to the meaning of these settings, see the following normative texts:
Quick-Admin-Login
It is now possible to associate a legal ID (or a Neuro-Access ID) with an administrative account on the Neuron®, from the build 2025-01-21. The login page now shows an animated QR code that you can can using the Neuro-Access app.

To associate a Neuro-Access ID (or legal ID) to a user account, edit the corresponding user. You will see three fields that have to be provided: The current Legal ID and the corresponding personal number and country code. You can get these from quicklog.in if not known.

Once the information has been provided, you can login to the administrative console of the Neuron® using the corresponding legal ID.
Updating ID
As legal identities are limited in time, there will come a point when an ID needs to be updated. This will obsolete the old ID, which will be replaced by a new one. As long as this process is followed (i.e. old ID is obsoleted) and the new ID contains the same personal number and country code you can also use the new ID to login to the same user account. The legal identity reference will be correspondingly updated, and an event will be logged, for reference.
Event Log
All administrative logins are logged to the event log, so too the logins using Neuro-Access digital identities. The message text and corresponding properties may be different. Any problems such as duplicate legal identities associeted with multiple accounts, etc., will also be displayed in the event log.
#new, #features, #neuron, #admin, #neuro-access, #quicklogin
Viewing HTTP Statistics
Each Neuron® collects statistics of how the HTTP interface on the Neuron® is used. You can view this statistics from the Node Explorer available from the Administration page, or from any harmonized interface you can access with sufficient privileges.
In the Node Explorer, Open the source Protocols and select the HTTP node. From the details view, press the Commands button. The Statistics command will be shown. Press this button to open the query parameters. You can either show statistics from the entire logged period, or you can enter a time interval over which the statistics will be shown:
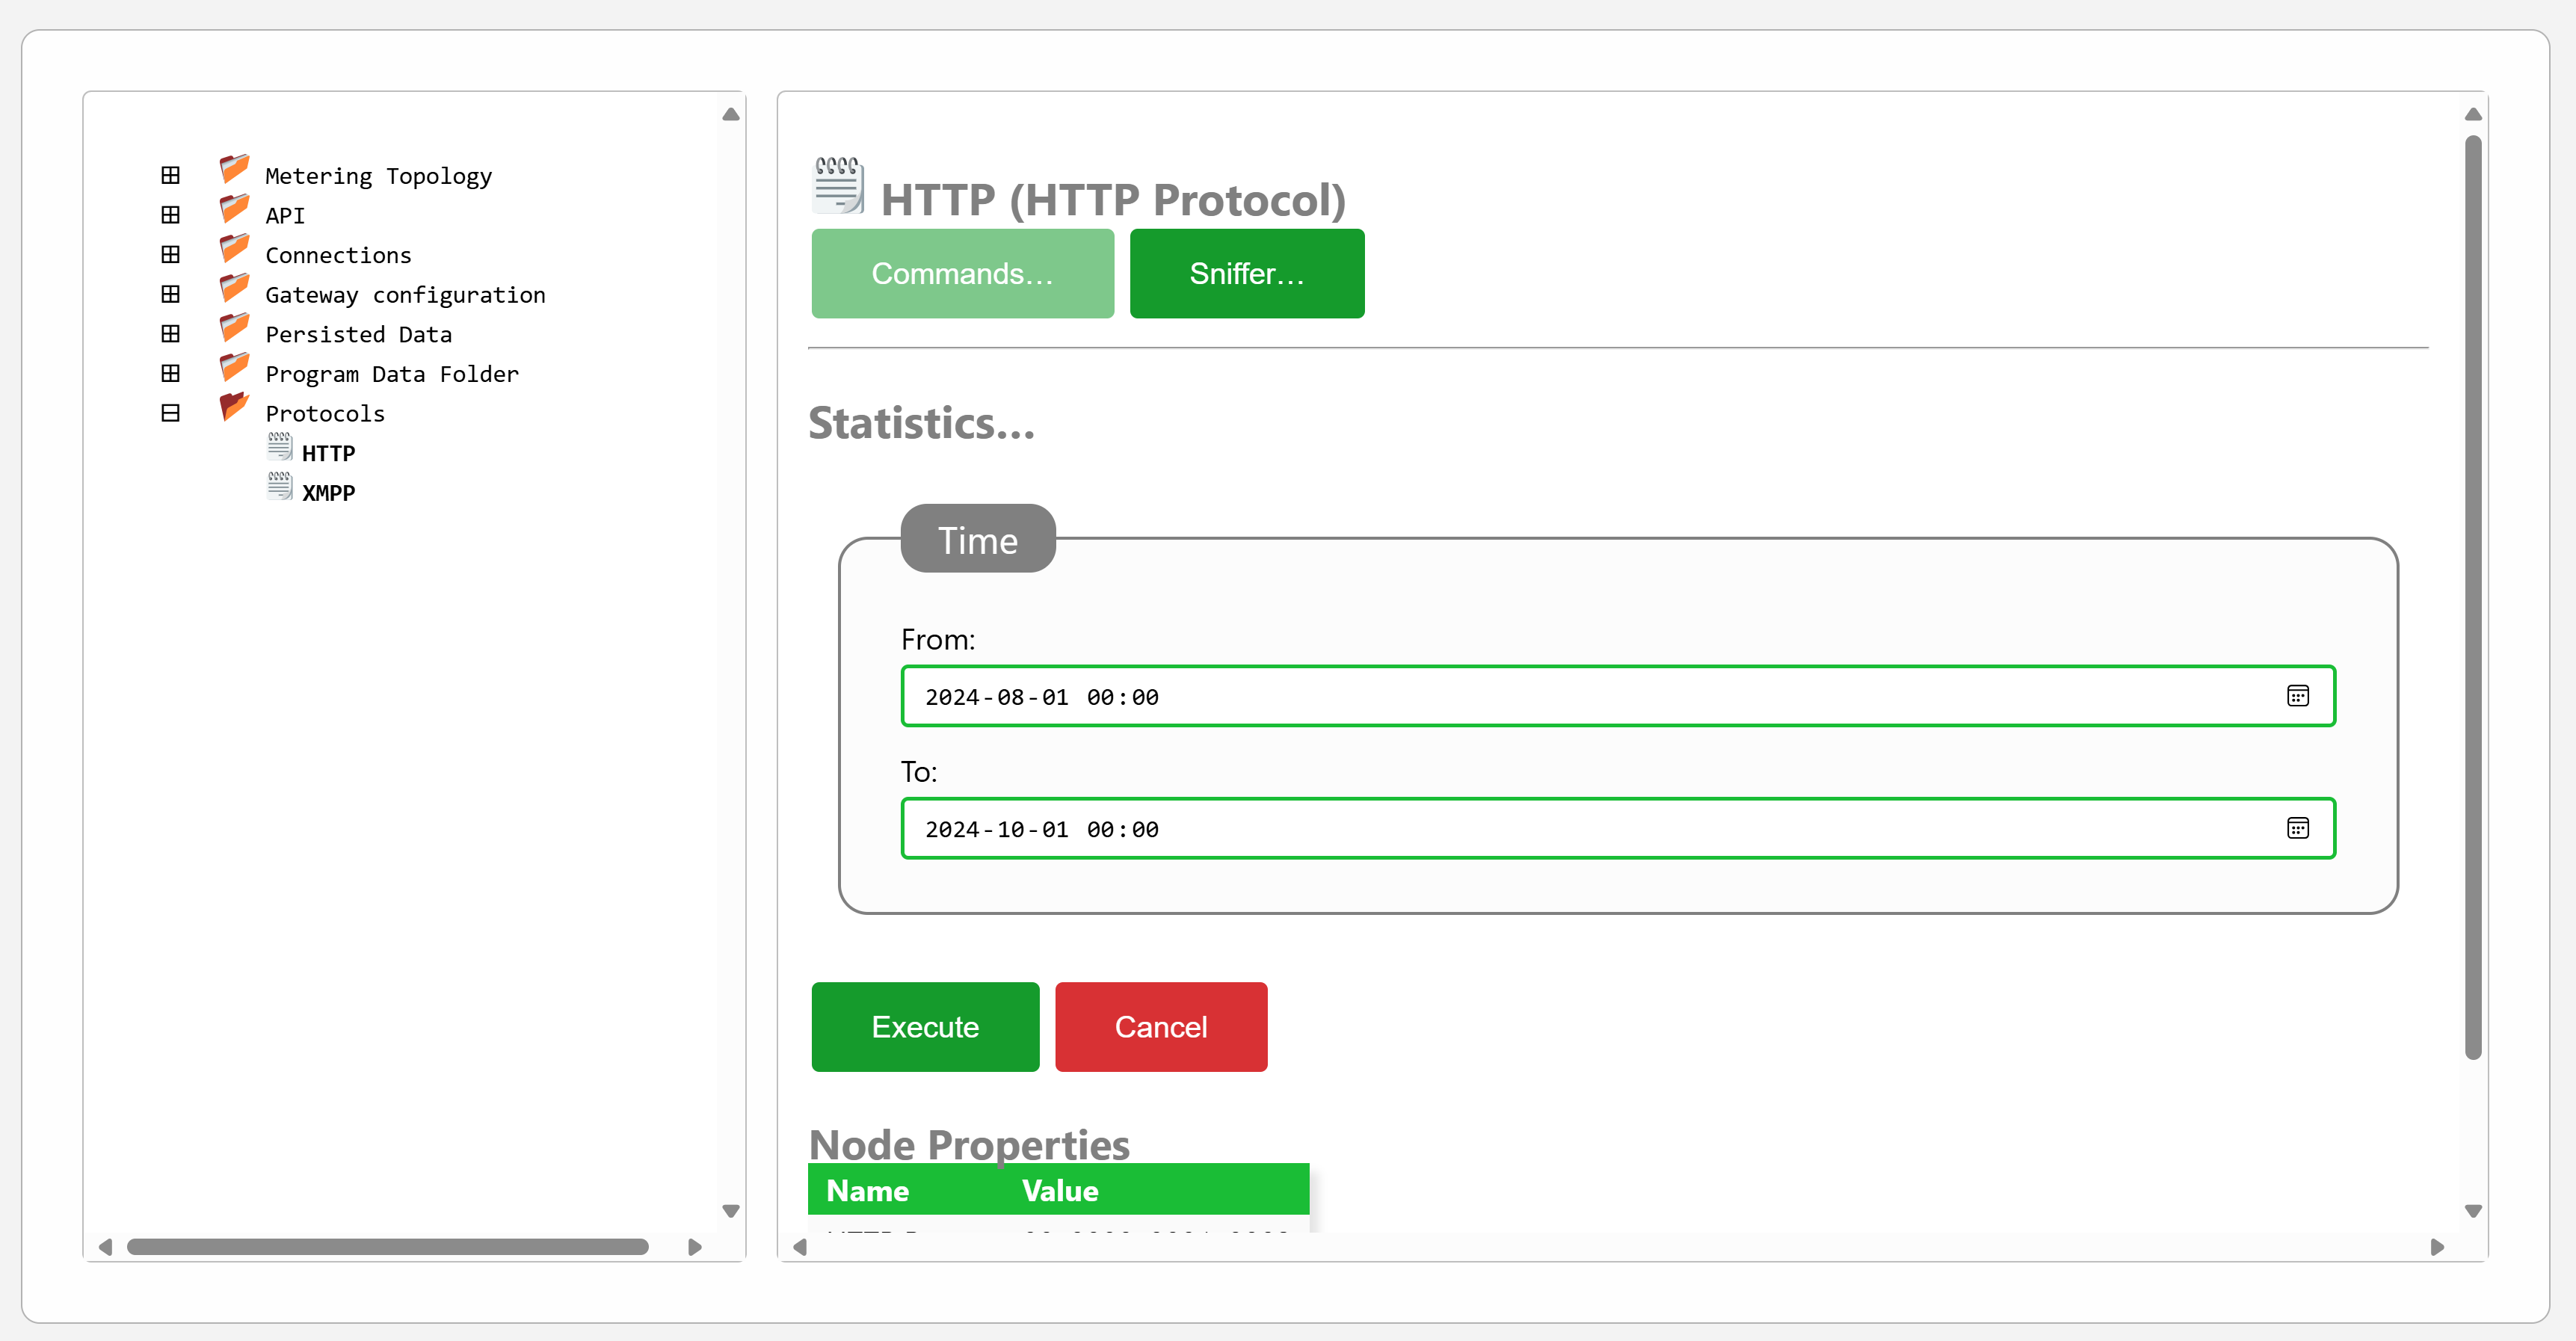
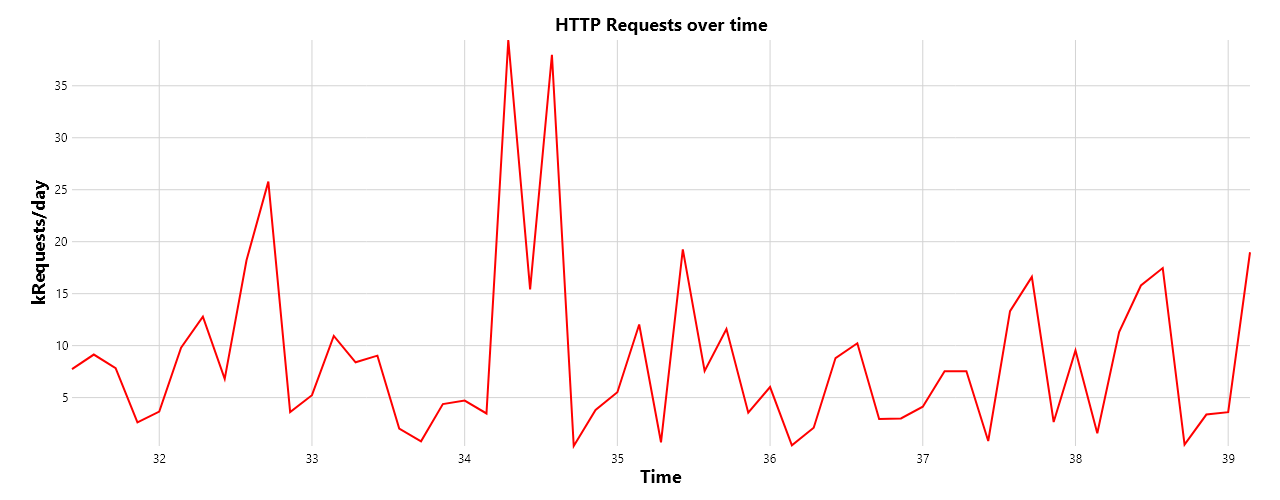
Click the Execute button to execute the query. A report will be generated. The report will contains the number of requests per day, over the time period:
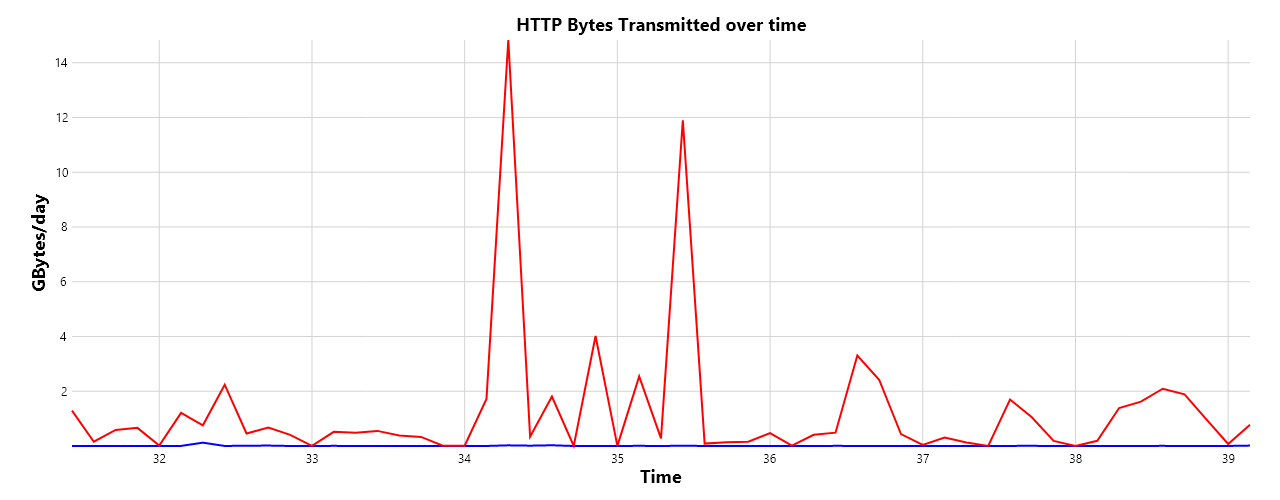
You can also see the amount of data transmitted and received, per day:

You can see calls distributed by HTTP method (including invalid method used by strange actors):

Next graph shows calls made by different user agents, as defined by the User-Agent HTTP header. To collect user agents, digits and contents within parenthesis have been replaced by # and ... respectively.

Then follows calls per source, as defined by the From HTTP header. The @ character can signify either an e-mail address, or an XMPP-address (in case HTTPX is used). All IP address sources are collected into one record.

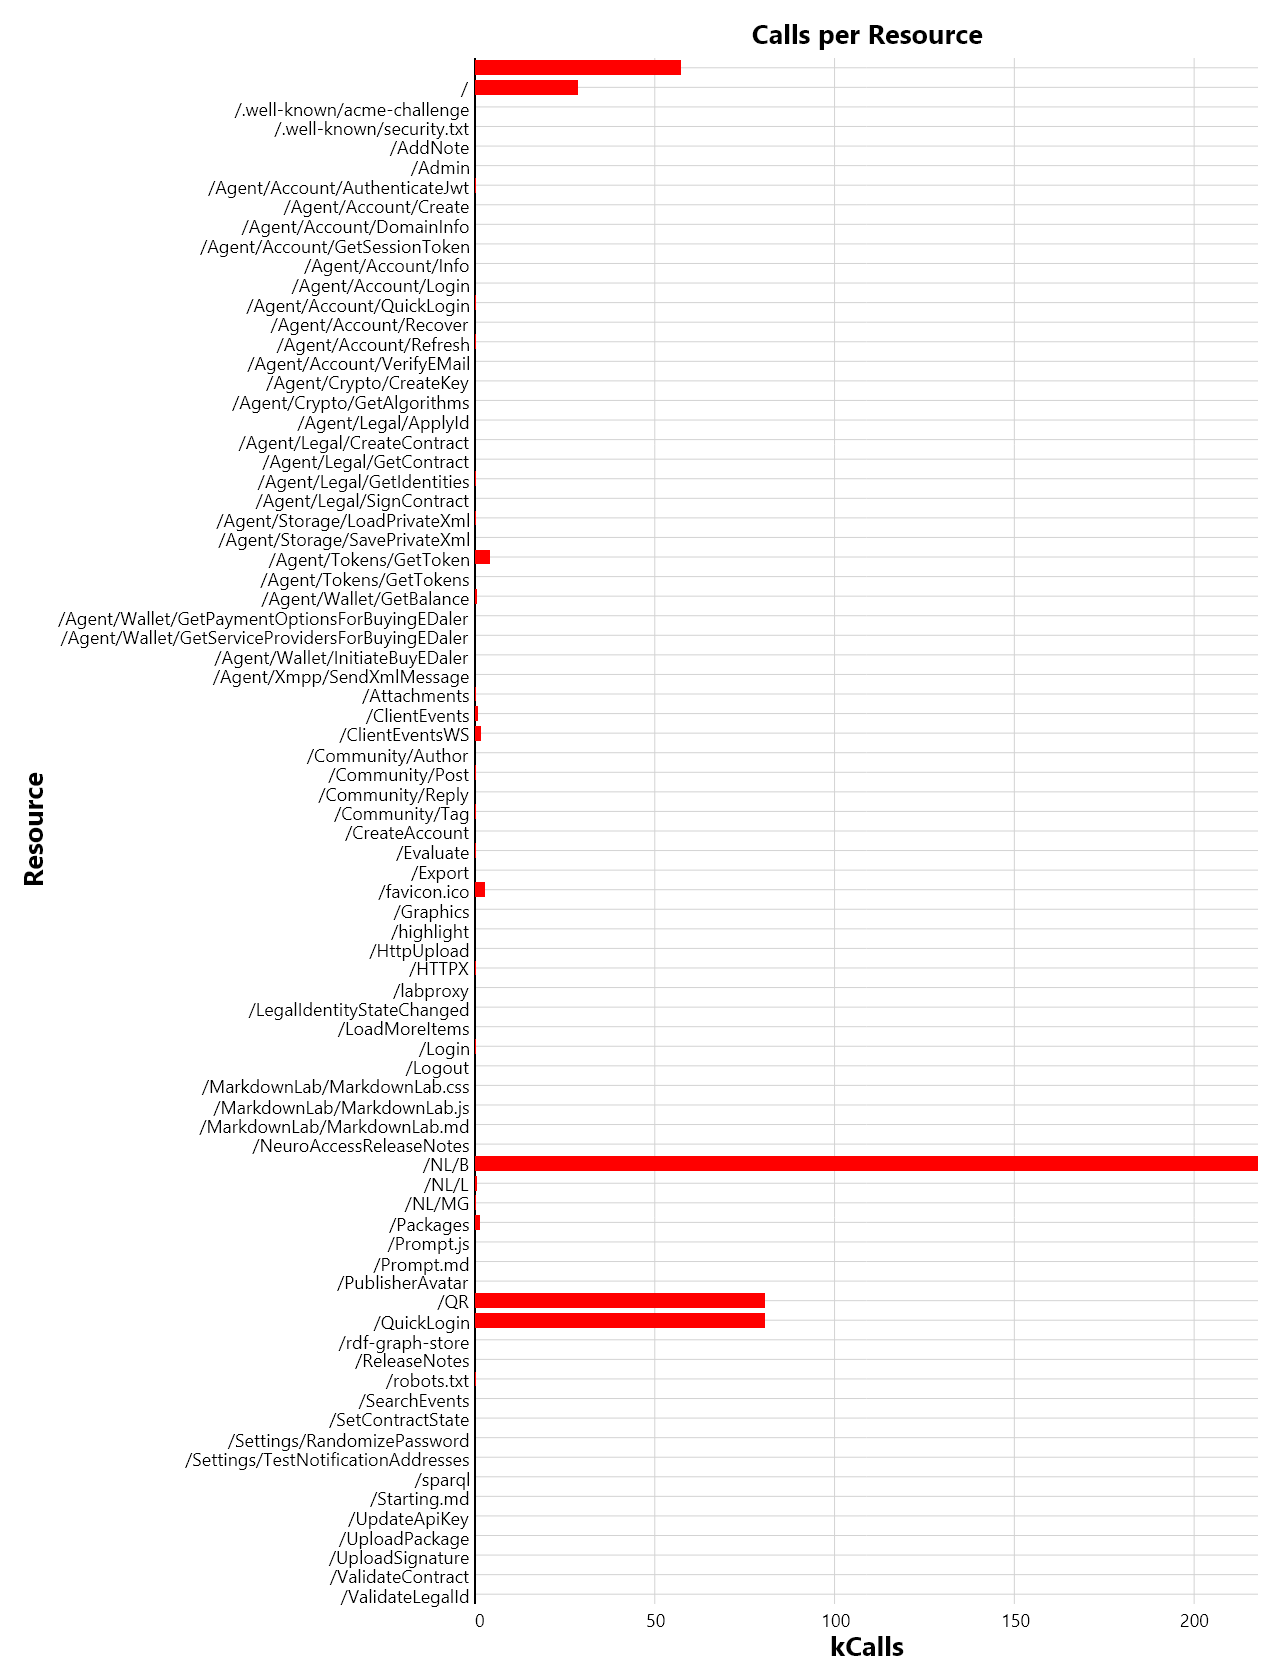
Finally, a graph of which registered resources receive the calls. This graph only counts registered resources, and not the sub-resources each resource might handle. The folder name for a File folder resource will therefore be counted each time a file in that folder is requested.
Domain-specific web configurations
Certain configurations in the TAG Neuron® need to be different, depending on domain used to access it. The Neuron® has one main domain, and up to 99 alternative domains. Each such domain can host domain-specific content. It can also have domain-specific configurations. This article lists how to perform such configurations and host such content.
Alternative Domains
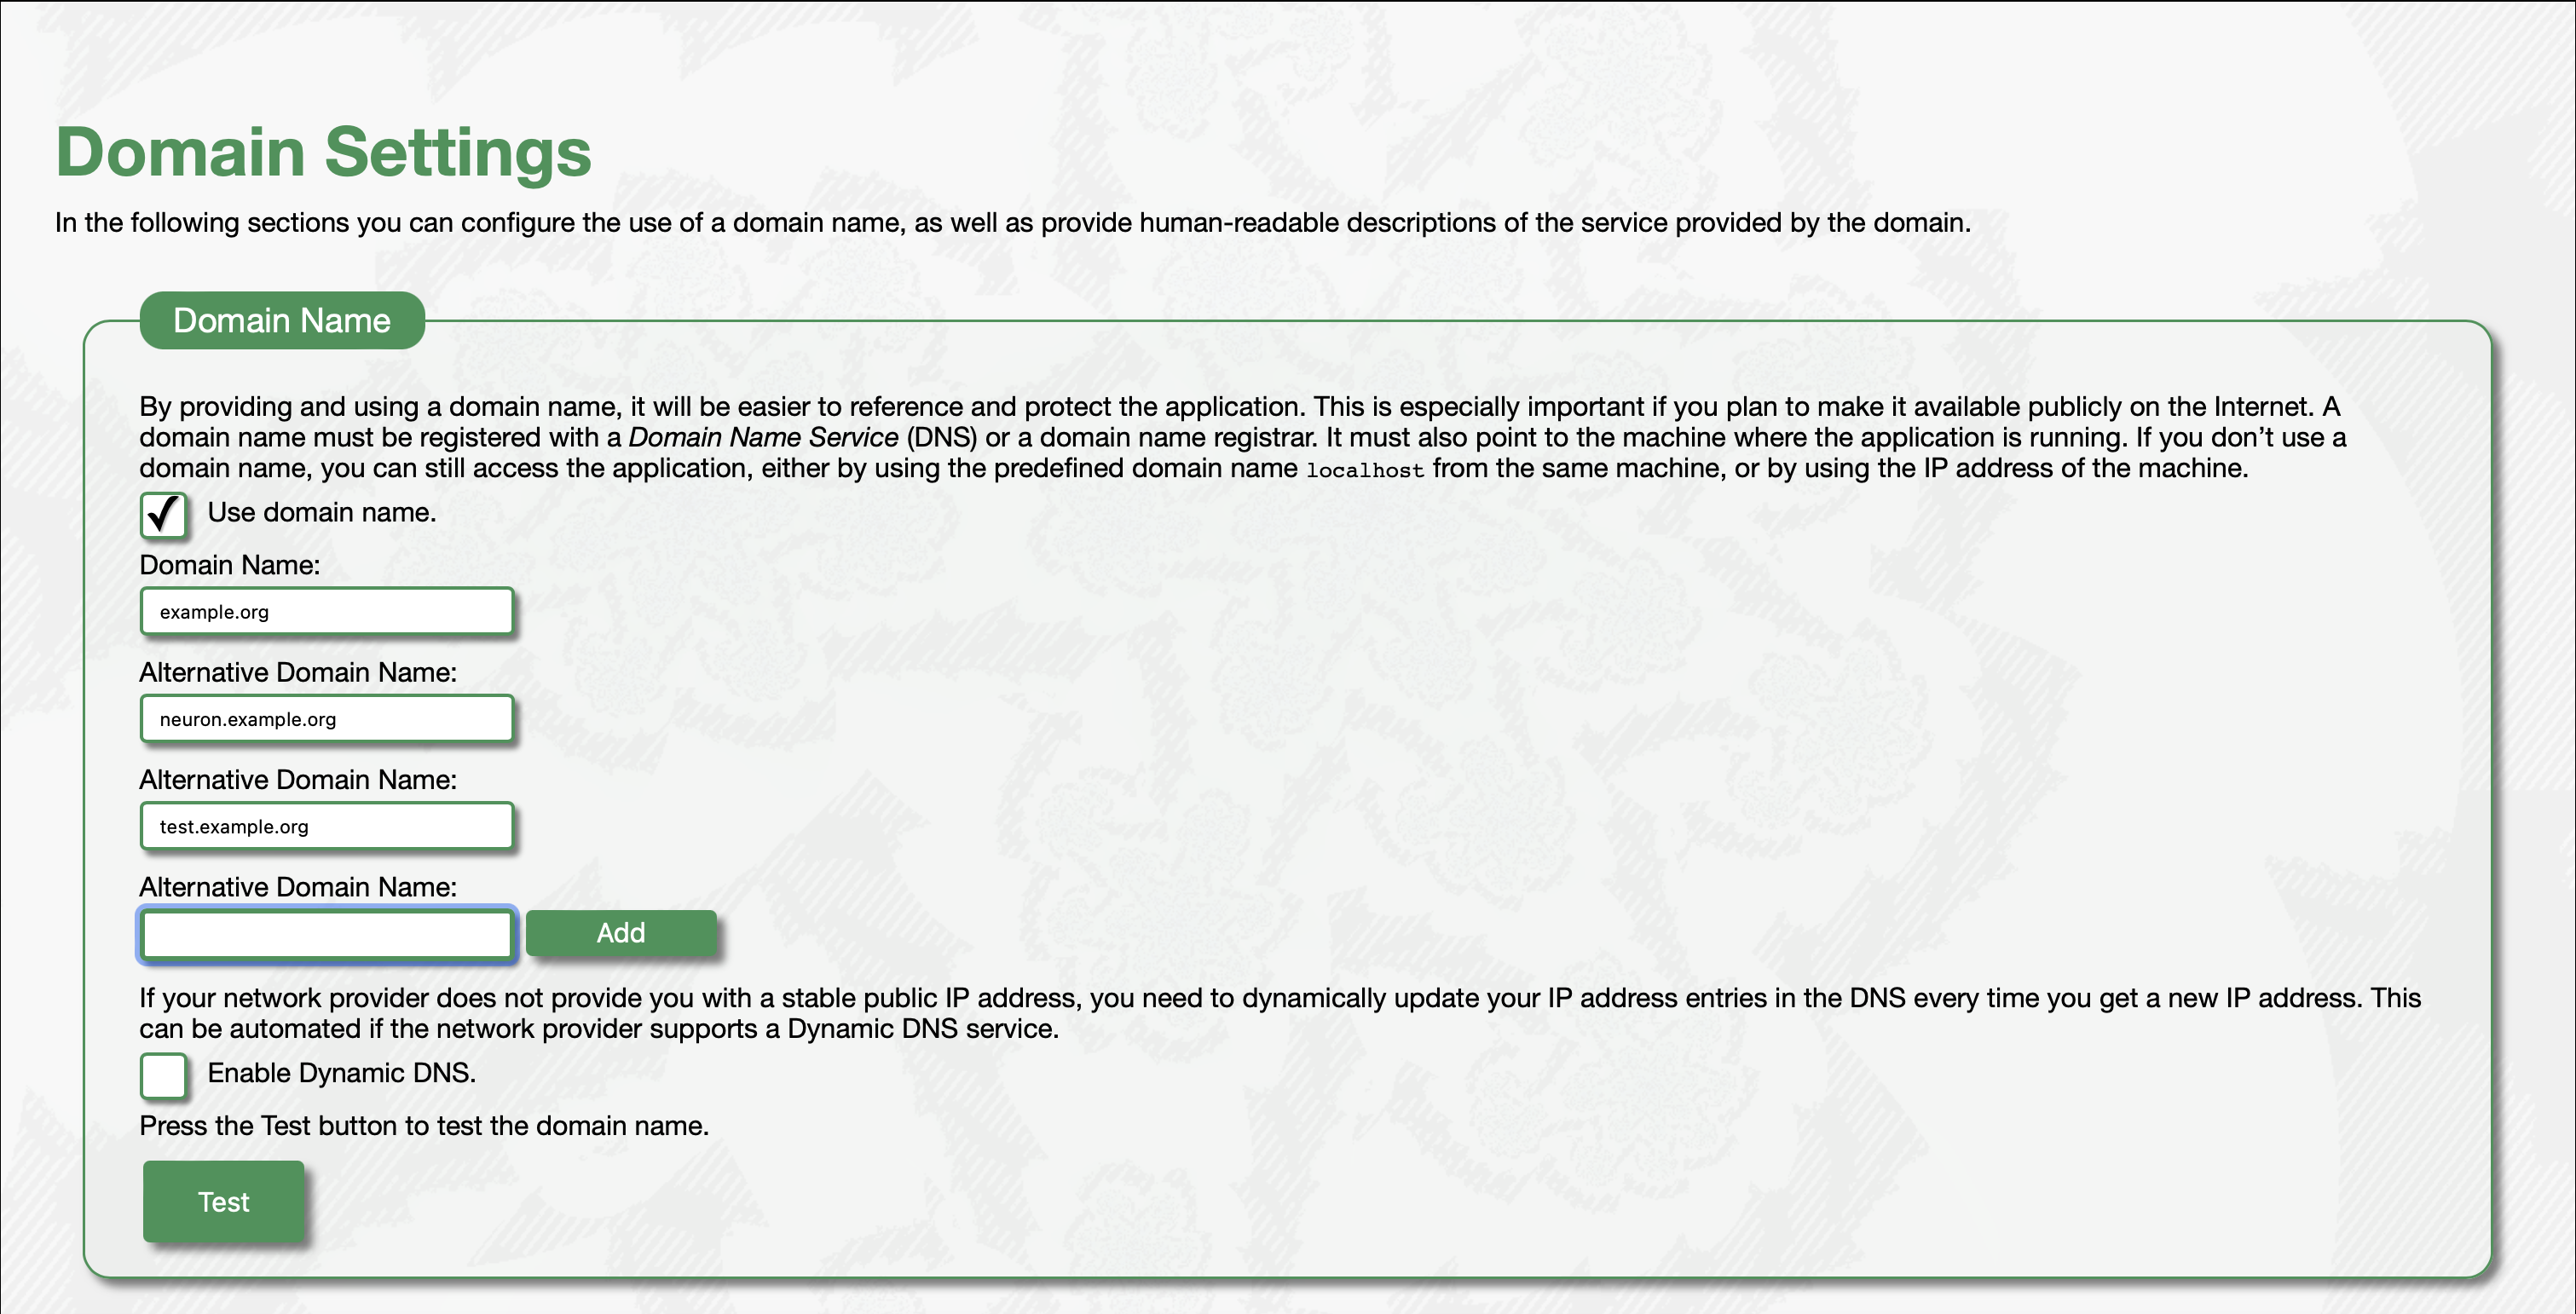
The Main Domain, together with Alternative Domains, are configured first in the DNS, and second in the Neurons Admin/Communication/Domain configuration page. You need to activate to use domain names, enter the main domain and alternative domainⓈ and then generate a certificate. Once created, the Neuron® can be accessed on both the main domain and alternative domain name.

Domain-specific content folders
When a browser access the Neuron® to get a resource, it sends the domain name used in a HTTP Header called Host. The Neuron® sees this header, and knows what domain was used to access the Neuron®. The web server in the Neuron® uses this information when it retrieves file-based content stored on the Neuron®. It first checks the subfolder under the Root folder matching the domain name used. If the file exists there, it is processed and returned first. If such a file (or folder) does not exist, the file in the Root folder is used. Any domain-specific content should therefore be placed in a subfolder under Root matching the domain name.
Example: If the Neuron® hosts a domain neuron.example.org, domain-specific files should be stored in Root\neuron.example.org.
favicon.ico
The file Root\favicon.ico displays a logo or favorite icon for pages on the Neuron®. This may need to be different on different domains. Press the Admin/Presentation/favicon.ico button to upload your favorite icon to the Neuron®. If you upload this icon using the main domain of the Neuron®, or using an IP-address or localhost, the icon will become the default favicon on the Neuron®. Any alternative domain will display this icon also, unless they have their own favicon uploaded. If you upload a favicon using an alternative domain URL, that icon will become the favicon for that particular alternative domain.


Note: Uploading a new icon will not affect the file in the Root folder. Likewise, changing the file in the Root folder will not affect the web resource, if a custom icon has been uploaded.
Theme
The theme used to display pages on the Neuron®, can also vary depending on which domain is used to view the content. Press the Admin/Presentation/Theme button to select the theme to use on the Neuron®. If you change theme using the main domain of the Neuron®, or using an IP-address or localhost, the icon will become the default theme on the Neuron®. Any alternative domain will display this theme also, unless they have their own theme selected. If you change the theme using an alternative domain URL, that theme will become the theme for that particular alternative domain.

robots.txt
The robots.txt file (located at Root\robots.txt) tells web crawlers (including search engines) what they are allowed to see. For privacy reasons, no content is allowed for web crawlers by default. If you need to change this (for instance, if you want search engines to be able to access content on the Neuron®), you need to edit this file. Press the Admin/Security/robots.txt button to edit the resource. Editing the resource using the main domain, will edit the default resource. Editing the resource using an alternative domain, will edit the resource, for that alternative domain only.

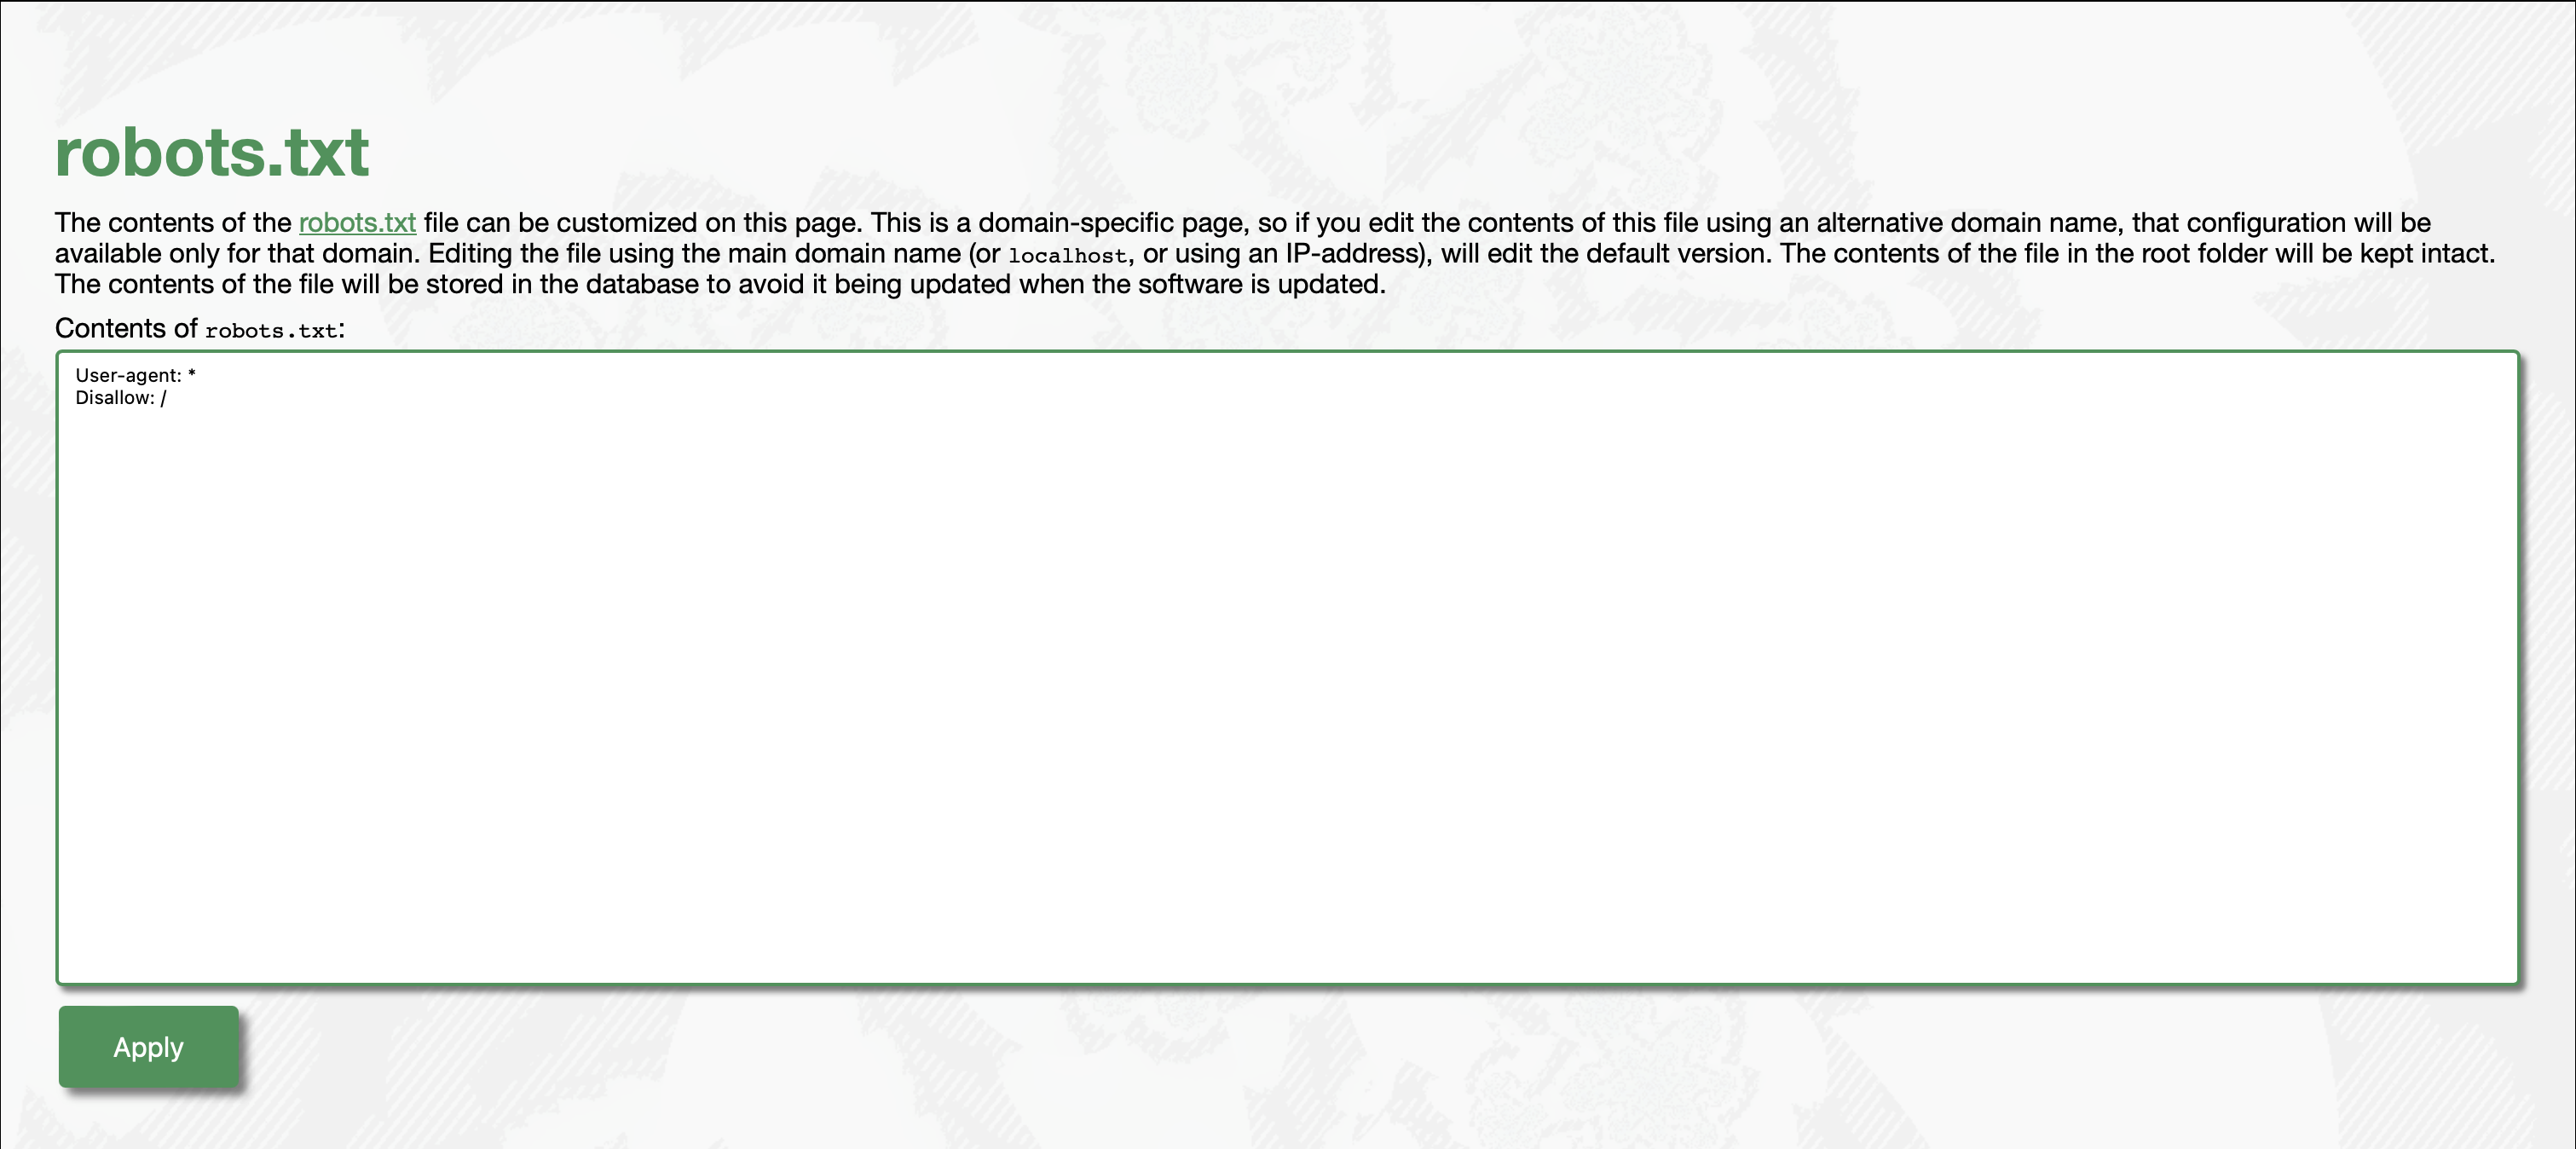
Note: Editing the contents of the file using this interface will not affect the file in the Root folder. Likewise, changing the file in the Root folder will not affect the web resource, if custom content has been provided.
security.txt
The security.txt file (located at Root\.well-known\security.txt) tells security researchers how they can contact responsible parties if they need to. The default content redirects them to the feedback page on the Neuron®. If you need to change this, you need to edit this file. Press the Admin/Security/security.txt button to edit the resource. Editing the resource using the main domain, will edit the default resource. Editing the resource using an alternative domain, will edit the resource, for that alternative domain only.

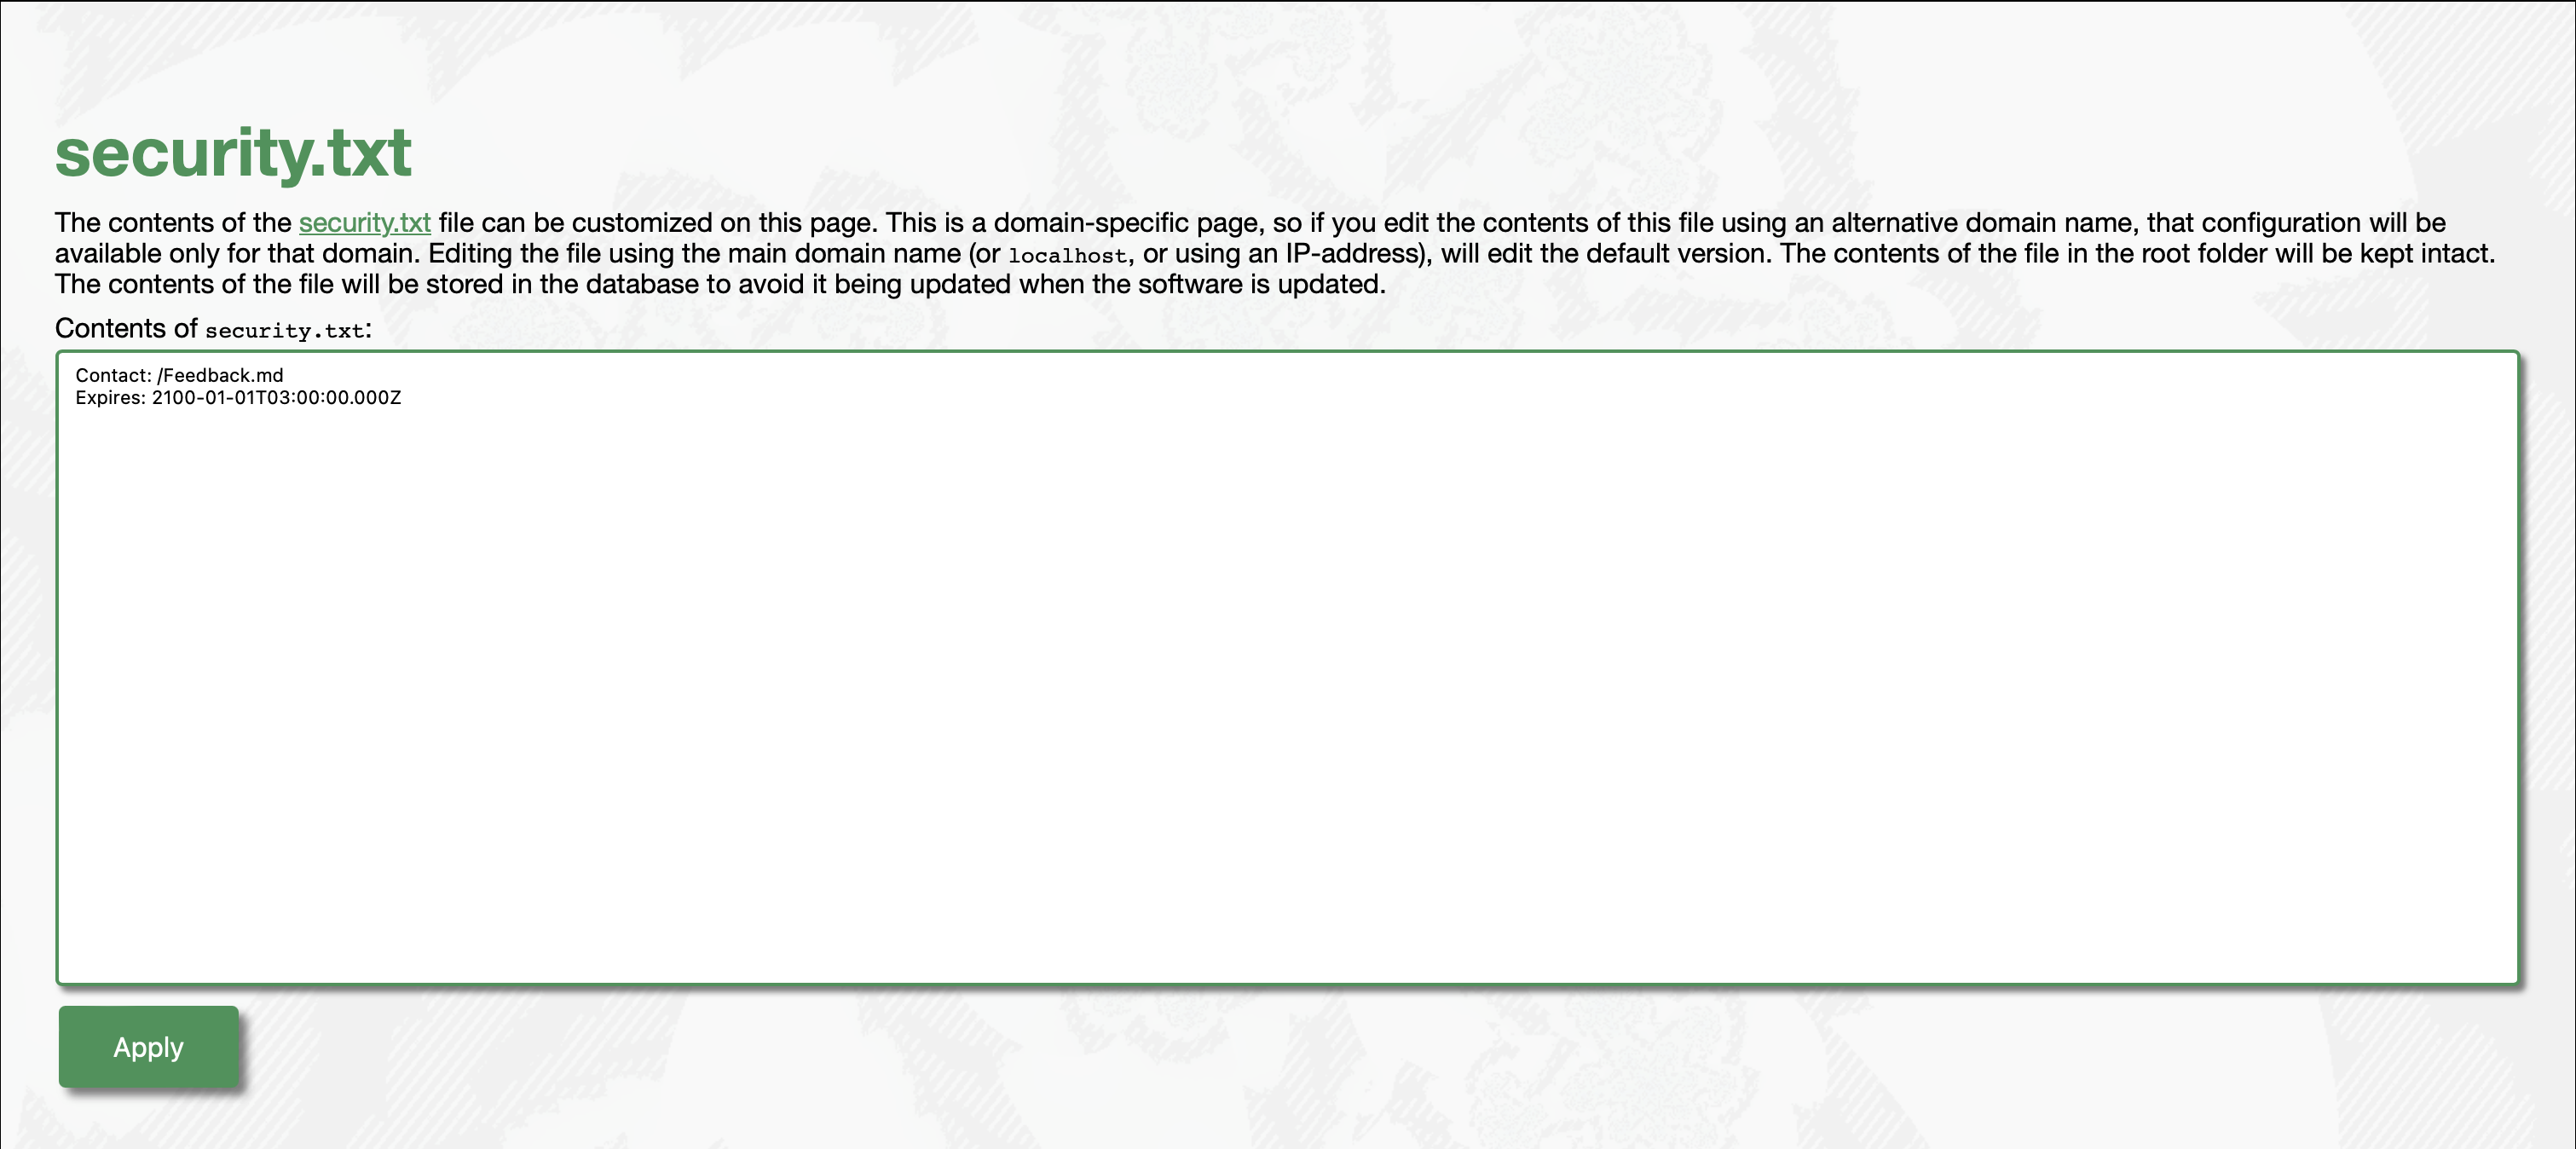
Note: Editing the contents of the file using this interface will not affect the file in the Root\.well-known folder. Likewise, changing the file in the Root\.well-known folder will not affect the web resource, if custom content has been provided.
This article is being written.
Posts tagged #admin
No more posts with the given tag could be found. You can go back to the main view by selecting Home in the menu above.