One way to prepare a set of Neuro-Access accounts for a predefined set of users, is to pre-create them using script and then generate onboarding codes that can be sent to the users. Once they receive their corresponding code, they can download the app, scan the code, and connect directly to the predefined account. This method allows you to create accounts on a predefined Neuron for a known set of users, without having to create API keys, and minimizing the risk of the users creating accounts on other neurons. It also allows you to predefine the account names.
To try the following tutorial, you need access to the script prompt on your neuron. The script prompt is available from the administrative page via this option:
Script Prompt from Admin portal
Creating the account
The main module of the XMPP broker, hosting the accounts, is Waher.Service.IoTBroker.XmppServerModule, or XmppServerModule for short. It has a property called PersistenceLayer that acts as an interface to the database for the XMPP server. This interface has a method called CreateAccount that allows us to create accounts. This method performs necessary checks to ensure the name is not occupied elsewhere, to protect integrity. Typing its fully qualified name into the prompt allows us to find its arguments:
CreateAccount method arguments
Note: Finding the names of the types, properties and methods is a combination of using the Namespaces & Types option from the administrative portal, and/or using the script prompt together with the methods and properties functions. You can also use the Neuron Documentation with its DoxyGen code documentation site where you can search for classes and other relevant names.
We are now ready to create accounts. We will generate account names that are GUIDs, using the NewGuid() script function. Each account will receive a random password with sufficient entropy, generated using the RandomPassword() script function. We will not use an API Key (leaving it empty), making the account behave as a manually created account. We will not assign e-mail adddresses or phone numbers to the accounts either. To ensure the account object has a proper remote endpoint associated with its creation, we will use the Request.RemoteEndPoint value, which will contain the remote endpoint of the person executing the script function via the script prompt. (If executing the script via some other interface, you might have to change this reference to something else.) The result of calling the CreateAccount method, is a KeyValuePair<IAccount,string[]> result, where the Key portion contains the new account, if created (or null if not), and the Value portion any alternative name suggestions in case the account could not be created.
Note: You can call properties(Account) to review the properties of the account. You can also see that access to the generated password is protected to reduce the risk of unauthorized access to the account.
Note 2: If you want, you can create a separate API key, and reference it when you create the account. This way, you can separate the accounts from other manually created accounts. You can also control the amount of accounts that can be created.
Creating an onboarding code
Next step is to create an onboarding code. This is done in cooperation with the onboarding neuron configured for the neuron on which the account was created. The onboarding code is a URI with the obinfo: URI scheme, that references the onboarding neuron, and contains a key and a secret. The onboarding neuron on the other hand receives an encrypted BLOB containg the information necessary to access the account. This information can only be decrypted using the secret key available in the onboarding code. Furthermore, the onboarding code can only be used once. You can also define a point in time when the code expires, if it has not been used.
Note: Since the code can only be used once, it is important to transfer the code in a way where it cannot be previewed by mistake. Previewing it will result in the code automatically expiring.
To create the code, we will call the GetOnboardingUrl method on the Account object. It takes one argument: The point in time when the code will expire if not used before. In the following example, we create a code that will be valid for three days:
Code:=Account.GetOnboardingUrl(Now.AddDays(3));
The Code will contain a string representing the onboarding URI. It will be of the form:
The Onboarding URI contains four parts, delimited by colons (:):
The obinfo URI scheme identifying the URI as an onboarding URI.
The onboarding neuron that contains the encrypted BLOB (but not the key).
The identifier of the encrypted BLOB.
The secret key necessary to decrypt the BLOB.
Creating an onboarding QR Code
The Neuron has a QR Code API that permits you to create QR codes for the onboarding URIs generated. The procedure is simple: A URL is generated pointing to the /QR resource on the neuron. After the resource name you add the contents you want to encode into the URI, prefixed by a /. The contents must be URL encoded. After the contents, you can add query parameters controlling how the QR code should be generated. This includes controlling the quality of the image, resolution and colors. Displaying a QR code on screen, or in an email requires less resolution, that including the image in print, for instance. A QR code for light mode displays (or white paper) should look different from QR codes for dark mode displays, for instance.
In the following example, we use the Waher.IoTGateway.Gateway.GetUrl(LocalResource) method to generate an absolute URL to an image containing a 400x400 pixel QR code encoding the onboarding URI just created. It uses a quality setting of 2, meaning 2x2 points are evaluated for every pixel generated, creating an anti-aliasing effect to create smoother edges.
The QR Code API documents parameters that can be used to control the colors used when generating the QR code. By appending &fg=white&bg=black&c=c0ffc0 to the URL, for instance, a QR code for dark-mode can be generated instead, as an example:
QR code of onboarding URI - Dark Mode
If higher resolution images are required, you can increase the w (width), h (height) and q (quality) settings. For example, an 800x800 image with 3x3 points per pixel quality would look like:
QR code of onboarding URI - Print
Batch creation of accounts
We are now ready to create script for the batch creation of accounts, and generate QR codes that can be distributed separately, for each account created. We will use the preview() function to display current progress in the prompt (and the batch procedure may require some time to execute, depending on the number of accounts and QR codes to create), the Get() function to retrieve the image from the generated QR Code URLs, and the SaveFile() function to save the QR codes generated, and the results of the batch procedure into a single JSON file. We will use the Waher.IoTGateway.Gateway.AppDataFolder property to save files in a location that is easily accessible, and where the Neuron has write-access. We will create a subfolder called Batch for the generated files. Finally, we generate an XML document with the same information, and store it as an XML file also. At the end we have a set of onboarding QR code image files, a JSON file with an index of all accounts created, and a similar XML file with the same information. We create the following batch account-creation function:
CreateAccounts([N]):=
(
	Created:=NowUtc;
	Accounts:=
	{
		"NrAccounts":N,
		"Created":Created
	};
	Records:=[];
	AccountNr:=1;

BatchFolder:=Waher.IoTGateway.Gateway.AppDataFolder+"Batch";
if !System.IO.Directory.Exists(BatchFolder) then
	System.IO.Directory.CreateDirectory(BatchFolder);

while AccountNr<=N do
(
	AccountNrStr:=Str(AccountNr);
	preview("Creating account "+Str(AccountNrStr)+"...");

do
(
	P:=Waher.Service.IoTBroker.XmppServerModule.PersistenceLayer.CreateAccount("",Str(NewGuid()),RandomPassword(),"","",Request.RemoteEndPoint);
	Account:=P.Key;
	AlternativeNames:=P.Value
)
while !exists(Account);

Code:=Account.GetOnboardingUrl(Now.AddDays(3));
CodeUrl:=Waher.IoTGateway.Gateway.GetUrl("/QR/"+UrlEncode(Code)+"?w=400&h=400&q=2");
QrCode:=Get(CodeUrl);

QrCodeFileName:=BatchFolder+"\\"+Left("00000000",9-len(AccountNrStr))+AccountNrStr+".png";
SaveFile(QrCode,QrCodeFileName);

Record:=
{
	"AccountNr":AccountNr,
	"UserName":Account.UserName,
	"OnboardingUrl":Code,
	"QrCodeUrl":CodeUrl,
	"QrCode":QrCodeFileName
};

PushLast(Record,Records);
AccountNr++;
);

Accounts["Records"]:=Records;

SaveFile(Accounts,BatchFolder+"\\Accounts.json");

AccountsXml:=<Accounts nrAccounts=N created=Created>
	<[[foreach Record in Records do
		<Account accountNr=(Record.AccountNr) userName=(Record.UserName) onboardingUrl=(Record.OnboardingUrl) qrCodeUrl=(Record.QrCodeUrl) qrCode=(Record.QrCode) />
	]]>
</Accounts>;

SaveFile(AccountsXml,BatchFolder+"\\Accounts.xml");
);
From build 2025-07-04 you can now include comments in script. Comments will be treated as whitespace when the script is parsed. Relevant section from the reference documentation:
Whitepsace and Comments
Whitespace is ignored in script, except when it is used to separate tokens. This means that you can use whitespace to make your script more readable. Whitespace includes not only the space character, but other characters as well, such as the tab character, and new-line characters.
Comments in script are also considered whitespace, for the purpose of parsing. Comments can be written in two different ways: Either, by using the // character sequence, where all characters until the next newline character are considered whitespace, or by using the /* and */ character sequences, where all characters between the two sequences are considered whitespace. The second method allows you to create comments that span multiple lines.
For example, the following script is equivalent to the script a+b+c:
a    + // First term
   b + /* Second term
        * is also added
        */
   c   // Third term
The free API package for interoperability with Microsoft products on neurons has been extended, to now support interoperability with Microsoft Excel documents also (saved using Open XML SDK, i.e. .xlsx documents). Conversion of Spreadsheets is also supported, to Script. This can be used for processing the information in the Spreadsheets, using scrfipt operations, etc. The Mictosoft Interoperability package is an optional component that can be installed by the neuron operator. The API is protected, and requires either a login (using user accounts defined by the Admin-interface; no special privileges), or a JWT token issued by the neuron (available to clients connected via XMPP, for instance), or being logged in through a web session. The API cannot be accessed anonymously.
Once the package has been properly installed, it will insert itself into the Script Prompt on the Neuron®. It introduces an Excel button that can be used to open an INPUT field that allows you to upload an Excel document to the server, and convert it to Script, on the page. This way, you can experiment with the conversion capabilities provided. If you want to have documents for testing purposes, the repository contains a set of testing documents.
Converting MultipleSheets.xlsx to Script
Internet Content Decoder
The package contains an Internet Content decoder for MS Excel documents. This means you can build your own web services, and similar tools, that receive Excel documents as content, and they will be automatically decoded. No automatic conversion to script is provided, as the script is supposed to be converted on the server, and not provided to the client, by default. You can convert the received Excel document using the static ExcelUtilities class on the server, or via the conversion API resource, if you request the script on the client.
Formatting Support
Microsoft Word supports a very rich set of features for formatting content in their documents. Markdown on the other hand, is not designed for creating formatted content in the same way, so a 1-to-1 conversion is not possible. But basic formatting constructs can be converted successfully. The following lists should give you an idea of what is supported and not.
What is exported?
As spreadsheets are exported to script, for processing purposes, formatting and Excel-specific formulas are not exported. Only values, and data types (such as the difference between strings, normalized (reused) strings, numbers, dates, times, etc.) are exported. Each sheet is exported as a Matrix, and a collection of sheets is exported as an object, where the tab names are used as property names, and the corresponding matrices as property values.
Logging of unrecognized elements
If converting an Excel document that contains elements the package library does not understand, information about these items will be logged to the event log. You can use this information to extend support to such items in the repository.
API Endpoint
API interface for the Excel -> Script conversion is very simple. You execute a POST to the /MicrosoftInterop/ExcelToScript resource on the Neuron® where the package is installed. The contents of the POST is the actual Excel document. The response will be Script, as text.
With the latest release of the TAG.XmppOpenAIBridge.package package (build time 2023-09-01) the ChatGPT OpenAI-integration supports function callbacks. You can both define functions the API can call via the API implementation, or via the script interface, as illustrated below. This makes it easier to integrate OpanAI functionality into your services, both .NET services hosted by the Neuron®, as well as Markdown and script-based services.
Custom function via chat
As an example of how to integrate custom functionality with ChatGPT, the XMPP <-> OpenAI bridge has added the following custom functions, to facilitate the presentation of non-text-based content:
ShowImage(Url[,Width[,Height[,Alt]]])
ShowImages(Images[])
ShowVideo(Url[,Title[,Width[,Height]]])
ShowYouTubeVideo(Url[,Title[,Width[,Height]]])
PlayAudio(Url[,Title])
ShareLink(Url[,Title])
ShareLinks(Links[])
An example conversation might look like:
Note: Test connections från lab.tagroot.io to ChatGPT have been removed, as test project has concluded. To use the XMPP<->OpenAI bridge, install the package above, and configure the service accordingly.
You can test ChatGPT via XMPP, by adding chatgpt@lab.tagroot.io to your contact list:
chatgpt@lab.tagroot.io
New script extensions
The following functions are available on systems with the TAG.XmppOpenAIBridge.package installed. A more detailed description about the OpenAI-related functions referenced in this section is available in the XmppOpenAIBridge repository.
Calls the chat completion API of OpenAI (ChatGPT). The Instruction argument contains initialization instructions. The optional Sender argument contains the JID of the sender. If not provided, the JID of the quick-login user will be used. Text is the chat message to send. Functions contains a single function definition or a vector of function definitions the API can call if it chooses to. History is a boolean parameter that indicates if the session history should be included in the query. The optional Preview argument indicates if intermediate content responses are previewed during the execution of the query. The response to the call will be an object containing a Content property with textual content, a Function property with function call information if available, including a Result property, containing any results from a function call. If a function call is requested, available function definitions or lambda expressions will be checked. If available, they will be called, with the arguments available from the API.
ChatGptConfigured()
Checks if Chat GPT is configured correctly. It requires a Chat GPT<->XMPP Bridge node to be configured in the MeteringTology source, with the Node ID ChatGPT.
Creates an array parameter for callback functions. The ItemParameter argument contains definition of each item in the array.
ChatGptBoolean(Name,Description,Required)
Creates a Boolean parameter for callback functions.
ChatGptEnum(Name,Description,Required,Values)
Creates an enumeration parameter for callback functions. The Values argument contains a vector of strings representing the possible values the argument can take.
ChatGptFunction(Name,Description,Parameters)
Creates a function definition for callback functions. The Parameters argument contains a vector of parameter definitions representing the arguments of the function.
Creates an integer parameter for callback functions, possibly within a specified range, between Min and Max, specifying also if the endpoints are included or not.
Creates an integer parameter for callback functions, possibly requiring it to be a multiple of a given base value, as well as within a specified range, between Min and Max, specifying also if the endpoints are included or not.
Creates a number (float-point) parameter for callback functions, possibly within a specified range, between Min and Max, specifying also if the endpoints are included or not.
Creates a number (float-point) parameter for callback functions, possibly requiring it to be a multiple of a given base value, as well as within a specified range, between Min and Max, specifying also if the endpoints are included or not.
Creates an object parameter for callback functions. The Properties argument contains a vector of parameter definitions representing the properties of the object.
Creates a string parameter for callback functions, having a regular expression to validate input.
ChatGptString(Name,Description,Required[,Format])
Creates a string parameter for callback functions, having a specific format, as given by the string format enumeration listed below.
Example:
ShowImage(Image):=
(
	Get(Image.Url) ??? "Image not available"
);

ShowImages(Images):=
(
	[foreach Image in Images do ShowImage(Image)]
);

R:=ChatGpt(
	"You help users find images on the Internet, representative of the queries made by the user.",
	"TestUser",
	"Can you find me some images of Kermit? If something is unclear, ask for additional information first. When ready to present images to the user, call available functions.",
	ChatGptFunction("ShowImages", "Displays an array of images to the user.", [
		ChatGptArray("Images", "Array of images to show.", true,
			ChatGptObject("Image", "Information about an image.", true, [
				ChatGptString("Url", "URL to the image to show.", true),
				ChatGptInteger("Width","Width of image, in pixels.", false, 0, false, null, false),
				ChatGptInteger("Height","Height of image, in pixels.", false, 0, false, null, false),
				ChatGptString("Alt", "Alternative textual description of image, in cases the image cannot be shown.", false)]))]),
	false,
	true);

R.Function.Result[0]
Result
Note: If running script with ChatGPT-services on a web server, you can use the associated script functions to push information asynchronously back to the web client using the PushEvent script function.
There are multiple ways for users to create broker accounts on a TAG Neuron®. With a broker account, a user can communicate on the federated XMPP network. They can also hold eDaler®, Neuro-Feature™ tokens, have legal identities and sign smart contracts, and use other related TAG services. Sometimes, a service provider using TAG Neurons must automate the creation of broker accounts, for instance, for integration with existing services. This article describes how this can be performed.
Account object
The TAG Neuron® uses an object database to store information it uses to operate accounts. So, to create an account, you need to create an account object. In script you use the Create function to create an object instance, from its type name. You can specify the type name, either using its local name, if there’s only one class with that name, or a qualified name or its fully qualified name. The fulle qualified name is the entire namespace + . + the local name. A qualified name is a portion of the fully qualified name that is uniquelly understood.
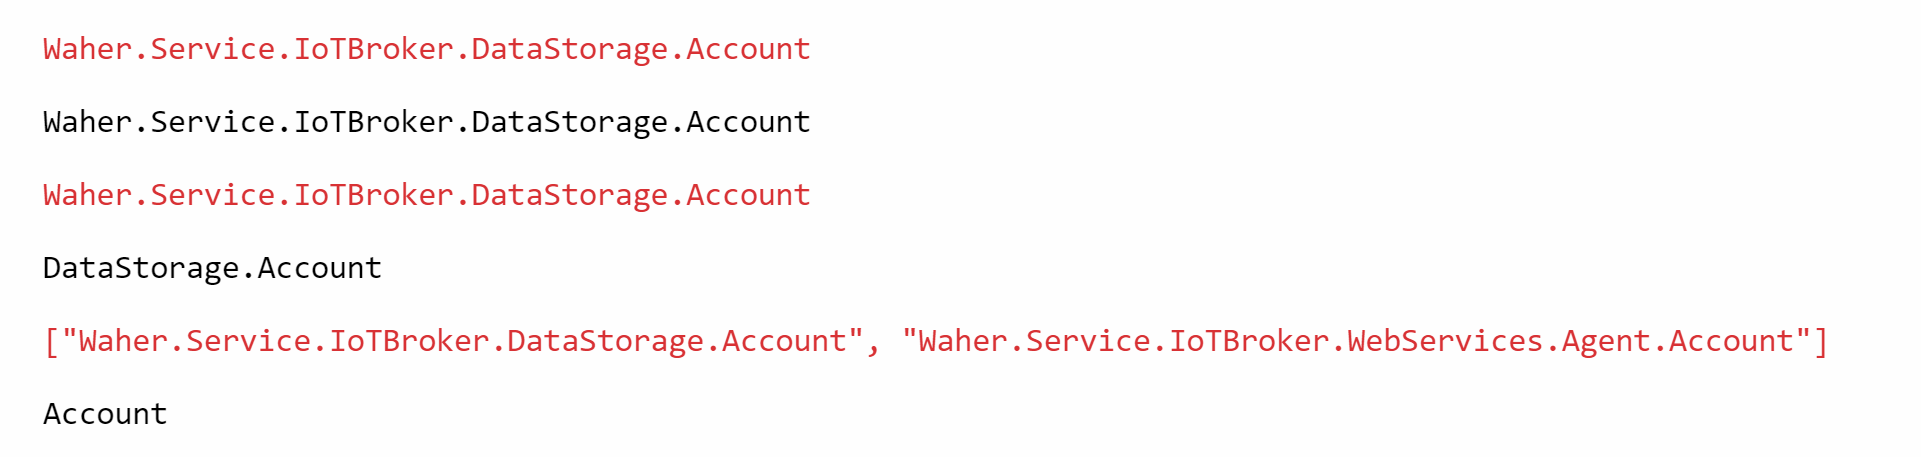
In the following example, the difference between the local name, a qualified name and the fully qualified name is shown. When there’s only one class matching a name, that type name is returned. If there are multiple classes that match the name, an array of type names is returned. (Example is done using the script prompt, so they should be read from bottom to top.)
Account class references
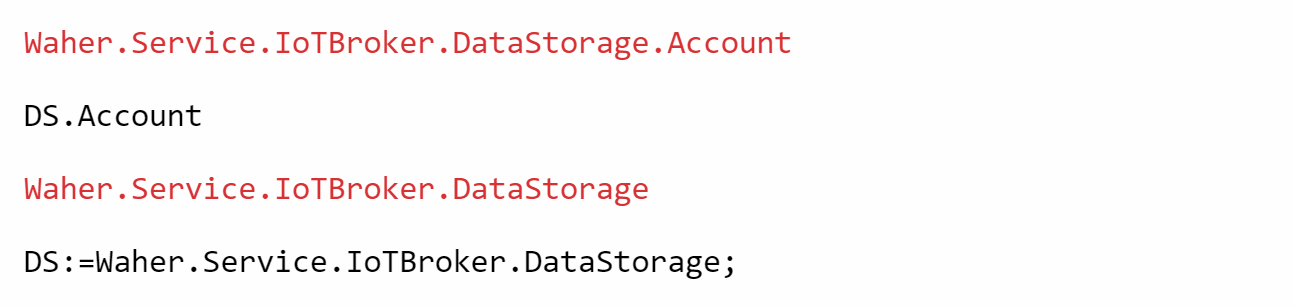
To avoid conflict in script over time (as new modules are added), fully qualified names are encouraged. To avoid making the code too cumbersome, you can assign namespaces and type names to variables. For instance, you can reference the Account class in the following manner:
Account reference
You can now create the new Account instance. Notice that above, you only referred to the type, while the result after this instruction is a newly created object instance. The output looks the same in this case, because the default ToString() method of the Account object simply returns the type name.
Creating Account instance
Account properties
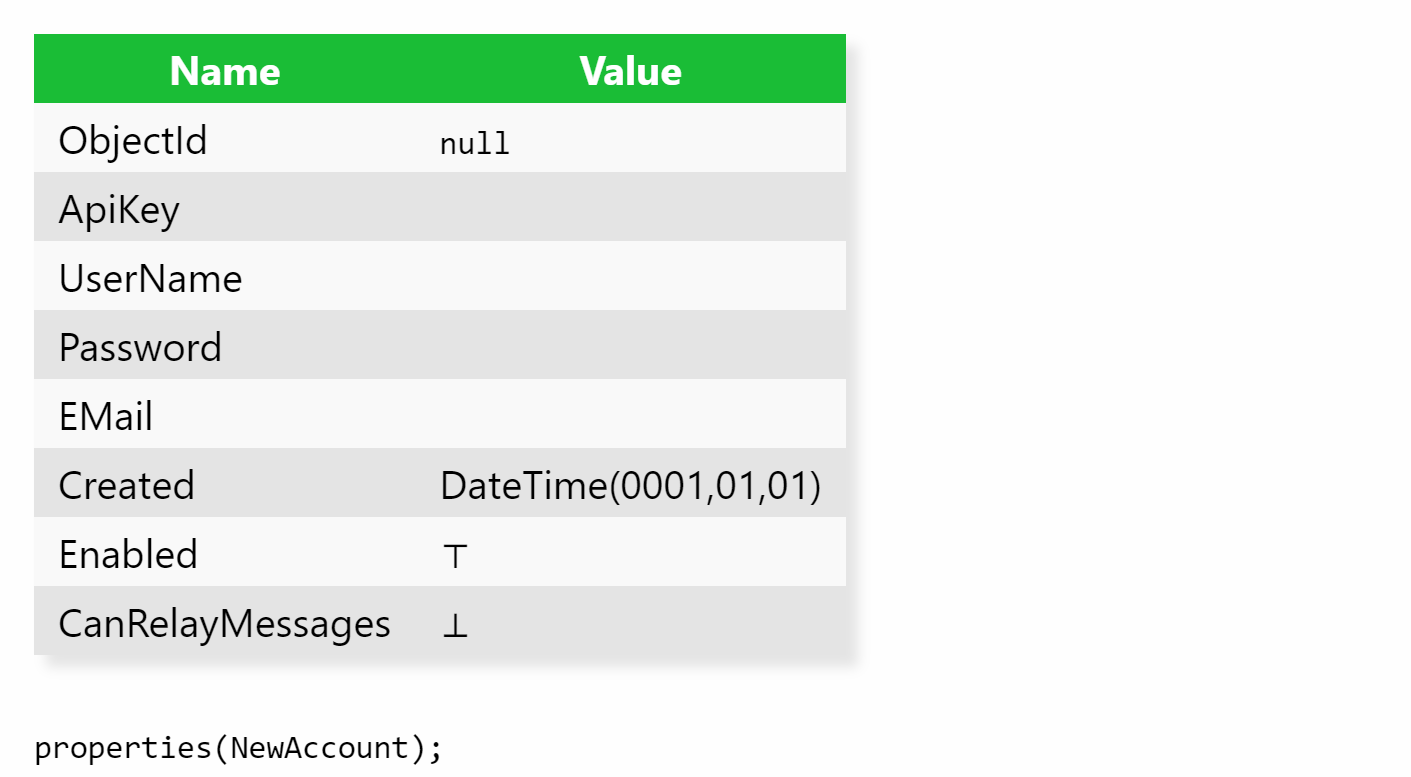
You are now ready to set the properties of the object instance, for the new account. To know what properties are available, use the properties function:
Properties Function
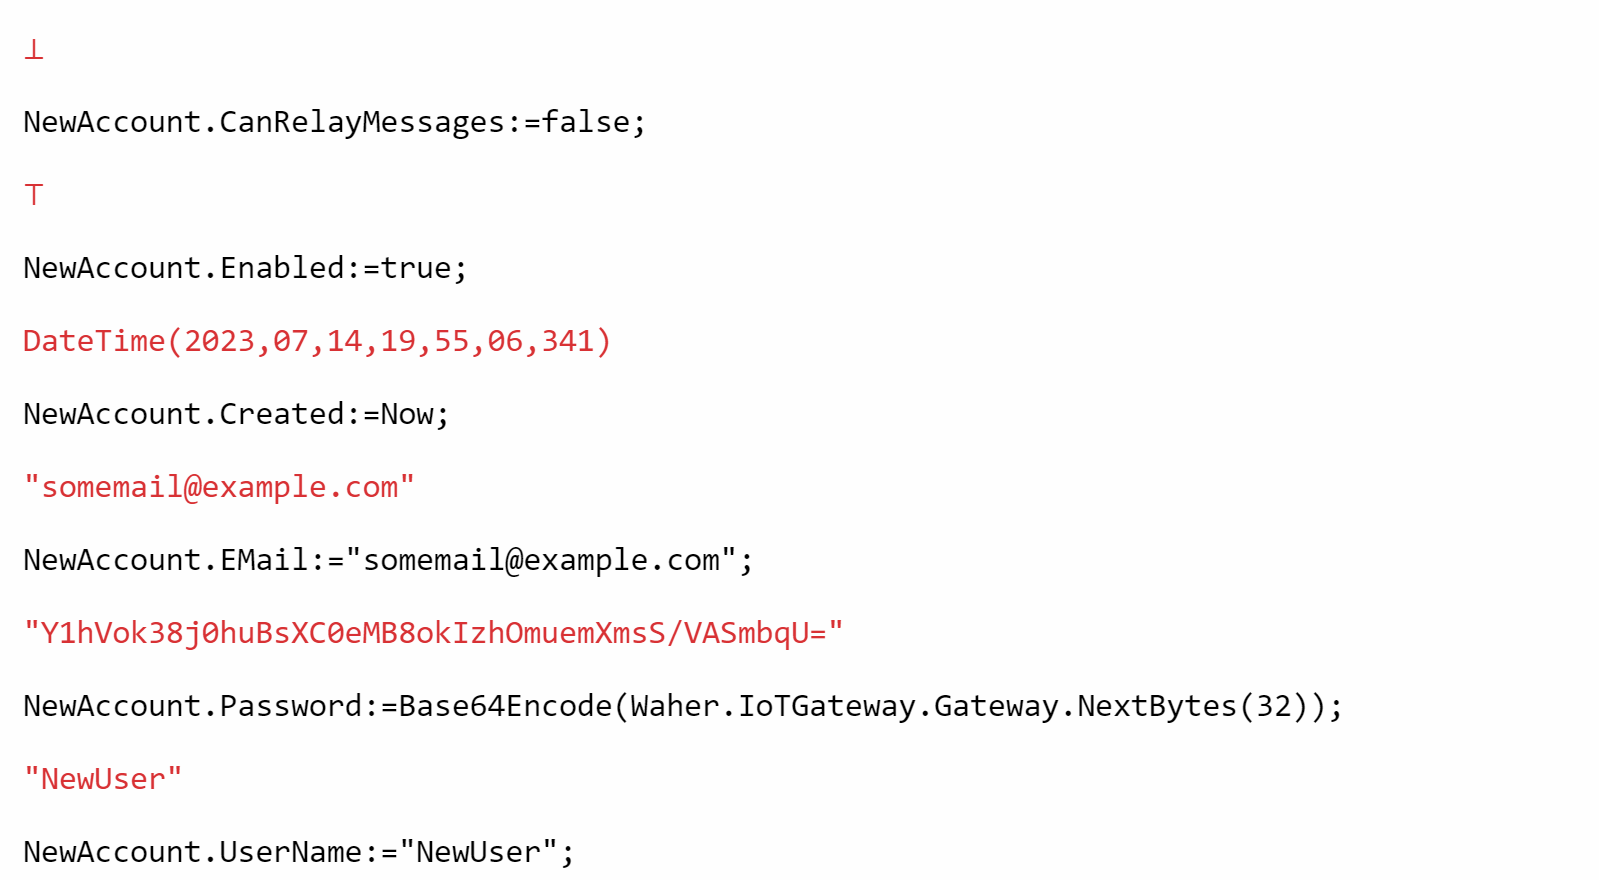
With this information, you just set the properties according to your requirements, one at a time:
SettingProperties.png
Saving object
After setting the properties, the object is ready to be saved in the object database. As it is an object database, persistance of the object is done seamlessly. You do not need to know they underlying database structure or schema. All information required to persist the object, is available in the class definition itself. All you need to do, is call the SaveNewObject function. The function will return the saved object, which will now have an Object ID identifying the object in the object database.
SaveNewObject function
The account is now ready to be used.
Security Considerations
Below, are some security considerations, you need to be aware of.
Man-in-the-Middle attacks
It is recommended the user change the password as soon as possible. The password generated must be transmitted to the user somehow, and all transmission channels out-of-band should be considered vulnerable. A Man-in-the-middle (MITM) might hijack the password. With it, the MITM can do one of two things:
Choose to use the credentials invisibly, i.e. without changing it. This will allow them to gain access to sensitive material, until the password is changed. Once it has been changed, the old credentials are no longer usable, and the MITM can no longer access the account.
Try to alter the credentials before the real user does so, to gain access of the account. If so, the real user detect it on the next attempt to login. Through contact with support, account password can be reset and account given back to the real user. The faster the user changes the password, the better.
The risk here, is if account is not used by real user. A MITM would then gain access to the account, without it being noticed. One way to reduce the risk even further, is to transmitt parts of the password on different channels, hoping the MITM is not able to gain access to all of them. Still, it is wiser to assume credentials are compromized, as soon as they are transmitted out-of-band (meaning out of the scope of the encrypted protocol for which they are intended).
Entropy in passwords
The example above creates a 32-byte random string, that it BASE64-encodes into a usable password. This provides a security strength of 256 bits, which is usually higher than other protocols and algorithms provide, and so it should be sufficient for most use cases. However, if you decide to employ entropy checks on computer-generated passwords, you might need to adapt the password generation algorithm to filter out passwords that should be ignored, at the cost of reducing the security strength somewhat. See the article On entropy in passwords for more information about this.