Creating broker accounts using script
One way to prepare a set of Neuro-Access accounts for a predefined set of users, is to pre-create them using script and then generate onboarding codes that can be sent to the users. Once they receive their corresponding code, they can download the app, scan the code, and connect directly to the predefined account. This method allows you to create accounts on a predefined Neuron for a known set of users, without having to create API keys, and minimizing the risk of the users creating accounts on other neurons. It also allows you to predefine the account names.
To try the following tutorial, you need access to the script prompt on your neuron. The script prompt is available from the administrative page via this option:

Creating the account
The main module of the XMPP broker, hosting the accounts, is Waher.Service.IoTBroker.XmppServerModule, or XmppServerModule for short. It has a property called PersistenceLayer that acts as an interface to the database for the XMPP server. This interface has a method called CreateAccount that allows us to create accounts. This method performs necessary checks to ensure the name is not occupied elsewhere, to protect integrity. Typing its fully qualified name into the prompt allows us to find its arguments:

Note: Finding the names of the types, properties and methods is a combination of using the Namespaces & Types option from the administrative portal, and/or using the script prompt together with the methods and properties functions. You can also use the Neuron Documentation with its DoxyGen code documentation site where you can search for classes and other relevant names.
We are now ready to create accounts. We will generate account names that are GUIDs, using the NewGuid() script function. Each account will receive a random password with sufficient entropy, generated using the RandomPassword() script function. We will not use an API Key (leaving it empty), making the account behave as a manually created account. We will not assign e-mail adddresses or phone numbers to the accounts either. To ensure the account object has a proper remote endpoint associated with its creation, we will use the Request.RemoteEndPoint value, which will contain the remote endpoint of the person executing the script function via the script prompt. (If executing the script via some other interface, you might have to change this reference to something else.) The result of calling the CreateAccount method, is a KeyValuePair<IAccount,string[]> result, where the Key portion contains the new account, if created (or null if not), and the Value portion any alternative name suggestions in case the account could not be created.
P:=Waher.Service.IoTBroker.XmppServerModule.PersistenceLayer.CreateAccount("",Str(NewGuid()),RandomPassword(),"","",Request.RemoteEndPoint);
Account:=P.Key;
AlternativeNames:=P.Value;
Note: You can call properties(Account) to review the properties of the account. You can also see that access to the generated password is protected to reduce the risk of unauthorized access to the account.
Note 2: If you want, you can create a separate API key, and reference it when you create the account. This way, you can separate the accounts from other manually created accounts. You can also control the amount of accounts that can be created.
Creating an onboarding code
Next step is to create an onboarding code. This is done in cooperation with the onboarding neuron configured for the neuron on which the account was created. The onboarding code is a URI with the obinfo: URI scheme, that references the onboarding neuron, and contains a key and a secret. The onboarding neuron on the other hand receives an encrypted BLOB containg the information necessary to access the account. This information can only be decrypted using the secret key available in the onboarding code. Furthermore, the onboarding code can only be used once. You can also define a point in time when the code expires, if it has not been used.
Note: Since the code can only be used once, it is important to transfer the code in a way where it cannot be previewed by mistake. Previewing it will result in the code automatically expiring.
To create the code, we will call the GetOnboardingUrl method on the Account object. It takes one argument: The point in time when the code will expire if not used before. In the following example, we create a code that will be valid for three days:
Code:=Account.GetOnboardingUrl(Now.AddDays(3));
The Code will contain a string representing the onboarding URI. It will be of the form:
obinfo:id.tagroot.io:14gsjgK56X6.................................:NKxDui0EMoLb1....................................
The Onboarding URI contains four parts, delimited by colons (:):
- The
obinfoURI scheme identifying the URI as an onboarding URI. - The onboarding neuron that contains the encrypted BLOB (but not the key).
- The identifier of the encrypted BLOB.
- The secret key necessary to decrypt the BLOB.
Creating an onboarding QR Code
The Neuron has a QR Code API that permits you to create QR codes for the onboarding URIs generated. The procedure is simple: A URL is generated pointing to the /QR resource on the neuron. After the resource name you add the contents you want to encode into the URI, prefixed by a /. The contents must be URL encoded. After the contents, you can add query parameters controlling how the QR code should be generated. This includes controlling the quality of the image, resolution and colors. Displaying a QR code on screen, or in an email requires less resolution, that including the image in print, for instance. A QR code for light mode displays (or white paper) should look different from QR codes for dark mode displays, for instance.
In the following example, we use the Waher.IoTGateway.Gateway.GetUrl(LocalResource) method to generate an absolute URL to an image containing a 400x400 pixel QR code encoding the onboarding URI just created. It uses a quality setting of 2, meaning 2x2 points are evaluated for every pixel generated, creating an anti-aliasing effect to create smoother edges.
CodeUrl:=Waher.IoTGateway.Gateway.GetUrl("/QR/"+UrlEncode(Code)+"?w=400&h=400&q=2");
For our example, this would result in a URL similar to the following:
https://lab.tagroot.io/QR/obinfo%3Aid.tagroot.io%3A14gsjgK56X6.................................%3ANKxDui0EMoLb1....................................?w=400&h=400&q=2
As an image, this QR code would look like:
The QR Code API documents parameters that can be used to control the colors used when generating the QR code. By appending &fg=white&bg=black&c=c0ffc0 to the URL, for instance, a QR code for dark-mode can be generated instead, as an example:
If higher resolution images are required, you can increase the w (width), h (height) and q (quality) settings. For example, an 800x800 image with 3x3 points per pixel quality would look like:
Batch creation of accounts
We are now ready to create script for the batch creation of accounts, and generate QR codes that can be distributed separately, for each account created. We will use the preview() function to display current progress in the prompt (and the batch procedure may require some time to execute, depending on the number of accounts and QR codes to create), the Get() function to retrieve the image from the generated QR Code URLs, and the SaveFile() function to save the QR codes generated, and the results of the batch procedure into a single JSON file. We will use the Waher.IoTGateway.Gateway.AppDataFolder property to save files in a location that is easily accessible, and where the Neuron has write-access. We will create a subfolder called Batch for the generated files. Finally, we generate an XML document with the same information, and store it as an XML file also. At the end we have a set of onboarding QR code image files, a JSON file with an index of all accounts created, and a similar XML file with the same information. We create the following batch account-creation function:
CreateAccounts([N]):=
(
	Created:=NowUtc;
	Accounts:=
	{
		"NrAccounts":N,
		"Created":Created
	};
	Records:=[];
	AccountNr:=1;

BatchFolder:=Waher.IoTGateway.Gateway.AppDataFolder+"Batch";
if !System.IO.Directory.Exists(BatchFolder) then
	System.IO.Directory.CreateDirectory(BatchFolder);

while AccountNr<=N do
(
	AccountNrStr:=Str(AccountNr);
	preview("Creating account "+Str(AccountNrStr)+"...");

do
(
	P:=Waher.Service.IoTBroker.XmppServerModule.PersistenceLayer.CreateAccount("",Str(NewGuid()),RandomPassword(),"","",Request.RemoteEndPoint);
	Account:=P.Key;
	AlternativeNames:=P.Value
)
while !exists(Account);

Code:=Account.GetOnboardingUrl(Now.AddDays(3));
CodeUrl:=Waher.IoTGateway.Gateway.GetUrl("/QR/"+UrlEncode(Code)+"?w=400&h=400&q=2");
QrCode:=Get(CodeUrl);

QrCodeFileName:=BatchFolder+"\\"+Left("00000000",9-len(AccountNrStr))+AccountNrStr+".png";
SaveFile(QrCode,QrCodeFileName);

Record:=
{
	"AccountNr":AccountNr,
	"UserName":Account.UserName,
	"OnboardingUrl":Code,
	"QrCodeUrl":CodeUrl,
	"QrCode":QrCodeFileName
};

PushLast(Record,Records);
AccountNr++;
);

Accounts["Records"]:=Records;

SaveFile(Accounts,BatchFolder+"\\Accounts.json");

AccountsXml:=<Accounts nrAccounts=N created=Created>
	<[[foreach Record in Records do
		<Account accountNr=(Record.AccountNr) userName=(Record.UserName) onboardingUrl=(Record.OnboardingUrl) qrCodeUrl=(Record.QrCodeUrl) qrCode=(Record.QrCode) />
	]]>
</Accounts>;

SaveFile(AccountsXml,BatchFolder+"\\Accounts.xml");
);
You can download the script file from the following link: CreateAccount.script
Uploading Branding Materials for NeuroAccess
Uploading Branding Materials for NeuroAccess
1. Introduction
Branding in NeuroAccess lets you customize the look of your NeuroAccess app for end users. By publishing colors and images to the broker’s PubSub service, any client connected can pick up your brand automatically.
2. Prerequisites
- Access to the PubSub service on your broker
- Hosted ResourceDictionary XAML and image files (see steps below)
3. Architecture Overview
3.1 Hosting branding description in the PubSub service
NeuroAccess, when connecting to a broker, looks for a node named NeuroAccessBranding and expects it to have an item with ID Branding, containing a <BrandingDescriptor> payload. The app downloads and caches this data for a set period.
3.2 The NeuroAccessBranding node
- Node name:
NeuroAccessBranding - Item ID:
Branding - Payload:
<BrandingDescriptor>element
4. Branding Descriptor Schema
The descriptor lives in the Branding PubSub item and must match the XML schema. See the full schema here: NeuroAccessBrandingV1.xsd
Key elements:
<Version major="2" minor="5" patch="1"/>— last supported NeuroAccess release version<ColorsUri>…</ColorsUri>— HTTP or XMPP URI to a MAUI ResourceDictionary<Images>with one or more<ImageRef id="…" uri="…" contentType="…"/>
4.1 Versioning
Although NeuroAccess currently ignores the version at the time of writing, it is critical for future compatibility. By incrementing semantic version attributes (major, minor, patch), you can publish new branding descriptors that only newer versions of the app will apply. This allows you to roll out multiple themes in parallel—each keyed by version—without changing the schema or node name.
Note: NeuroAccess currently always looks for a
Brandingitem. So at the time of writing, publishing multiple versioned themes is not supported. Also the versioning is only planned to allow for the app to resolve conflict between multiple items. In the case the app is version 2.6.0 and the provided theme is 2.5.1 it will still use that.
5. Step-by-Step Guide
5.1 Prepare your color palette
Create
MyColors.xaml:
<ResourceDictionary
  xmlns="http://schemas.microsoft.com/dotnet/2021/maui"
  xmlns:x="http://schemas.microsoft.com/winfx/2009/xaml">

<Color x:Key="ExamplePrimaryColor">#123456</Color>
<Color x:Key="ExampleSecondaryColor">#ABCDEF</Color>
</ResourceDictionary>
Host it so it’s reachable at one of:
- HTTP (for example,
https://neuron.example.com/MyColors.xaml) - XMPP PubSub: publish it as an item with ID
ColorsonNeuroAccessBranding, then URI:xmpp:NeuroAccessBranding@pubsub.example.neuron.com/Colors
Tip: Using XMPP URIs keeps everything within the broker—no external server required.
5.2 Prepare image assets
- Upload images so they are accessible using HTTP:
https://neuron.example.com/<filename> - Recommended IDs (add more if needed):
banner_large_lightbanner_large_darkbanner_small_lightbanner_small_dark
Record each asset’s ID, URI (for example,
https://neuron.example.com/banner-large-light.png), andcontentType(for example,image/png).
Tip: You can store image files in the broker’s Root folder so they’re publicly accessible at a simple HTTP URL (for example,
https://neuron.example.com/BrandingMaterial/banner.png).
5.3 Publish theme descriptor
Create the Branding item payload:
<BrandingDescriptor xmlns='urn:neuroaccess:branding:1.0'>
  <Version major='1' minor='0' patch='0'/>
  <ColorsUri>
    xmpp:NeuroAccessBranding@pubsub.example.neuron.com/Colors
  </ColorsUri>
  <Images>
    <ImageRef
      id='banner_large_light'
      uri='https://neuron.example.com/banner-large-light.png'
      contentType='image/png'/>
    <ImageRef
      id='banner_large_dark'
      uri='https://neuron.example.com/banner-large-dark.png'
      contentType='image/png'/>
  </Images>
</BrandingDescriptor>
And publish it on the pubsub node NeuroAccessBranding with the item id Branding
5.4 Verify in NeuroAccess
- Connect using NeuroAccess to your broker.
- The app fetches
NeuroAccessBranding→Branding. - It applies your colors and images in the UI.
6. Troubleshooting
No branding?
- Verify node:
NeuroAccessBranding - Verify item IDs:
Colors,Branding - Clear cache in NeuroAccess settings and restart
- Images not showing?
- Open URIs in a browser
- Check
contentTypevalues
7. Conclusion
A ResourceDictionary and image files let you brand your NeuroAccess app entirely via PubSub—no app update needed. Version descriptors for seamless theme updates.
8. References
NeuroAccess Branding schema: NeuroAccessBrandingV1.xsd
Colors XAML example: Colors.xaml
.NET MAUI ResourceDictionary docs: MS Docs
Quick-Admin-Login
It is now possible to associate a legal ID (or a Neuro-Access ID) with an administrative account on the Neuron®, from the build 2025-01-21. The login page now shows an animated QR code that you can can using the Neuro-Access app.

To associate a Neuro-Access ID (or legal ID) to a user account, edit the corresponding user. You will see three fields that have to be provided: The current Legal ID and the corresponding personal number and country code. You can get these from quicklog.in if not known.
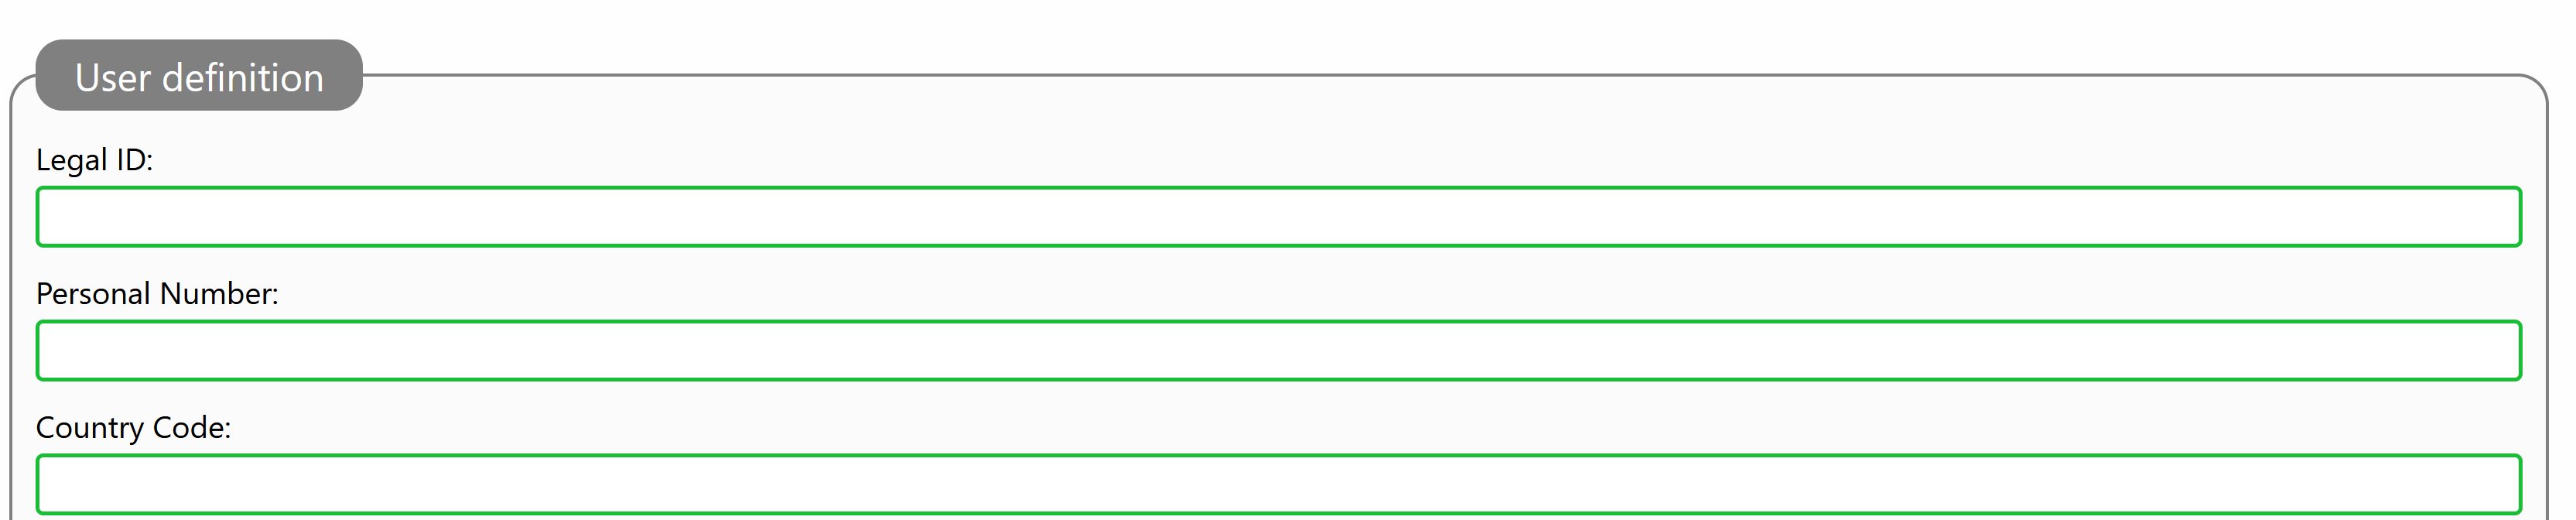
Once the information has been provided, you can login to the administrative console of the Neuron® using the corresponding legal ID.
Updating ID
As legal identities are limited in time, there will come a point when an ID needs to be updated. This will obsolete the old ID, which will be replaced by a new one. As long as this process is followed (i.e. old ID is obsoleted) and the new ID contains the same personal number and country code you can also use the new ID to login to the same user account. The legal identity reference will be correspondingly updated, and an event will be logged, for reference.
Event Log
All administrative logins are logged to the event log, so too the logins using Neuro-Access digital identities. The message text and corresponding properties may be different. Any problems such as duplicate legal identities associeted with multiple accounts, etc., will also be displayed in the event log.
#new, #features, #neuron, #admin, #neuro-access, #quicklogin
Content-Only Service Template
A new open repository has been published that simplifies the creation of new services that only publish content-files on the TAG Neuron®. The repository also contains instructions on how to implement such a service and the different steps that need to be completed in order to create an installable package for the service, to distribute it in a Neuron® network. It also shows how to implement a service that lets users login using Neuro-Access, or the administrative interface.
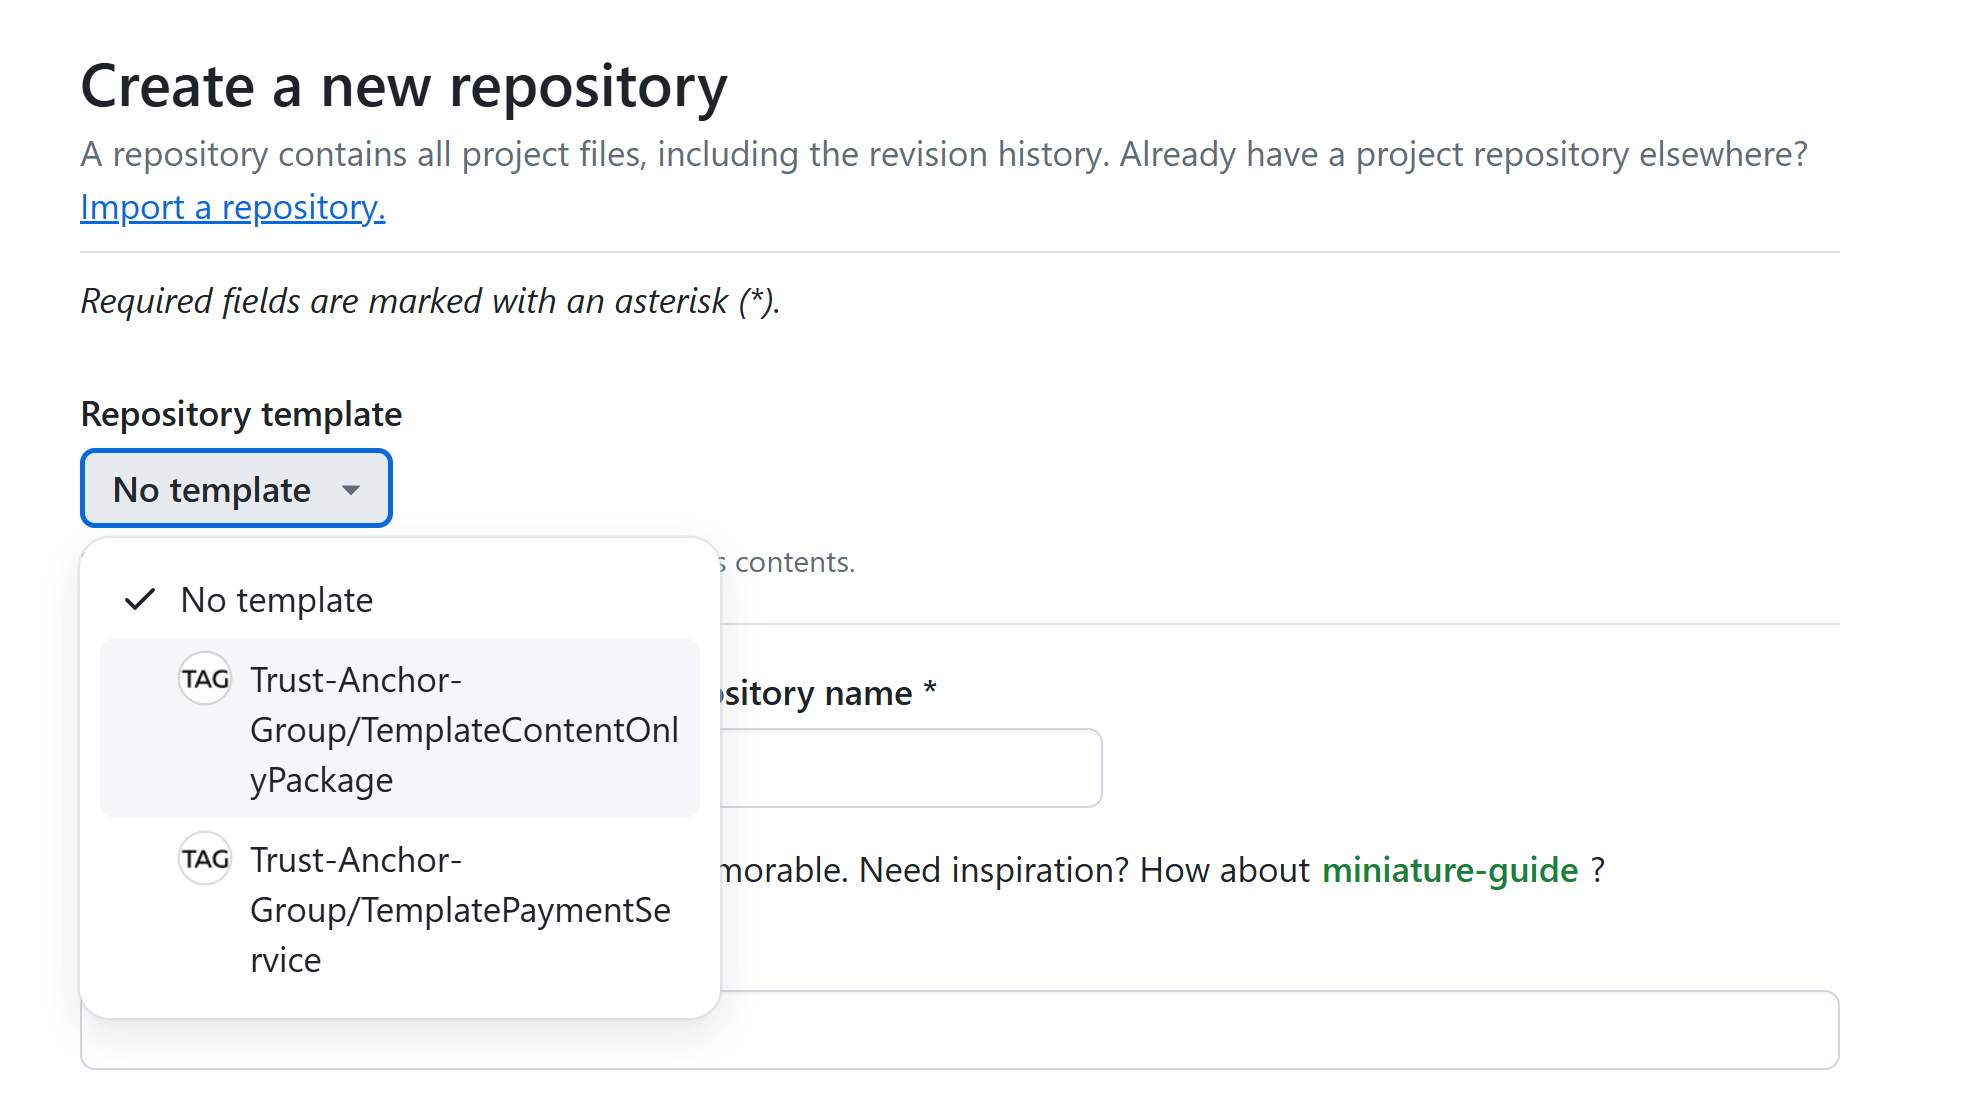
For more information, see the TemplateContentOnlyPackage on GitHub.
Development Neurons and Neuro-Access integration
If you are developing a local project on a locally hosted development Neuron®, and you want to integrate Neuro-Access to let users to login to show protected pages, your development Neuron® must be configured to permit this. This is done by adding the XMPP addresses (JIDs) of the apps involved during development to the Roster of the development Neuron®. On published Neurons, this is not necessary, as they are federated and use their domain names to interconnect with other Neurons (such as the Neurons serving your Neuro-Access connections). But a developer Neuron® cannot do this, as it most probably lacks both a domain name and a public IP address. Communication in this case, is done using the XMPP Addresses (JIDs) of the Neurons, as clients to their parent Neurons (which are federated). For communication to pass in this case, and not be rejected as invalid, the sender has to reside in the Neurons Roster (accessible from the Admin page, in the Communication section).
Posts tagged #neuro-access
No more posts with the given tag could be found. You can go back to the main view by selecting Home in the menu above.