Killing a State Machine
If a state-machine associated with a token or set of tokens misbehaves, and needs to be stopped, an operator of Neuro-Features on the Neuron® that hosts the state-machine can kill it. This does not destroy the token or tokens associated with the state-machine, it just stops the state-machine. The event is also appropriately logged, with information about who took the responsibility to kill the machine.
In order to be able to kill a state machine, the operator needs to fullfil the following requirements:
- Be an operator on the Neuron hosting the state-machine (i.e. have an administrative account on the Neuron).
- Have a Digital ID associated with the account.
- Have sufficient access rights to administer Neuro-Features. (This means, having the
Admin.Notarius.NeuroFeaturesprivilege associated with one of its roles.) - Digitally sign an approval of the killing of the machine, where the user affirms to reviewing the token and taking the responsibility of killing the state-machine.
Accessing the Token
To access available tokens on the Neuron, go to the Neuro-Features section in the administrative portal:
Find the corresponding token, and open it by clicking on its ID. A link of the following type is opened:
https://DOMAIN/NeuroFeature.md?ID=TOKEN_ID
If you know the Token ID, you can open the page directly by replacing TOKEN_ID in the URL above with the correct Token ID. If you don’t know the Token ID, but you know the ID of the smart contract that created the token, you can use the script prompt, to find the Token ID, using the following SELECT statement:
select
	top 1 TokenId
from
	NeuroFeatureTokens
where
	CreationContract=CONTRACT_ID
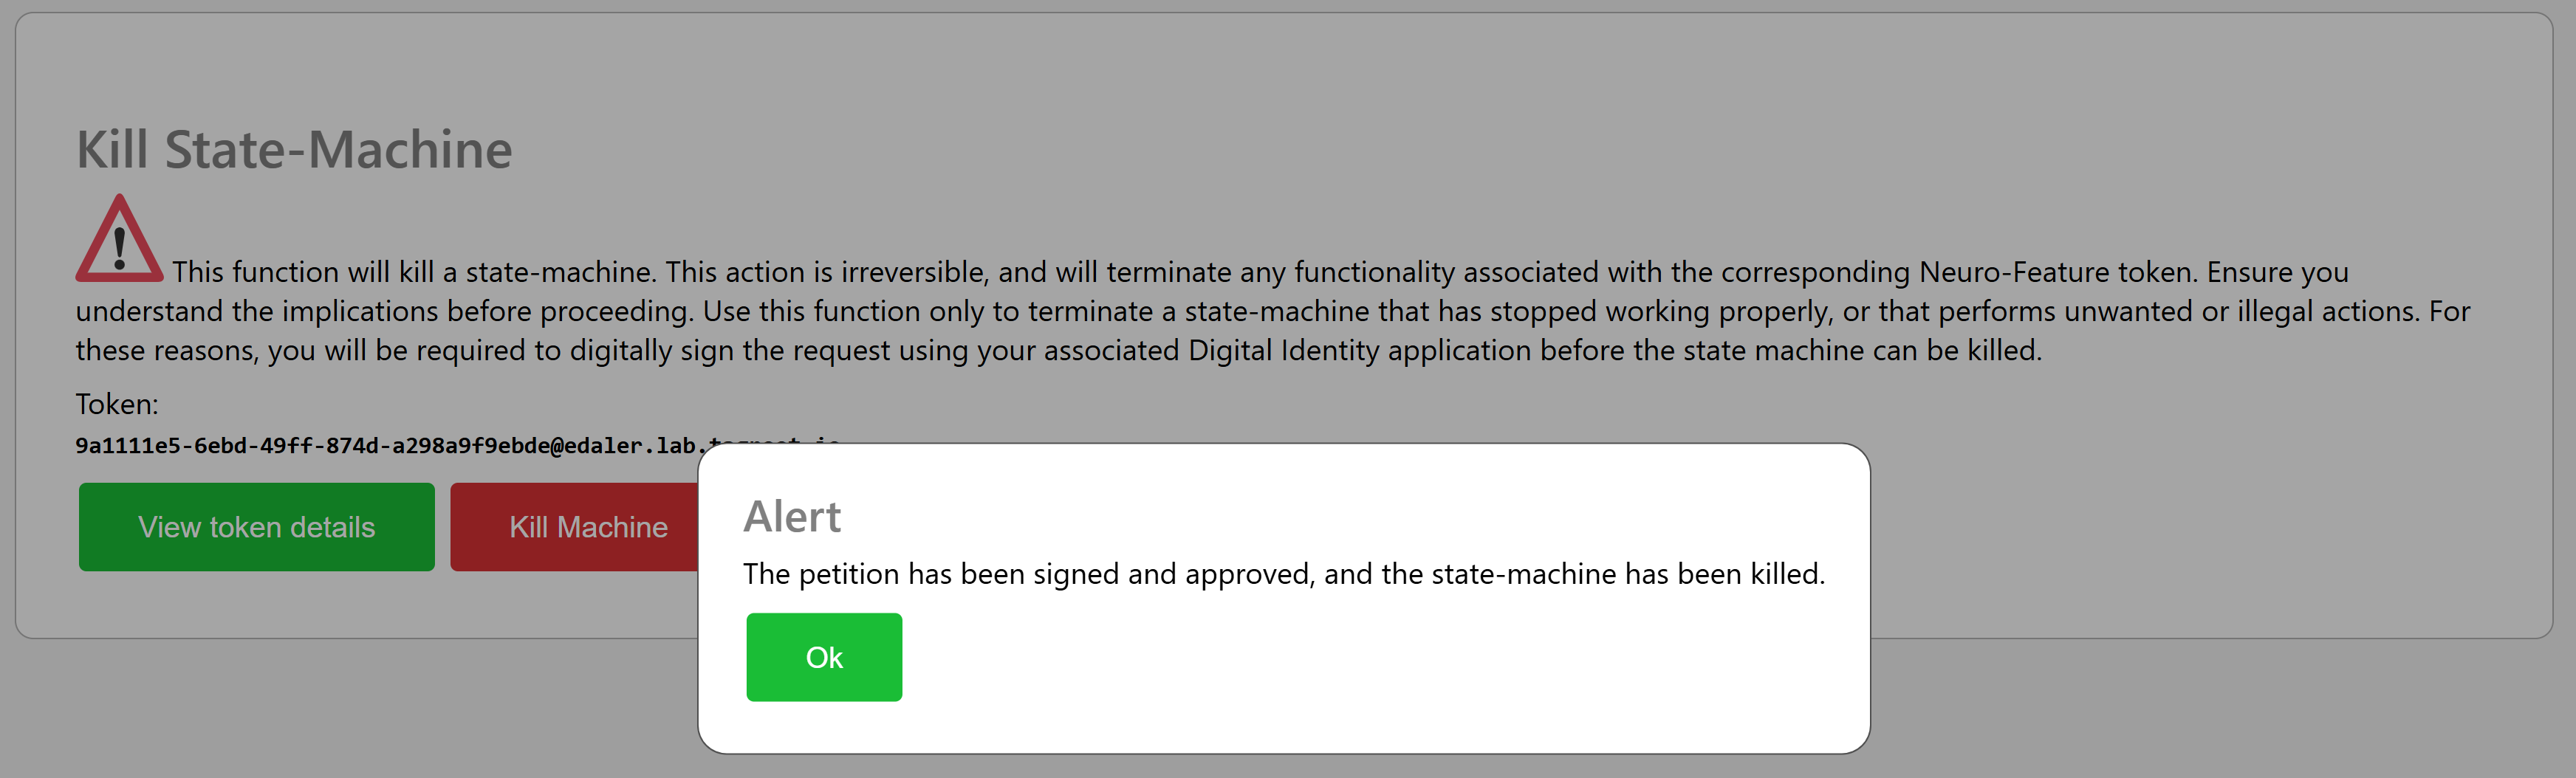
Killing the state machine
Once the Current State part of the Neuro-Feature page has loaded, it will present a Kill Machine button, if the token has an associated state-machine.
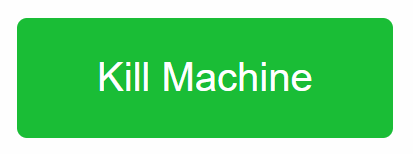
Press this button to open a new page where you can kill the machine. The page has the following URL. If you have the Token ID already, and cannot open the Neuro-Feature page associated with the token for some reason, you can enter this URL directly into the broker, replacing TOKEN_ID with the corresponding Token ID:
https://DOMAIN/KillMachine.md?ID=TOKEN_ID
The page that opens is simple and informs the user they need to approve the operation using their Digital ID, and that they will be responsible for the action:
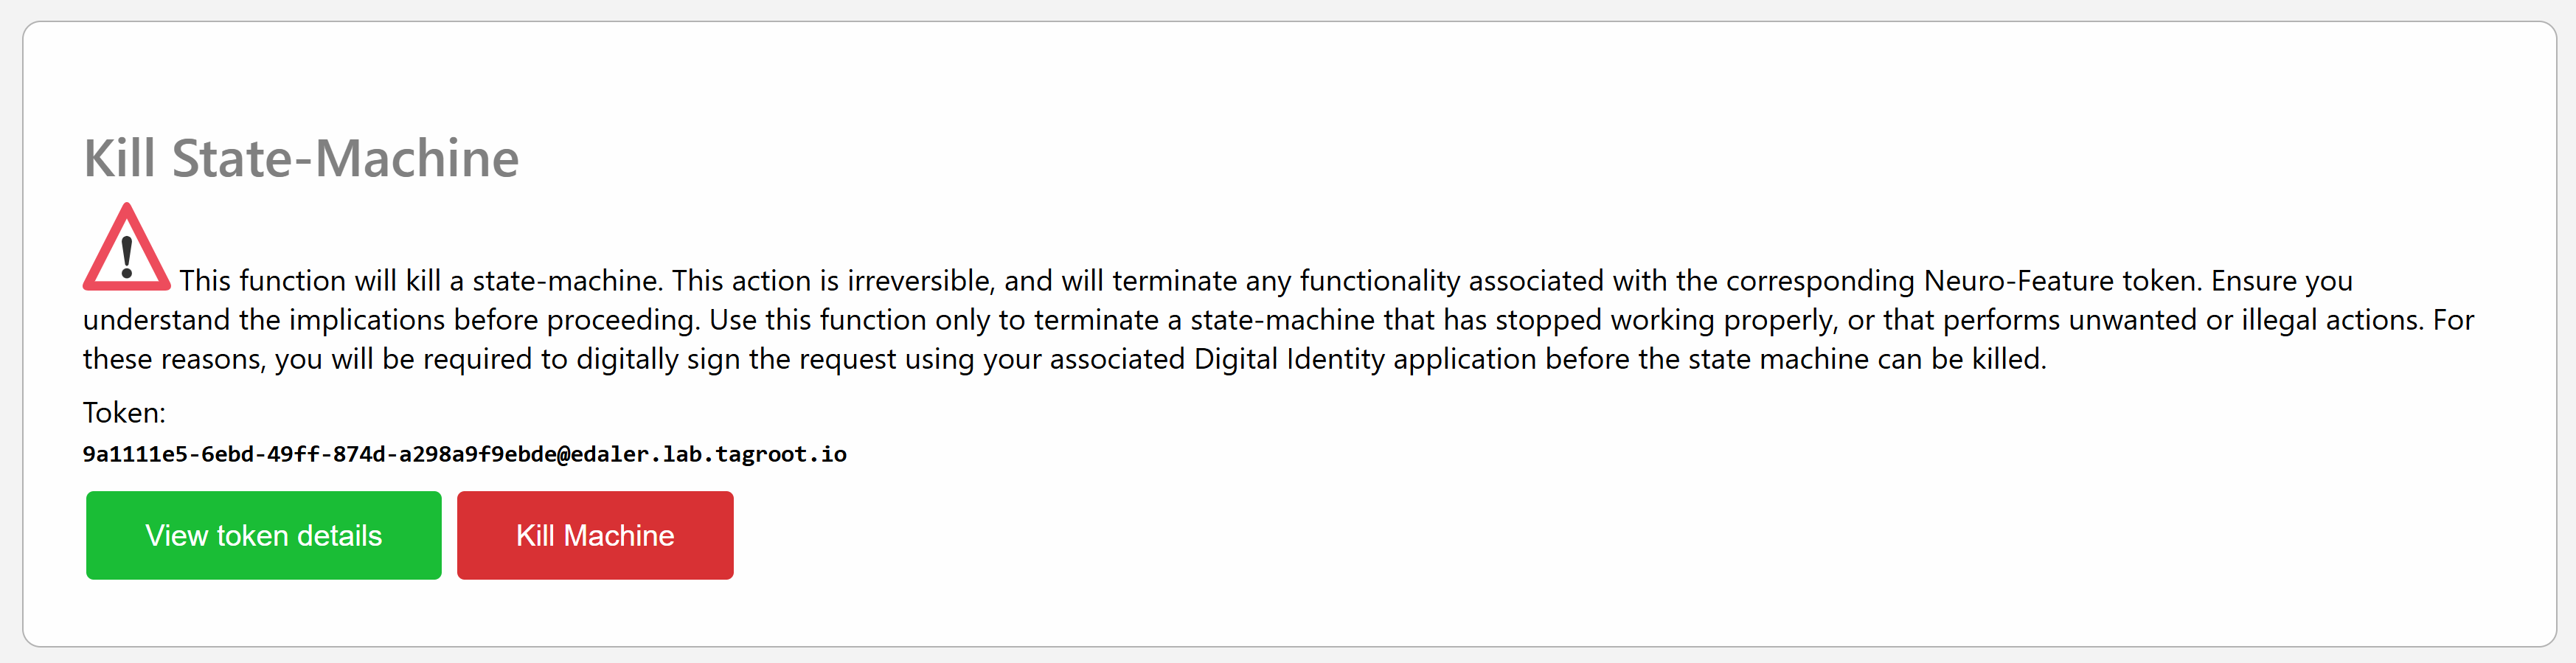
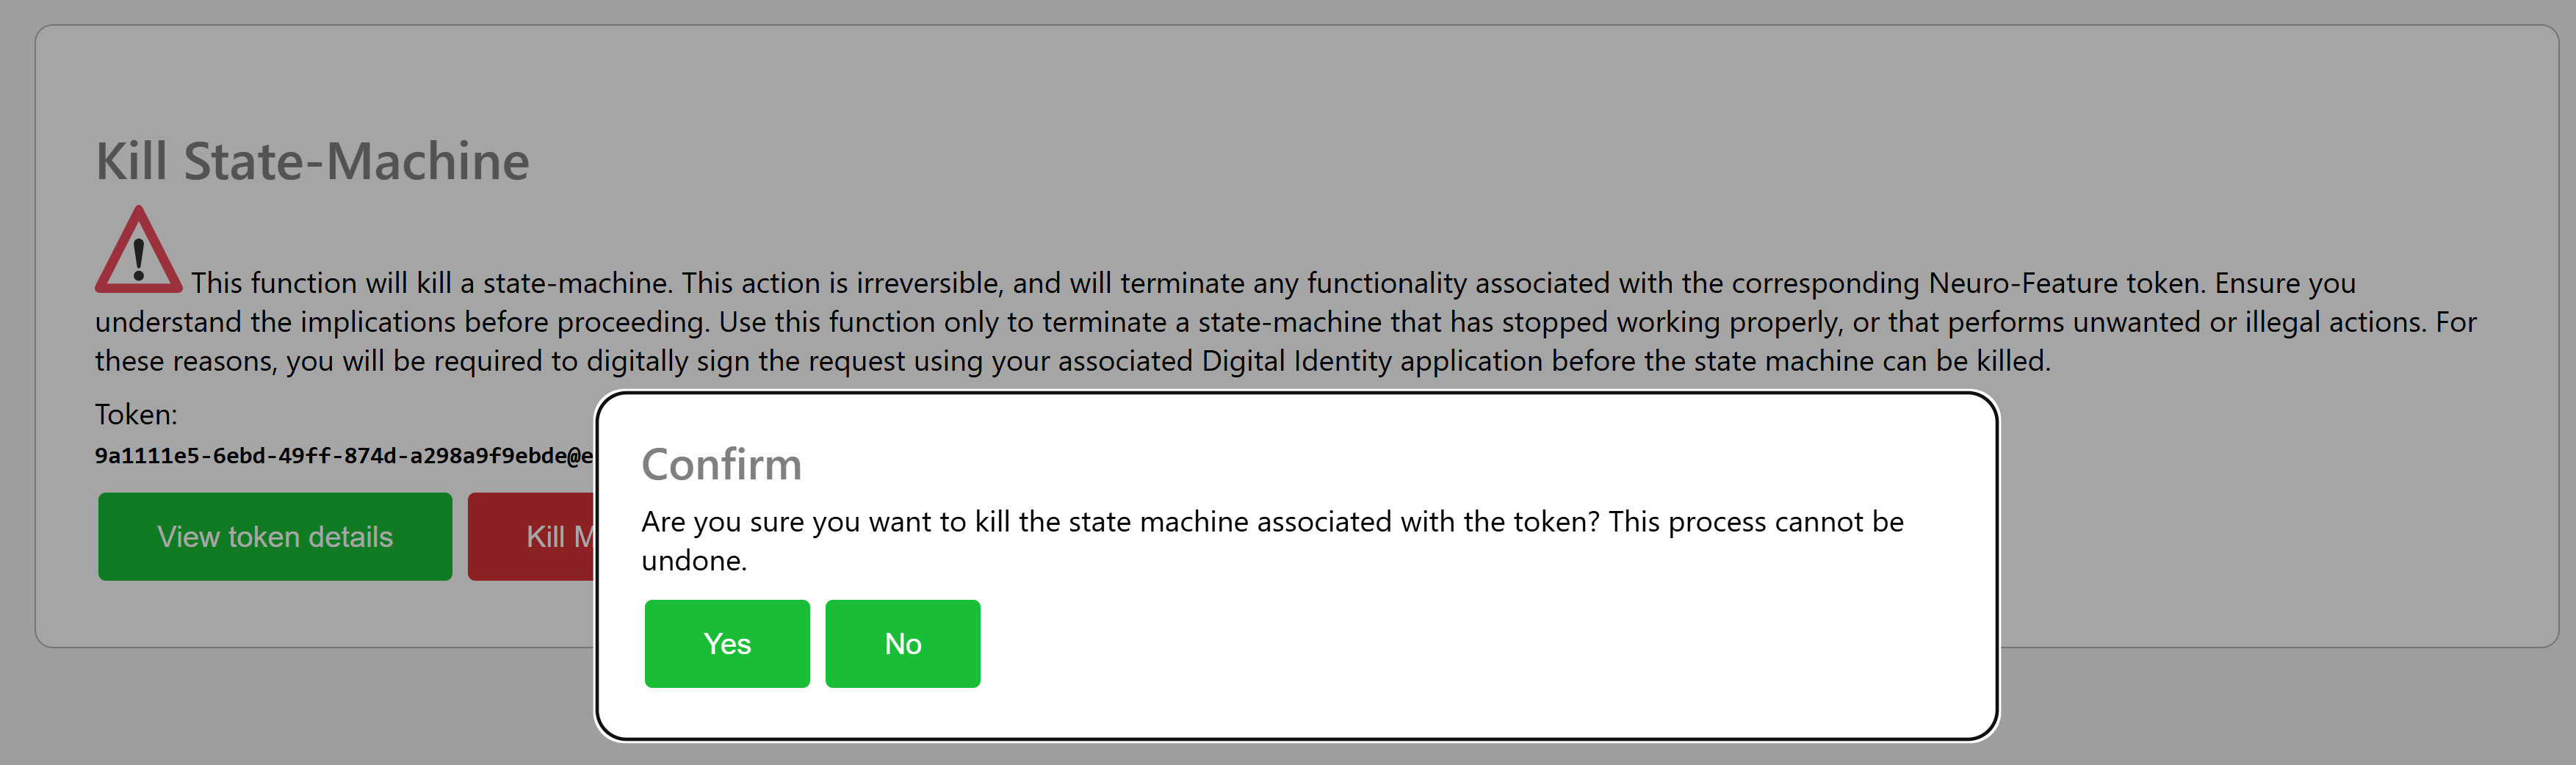
Press the Kill Machine button to initiate the process by sending a petition to the Digital Identity of the currently logged in user:
If a Legal Identity is associated with your account you will receive an acknowledgement that a petition has been sent.

You will see this petition in your Digital ID app, as follows:
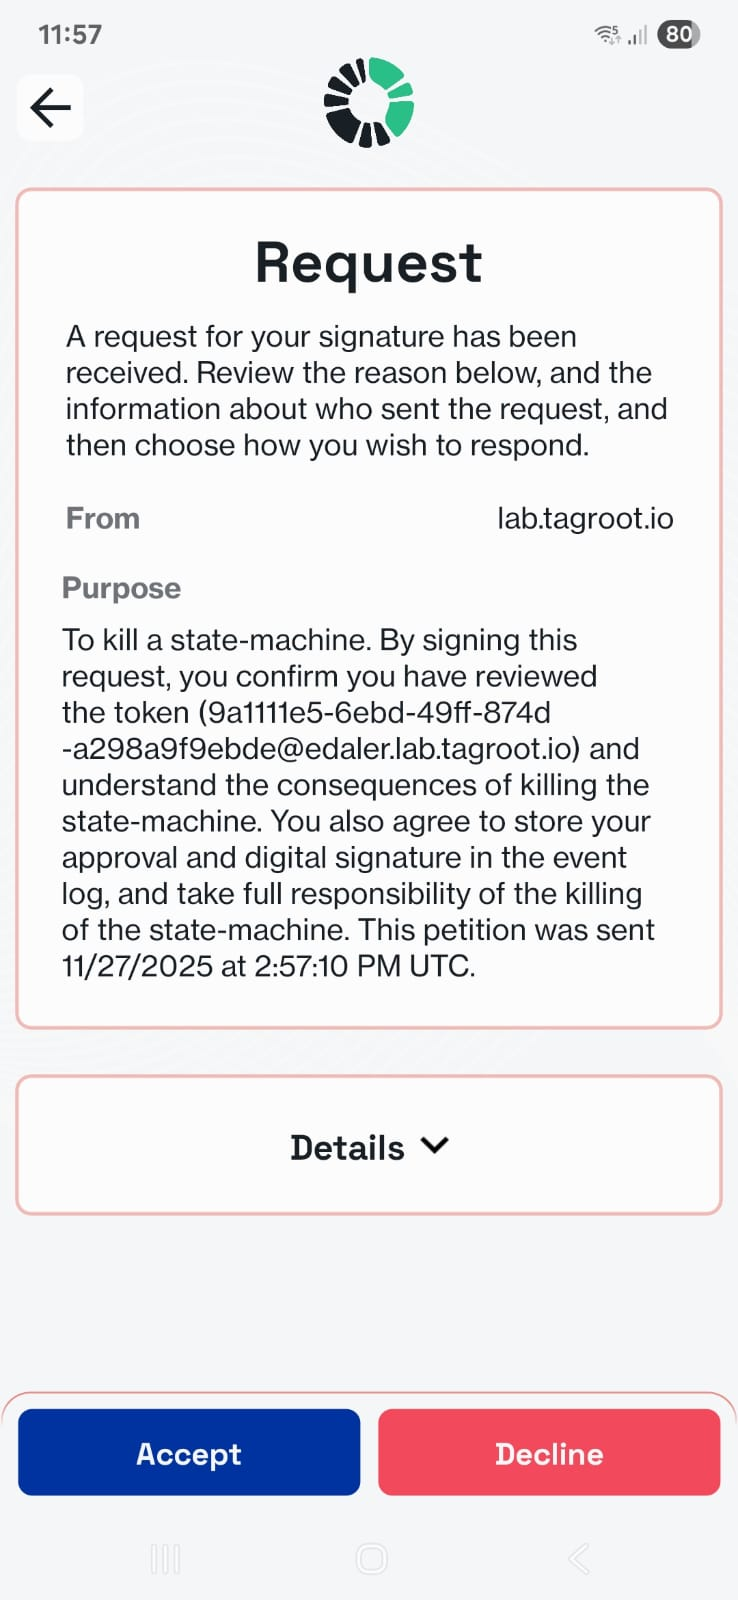
Take time to read through the purpose of the signature. If you agree, sign the petition, and the state-machine will be killed:
Processing signed contracts in a state machine: Open Vote example
The LegalLab repository contains a new example that illustrates how Neuro-Feature token state machines can be used to process signed smart contracts. The example implements a simple open voting system that tokenizes each vote, counting ballots within a given time frame, as they are cast. Each ballot is a smart contract signed by a participant. The state-machine of the vote counts accepted ballots, rejects incorrect ballots, and logs events to the Neuro-Ledger for transparency and auditability.
Note: The same architecture as exemplified by the Open Vote set of contracts (Vote + Ballot contracts) can be used in many technically similar (albeit conceptually different) cases. One such example is the tokenization of agriculture, for example, where each cultivation can be tokenized, and it can keep track of its current state transparently (for the end consumer) by processing observations, each observation recorded as a signed smart contract with information about what has occurred. Another example can be the tokenization of medical journals, for interoperability and privacy protection. The journal observes diagnoses and tests being performed, each one recorded as a signed smart contract with the appropriate information.
Vote Contract
The first contract in the Open Voting model (OpenVoteYesNoAbstain.xml), contains the state-machine Neuro-Feature token definition and contract. It defines the basic states of ballot processing. It assumes each ballot contains machine-readable information, as defined by the schema OpenVote.xsd, also downloadable online via its target namespace: https://paiwise.tagroot.io/Schema/OpenVote.xsd.
Note: Each contract containing machine-readable instructions will only be accepted if each Neuron® can validate the XML it contains. This is done by downloading the schema files from the corresponding target namespaces and using these schemas for validation. If the validation does not complete successfully, the contract is automatically rejected.
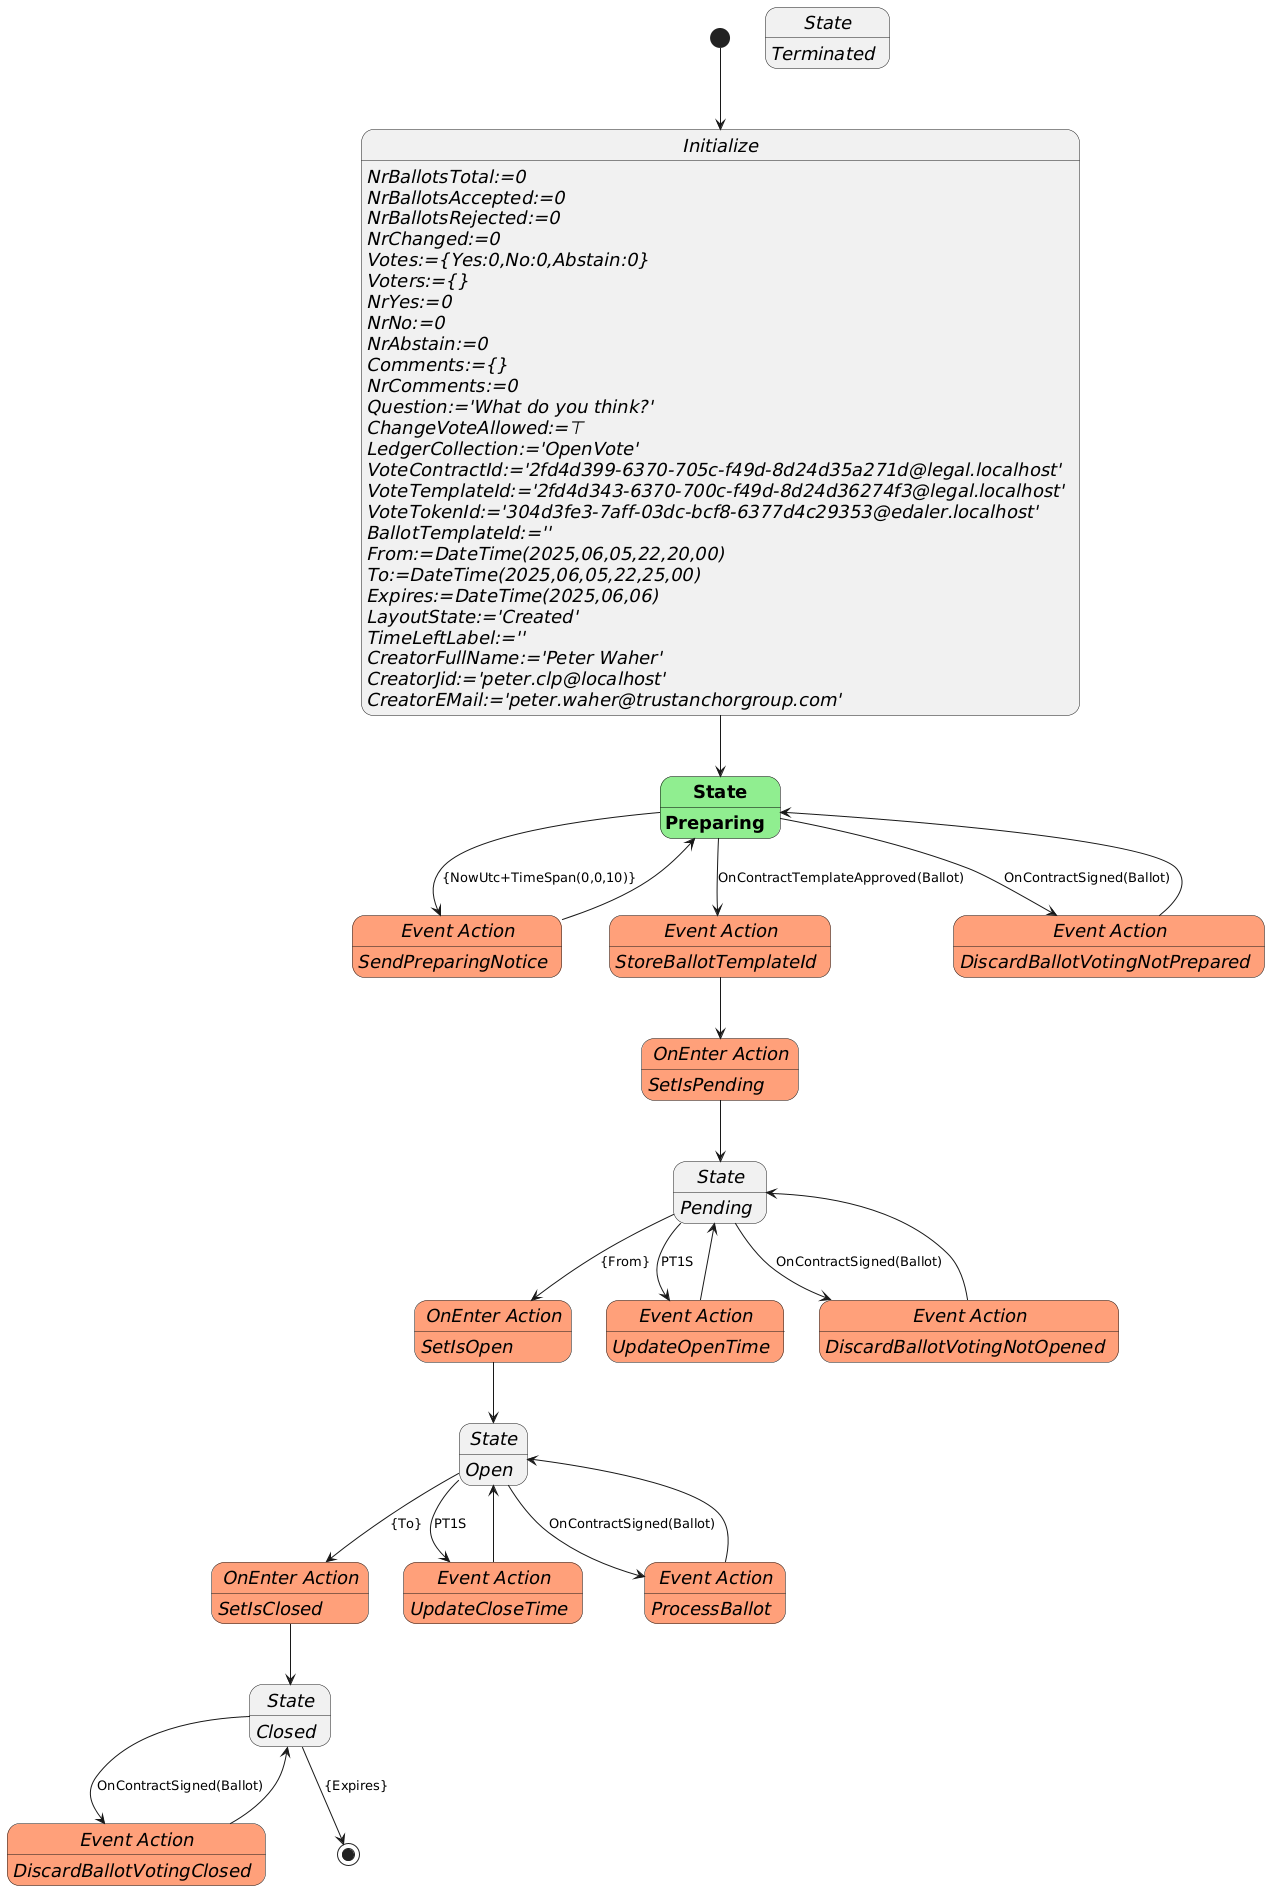
The states defined in the contract can be illustrated with the following state diagram:
The voting contract allows the creator to pose a question, define if participants are allowed to change their votes, and between what times the vote will be active. Times are defined in UTC. Participants need personal digital IDs with at least a validated country code, personal number and full name. Only one ballot per (Country, Country Code) will be counted. Apart from a Creator, the contract also requires a Certifier, which can be the same as the creator. The Certifier are given rights to cancel (invalidate) an election.
The states a voting procedure passes through are:
During the Preparing state, the state machine checks if it is paired with a Ballot template that points to it. The Ballot template needs to define a contract reference parameter to the vote, and it needs to enforce the template of the vote to match the template used to create the vote. If one such Ballot template is found, it progresses automatically to the next state. If one is not found, it awaits until such a template is approved on the Neuron®.
The Pending state, is a state where the vote is prepared, but has not commenced yet. During this state, the present view can be displayed, and links to the vote can be distributed. Any ballots cast during this state will be automatically rejected. Once the time to open the vote has been reached, the state-machine progresses to the next state.
The Open state is where participants can vote by signing Ballot contracts. If they are signed using the appropriate template, and pointing to the vote, the state-machine will process the ballots. If any errors are encountered, the corresponding ballot is rejected, and error logged. When the finishing time has been reached, the state-machine progresses to the next state.
The last state is the Closed state. Here, the voting machine is kept alive, to present results, but no ballots are processed, so the tally cannot be changed. Once the expiry time is reached, the state-machine is ended.
During state changes, the creator is notified by XMPP (Instant Chat Message) and e-Mail about the state of the vote. The messages contain links to the vote. These can be distributed to participants of the vote. The vote can also be shown in a browser. If published, voters and other participants can follow the results in real-time.
Ballot Contract
The second contract template is the OpenBallotYesNoAbstain.xml contract. It defines the ballot contract that can be used to participate in any votes generated by the corresponding voting template. The two templates must be paired. So, once the voting template has been proposed and apporved, its ID must be set into the Ballot template contract, before it can be proposed. Once this has been done, it can be proposed and approved accordingly. Then, the pair can be used with as many votes as desired.
The Ballot template defines the Boolean parameters necessary to be able to select Yes, No or Abstain. The Machine-readable part (defined by the https://paiwise.tagroot.io/Schema/OpenVote.xsd namespace) instructs the vote state-machine how the ballot is to be interpreted. The Ballot template has a contract reference parameter of a given name, and it must require a contract reference having a template ID restriction equal to the ID of the voting template. Once the voting state-machine is running, it will provide links to the corresponding Ballot contract template, with these references pre-set, so the user does not need to worry about providing the values for thse references. The user will only scan a QR code to vote.
Approved templates for experimentation
If you want to experiment with the open voting solution described, you can use the following approved contract templates. You can either copy the contract IDs and use in your application, or if you use an App, scan the corresponding QR code to access it.
To create a vote, i.e. define a question partiticpants will vote on, use the following template by scanning the code or entering its ID in the appropriate interface:
The matching Ballot template (which you will not need to scan here directly, as it will be presented pre-filled for you, see below), is:

After scanning the code, a new vote contract will be displayed. Fill in the details (question, if votes can be changed and the time interval the vote will be open; remember the times need to be provided in Universal Time Coordinates, or UTC). Sign the contract, both as Creator and Certifier (unless you want another person to sign as Certifier). Once the vote has been created and been properly signed, a Neuro-Feature token will be created. It will send you an e-mail with a link to the voting results page. The vote only passes slightly the preparation state, as an approved ballot template already exists. The vote page will look something as follows. Note the QR code to the right. It will point to the ballot contract template to use to cast a ballot, and also contain the reference to the current vote pre-filled. All you need to do after scanning the QR-code, is to select how you want to vote.
Note: The vote token is defined to be unique. This means, you can only create one token (one vote) with the same set of parameters. This means, you need to change any of the parameters from previous versions, including the question or time parameters, before you can create additional votes.
Vote Count & real-time presentation
The token that is generated by the vote contract has a present report that displays the current state of the vote. The creator can access the present report from the client used to create the vote contract, and by extension the token. The creator will also get an Instant Chat Message and an e-Mail, containing the present report and current vote count (which would be zero and pending, before the count starts). There will also be a web URL which can be distributed, that will show the vote to any online viewer. The URL will have a format similar to https://sa.id.tagroot.io/NF/a86d6033-b694-7b5e-c8d3-42d5200ec85c@edaler.sa.id.tagroot.io. The ID in the URL corresponds to the ID of the Vote. You can match this ID with the ID displayed for the vote (see below). The present report can be projected and displayed in kiosk mode as well. It will be updated in real-time as votes are counted. The initial view may be something as follows:
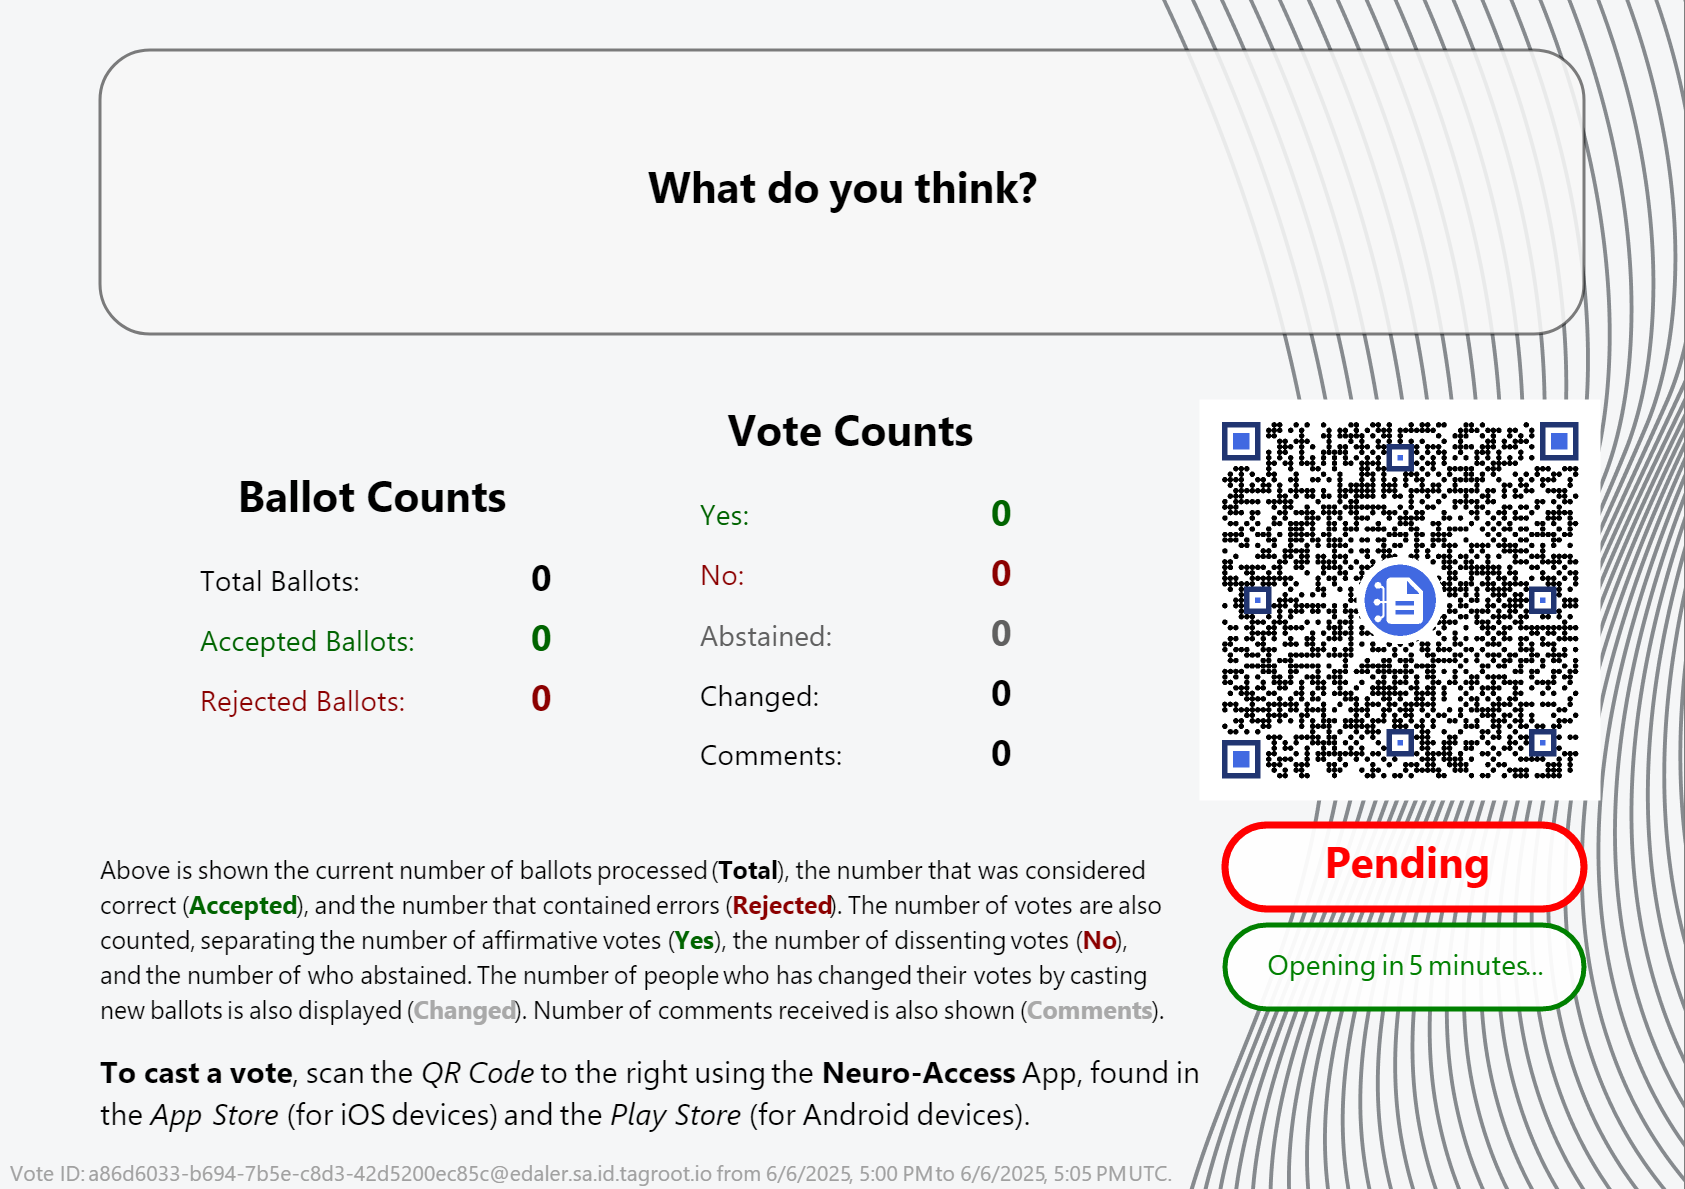
Note The QR code in the report can be scanned by participants, and will point to the ballot template, with the vote reference pre-filled in. All the participant needs to do, is vote, and sign the ballot and the vote will be counted. Once the vote closes, the report will be updated accordingly also.
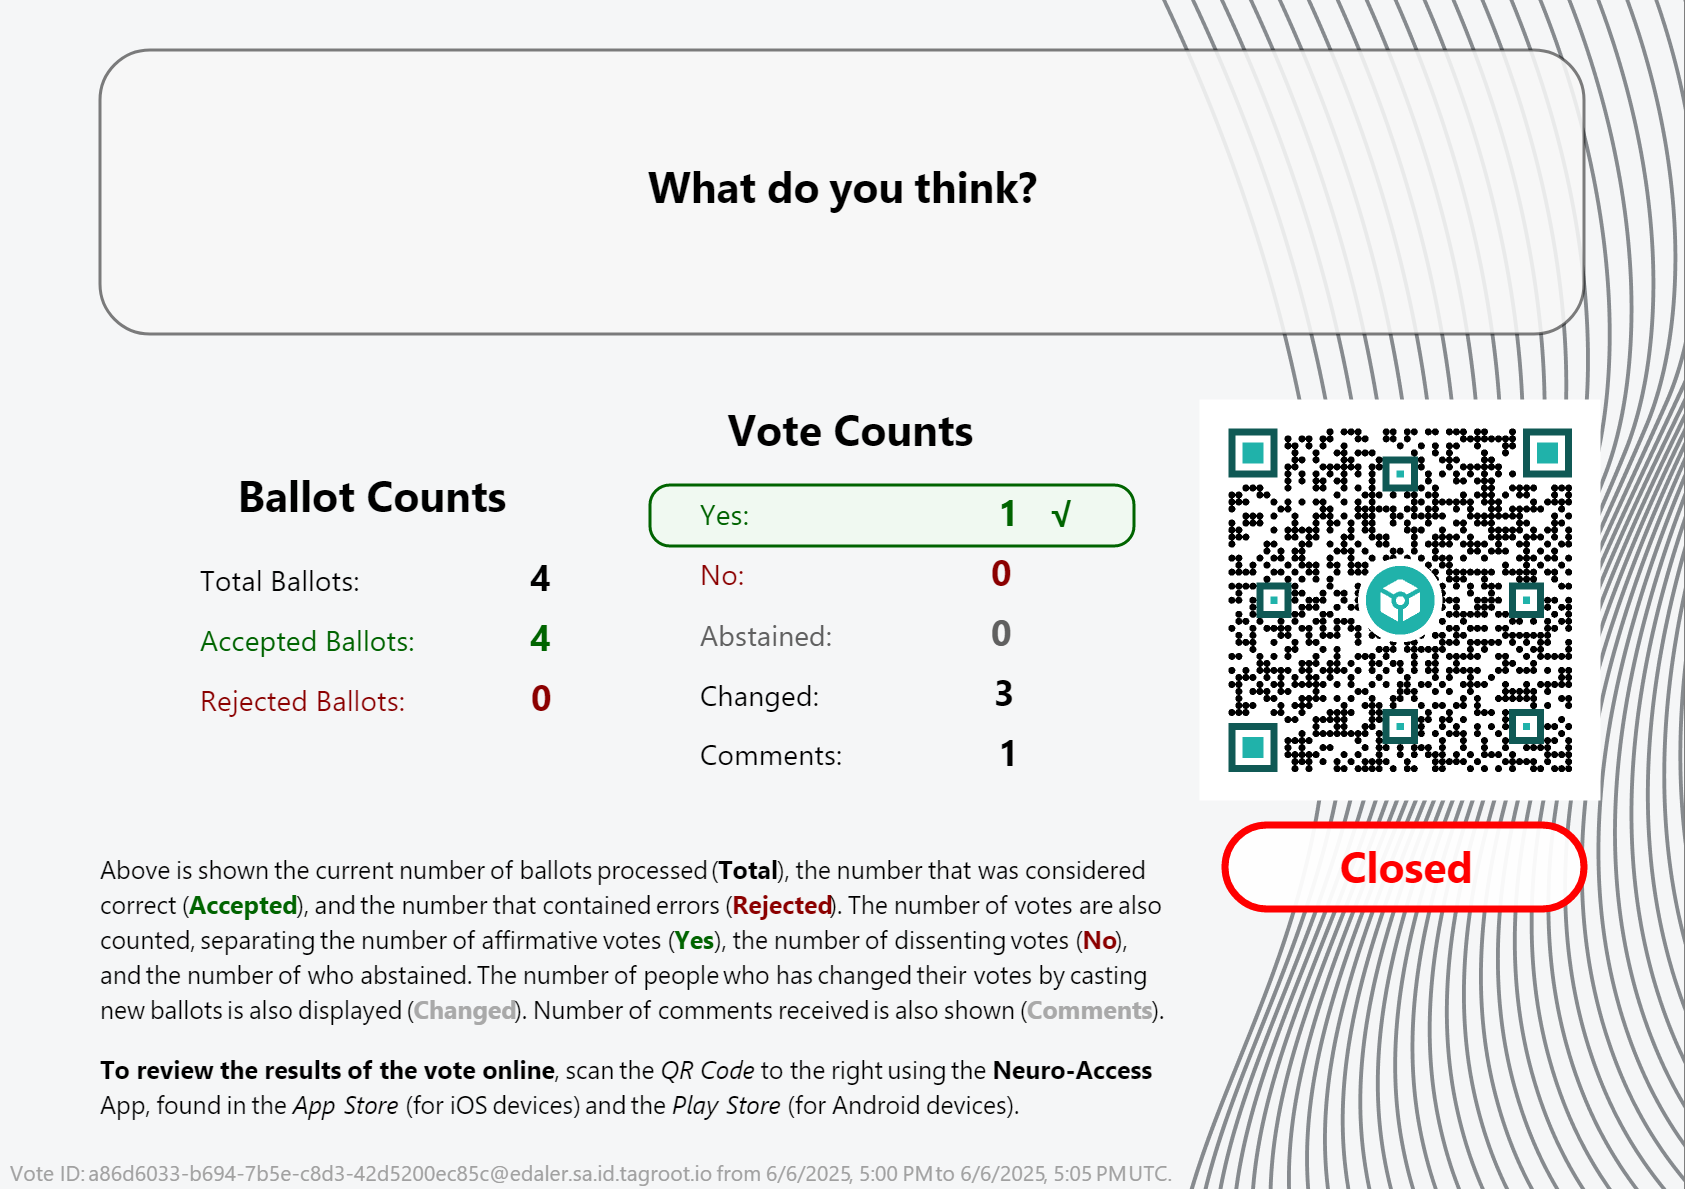
Note: Once the vote closes, the QR code changes. It is no longer pointing to the ballot template, but instead to the token that performed the count. Scanning it will give access to the token, and the reports it publishes.
Presentation Layout
The layout presenting the vote count is generated by the voting token itself, and is part of the vote contract template, and can therefore be reviewed as well. It is an XML Layout format, availble in the OpenVoteResultLayout.xml file. You can edit such XML files and preview the layout using LegalLab as follows:
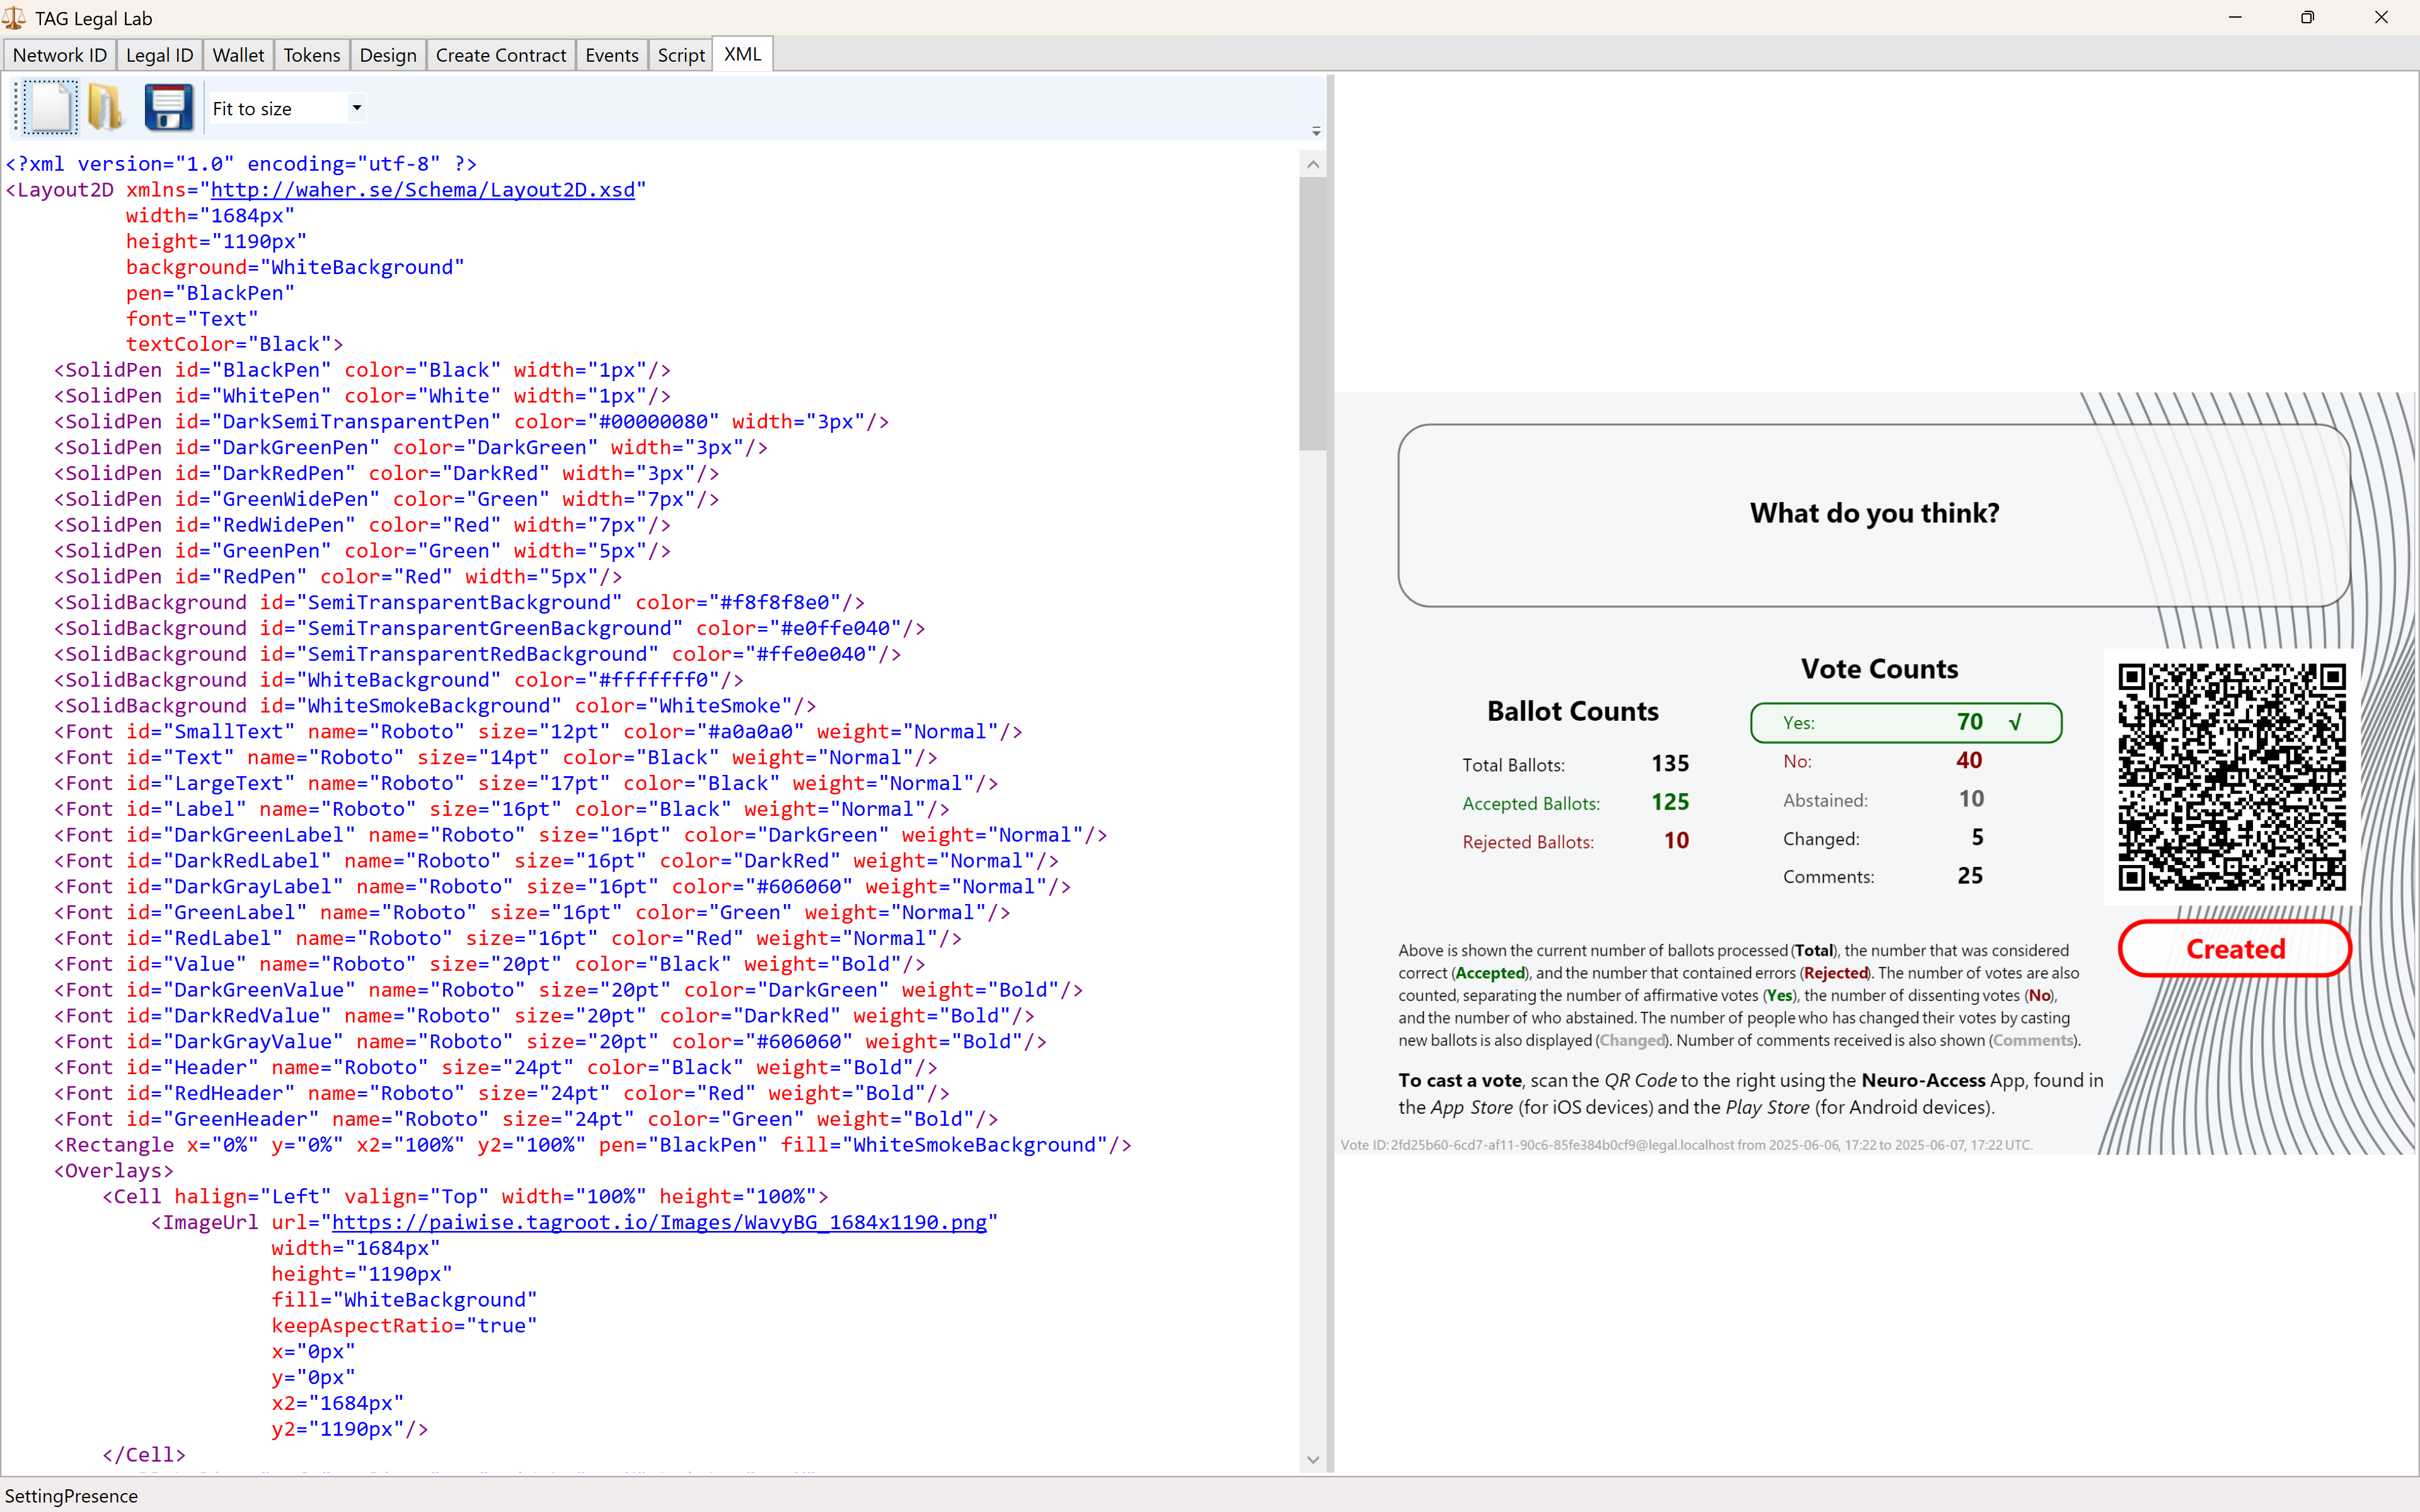
The variables and script functions used in the layout need to be initialized. This can be done in the Script tab. You can use the initialization script published in the repository: OpenVoteResultLayoutInit.script to generate the view above.
Neuro-Ledger entries recorded
Apart from all entries recorded regarding Digital Identities, Smart Contracts, Tokens and State-Machines, the Open Vote example records several entries by itself. These include:
| Entry | Description |
|---|---|
BallotCounted |
A ballot has been counted. |
BallotRejected |
A ballot has been rejected. |
BallotRevoked |
When an older ballot has been revoked because the participant submits a new ballot. |
CommentReceived |
A comment by a participant has been received. |
Note: The vote contract defining the vote, also defines the Neuro-Ledger Collection these entries are recorded in.
The other common Neuro-Ledger collections annotating entries are:
| Neuro-Ledger Collections | |
|---|---|
LegalIdentities |
Contains entries related to digital identities, including Neuro-Access digital identities. |
Contracts |
Contains entries related to smart contracts, including the voting contract and the ballot contracts used during voting. |
NeauroFeatureTokens |
Contains information regarding Neuro-Feature tokens, including the token definition of the open voting logic. |
StateMachines |
State-Machine information is recorded in this collection. This includes the open voting process performing the ballot counting and presentation. |
StateMachineCurrentStates |
Contains current states of different State-Machines. |
StateMachineSamples |
Contains variable changes as they are persisted by State-Machines. These samples can be used to track the counting process. |
#tutorial, #example, #legallab, #contracts, #neuro-feature, #neuro-ledger, #state-machine
Smart Contract operations on tokens
One of the ways an owner of tokens can perform operations on them, is by using smart contracts referencing the tokens. The operations that can be used are defined by the https://paiwise.tagroot.io/Schema/NeuroFeatures.xsd namespace, the same namespace used to create the tokens.
The operations supported include:
CreateDestroyDonate(new)Transfer
Create
A smart contract with the Create machine-readable element creates one or more Neuro-Feature tokens. Creating tokens may require a comission fee to be paid first, as defined by the smart contract template used. An initial value is set by the creator.
Destroy
Destroy on the other hand, in a smart contract, destroys the token, if such is permitted by the token definition. During the creation of the token, the creator defines under what cirumstances the tokenⓈ can be destroyed, and by whom (if at all):
CreatorCanDestroydefines if the creator is allowed to destroy the token.OwnerCanDestroyBatchspecifies that an owner can destroy a token or tokens, but only if the owner is the owner of all tokens created using the same creation contract (here called a batch of tokens).OwnerCanDestroyIndividualallows the owner to be able to destroy any token it owns, regardless if other owners owns tokens from the same batch.CertifierCanDestroycan be used to give privileges to a certifier signing the token creation contract, to destroy any of the certified tokens. This gives the certifier the authority to ensure and enforce the rules set forth in the creation contract.
Donate
The Donate operation is new as of build 2025-01-30. It allows an owner to donate a token or set of tokens to another, without a monetary recompensation. This operation does not change the registered last value of the token. (This is the initial value set during creation if the token has never been transferred, i.e. sold.) The donation operation registers a specific donation event for transparency, showing the ownership has changed without compensation.
Transfer
The original way to change ownership of a token is called Transfer and includes a payment of eDaler® to compensate for the transfer. This payment may include a commission to the Trust Provider hosting the token. The payment will also be recorded as the new value of the token, and a corresponding event will be recorded, for transparency, giving future new owners (buyers) a way to transparently review a token’s history and trade.
LegalLab
The LegalLab repository contains multiple examples of token operations. This includes examples of the Create, Destroy, Donate and Transfer operations.
Adding external notes to Neuro-Feature™ tokens
Each Neuro-Feature™ token has an event log. Notes can be added to this log. If the Neuro-Feature™ token runs a state-machine, the state-machine can process the contents of such notes also.
There are 2 × 2 × 2 types of notes that can be added: Plain text and XML notes can be added, and they can be either by owner or an external source. They can also be personal or public. Personal notes are deleted when the token changes owner. This article describes how a public (to those with access to the token) external note can be added to the Neuro-Feature™ token.
External Sources
To add an external note on the token, you need to be an approved external source. Depending on method used to add the token, this source is typically a User name on the Neuron® hosting the token. This User name, can also be a domain name of the caller, if mutual TLS (mTLS) is used to authenticate the call. If note is added by an XMPP client or Agent API client, the source would be the Bare JID of the client adding the source. In all cases, the source needs to be an approved source, otherwise the note will be discarded.
Methods of adding an External Note
There are multiple ways how a note can be added to a token. If the caller is not the owner of the token, the note will be added as an external token. Some of the methods described allow the Owner to add a note. If this is the case, the note will be added as a normal note, and may be processed differently to an external note.
XMPP Library
You can use an XMPP extension library, such as the NeuroFeatures nuget from TAG. It extends the Waher.Networking.XMPP library using in the Neuron®, LegalLab, IdApp, Neuro-Access, and other projects. Once the XMPP Client is connected, you can use the extension library to add notes to any tokens.
Approved Sources: If adding a note via the XMPP library, the account you use to sign in must either be part of the contract that created the token, or be an approved external source. The token (if running a state-machine) can define what external sources are approved.
Agent API
The Agent API can be used to add notes to tokens in the network. Multiple implementations exist, including an Agent API nuget. Depending on the type of note you want to add, you can use the AddTextNote or AddXmlNote resources to add notes.
Approved Sources: As with using an XMPP Library, the account you use to sign in must either be part of the contract that created the token, or be an approved external source. The token (if running a state-machine) can define what external sources are approved.
NeuroFeatureNotes Nuget
A specific nuget exists for adding external notes to Neuro-Feature™ tokens: NeuroFeatureNotes. The source-code of this nuget is available in the AddNote repository published by TAG. The repository also contains information about the methods to use to add an external note, and what parameters are required.
Approved Sources: The nuget performs an HTTP POST to the Neuron® hosting the token. The request is authenticated using mutual TLS (or mTLS), where the caller provides a valid certificate that can be used to sign the request. To be able to use this method, you need to do the following:
Enabled mTLS on the Neuron® hosting the Neuro-Feature™ token. This is done in the gateway.config file, and then restarting the Neuron®. You need to set mTLS option to Optional at least, for mTLS to be activated for use in HTTP requests.
Create a Role on the Neuron® for users that are permitted to add notes on the Neuron®. The regular expression approving adding of notes specifically is:
+NeuroFeatures\.Notes\.Add\.(Text|XML)Create a User on the Neuron® with the same user name as the domain name in the certificate you want to use. The user needs at least the privileges define in the Role above.
Note: There is no need to specifically in the token approve the external source, if the operator has approved the domain name already, authenticated using mTLS, as described above.
Once the settings have been made, the library can be used to add external notes to tokens on the Neuron®.
Command-Line tool
The AddNote repository contains a command-line tool that can be used to add external notes on tokens. This command-line tool can be used to automate adding notes via script. The repository lists the arguments required to run the tool.
Approved Sources: As the command-line tool uses the NeuroFeatureNotes nuget to add notes, authentication is performed using client certificates and mTLS, and the same steps of configuring the hosting Neuron® is required, as described above.
Script
If running multiple Neurons, you can add an external note using script on one Neuron® on a Neuro-Feature™ token on another Neuron®, using the certificate of the calling Neuron®.
To add a text note, call the following script (on the first Neuron®, via a web-service or the Prompt):
Post("https://DOMAIN/AddNote/TOKEN_ID","ADD THE TEXT YOU WANT TO ADD HERE.",\{\},Waher.IoTGateway.Gateway.Certificate)
To add an XML note, call a similar script, but instead of POSTing a string, POST an XML document (the XML needs to be valid, in accordance with the schema, downloadable from the namespace):
Post("https://DOMAIN/AddNote/TOKEN_ID",<ADD THE XML YOU WANT TO ADD HERE>,\{\},Waher.IoTGateway.Gateway.Certificate)
PS: The Community site adds backslash characters before the start and stop braces in the script examples above. These need to be removed when executing the script.
Approved Sources: The script above performs a POST that will be authenticated using mTLS, as in the examples above. Therefore, the same steps of configuring the Neuron® hosting the token is required, as described above.
Creating a Neuro-Feature token on credit using AgentAPI
This article describes how you can use the Agent API to create Neuro-Feature™ tokens on credit. It assumes you already have an account, and a wallet created. The wallet will receive the tokens created, as well as receive the credits required to pay for any token creation fees required. If you do not have an account with a wallet, check out the recipe Creating a wallet using Agent API.
The process is as follows:
- A smart contract template is created and approved. The purpose of the template is to define how tokens are created, and their legal context.
- A smart contract is created based on the approved template.
- Neuro-Credits™ are bought, to generate sufficient eDaler® in the wallet to create the tokens.
- Invoices with reminders are sent to the e-mail registered for the account.
- Payment of invoices can be done at a later stage (before the due-date) on the links provided in the e-mails.
- The contract is signed. This casues a series of events:
- The token generation process to start (if contract successfully approved, and not failed).
- Funds required to create the token or tokens are withdrawn from the wallet.
- The created token or tokens are received in the wallet.
Creating a smart contract template for token creation
The creation of smart contract templates is done outside of the scope of the Agent API. It is typically a development process, where token developers generate the template in some form of tool, such as LegalLab, and publish the templates on Neurons. Once the templates have been approved by the Neuron® operators, they can be the basis of creating smart contracts using the Agent API. When creating a smart contract based on a template, you can change the parties that sign, and the parameter values, within the valid ranges defined by the template, but you cannot change the underlying definition of the token, or any human-readable sections or validation rules of the smart contract template.
Note: The LegalLab repository contains many examples of templates for creating Neuro-Feature™ tokens. These can be used for development purposes, and for testing the concepts described in this article.
Creating a smart contract for token creation, based on a template
When automating the creation of smart contracts based on a smart contract template, you typically need the following information:
- A Contract ID for the template.
- What Roles are defined in the template, and how many are needed of each for the contract to become valid.
- What Parameters exist, and their types and valid value ranges.
This information is readily available from the template itself, and it may vary from template to template. It can also be provided by the developer of the template. But there are some roles and parameters that will occur frequently, if they are not hard-coded into the contract template itself. They are provided here, for reference:
| Common Roles | ||
|---|---|---|
| Role | Use | Description |
Creator |
Required | The creator of the token. The party that signs the contract as a Creator pays the fees required to create the token or tokens. This would be the Agent API client, in the example of this article. |
Owner |
Optional | If the template allows the owner to be different from the creator, the party that signs as Owner will receive the created tokens in their wallet. |
TrustProvider |
Required | This role is reserved for the Neuron® itself. The Trust Provider is the party that permits the creation and hosting of the token, and assures the integrity of the token, as well as protects the confidentiality and privacy of the associated information. |
Valuator |
Optional | A party that attests to the initial value stated for the contract. |
Assessor |
Optional | A party that has provided necessary input in the creation of the token. |
Certifier |
Optional | A privileged role albeit external role of a token. They can certify to the correctness, legality, contents or context of the token. They can also be given special privileges with control over the life-cycle of the token (meaning, if the token definition permits it, they can kill the token if compliance quirements are not met). |
Witness |
Optional | A witness to the signature and creation of the tokens. |
| Common Parameters | |||
|---|---|---|---|
| Parameter | Use | Type | Description |
Value |
Optional | Numeric | The initial value of the token. |
Currency |
Optional | String | The currency of the token. |
CommissionPercent |
Optional | Numeric | The number of percent of the value that needs to be paid by the creator, for the creation of the token or tokens. |
Note: There may be other parameters available that are required, depending on the type of token that is to be created. Check with the creator of the token definition to get a detailed list of parameters required to be set.
Getting token creation attributes
The Currency and CommissionPercent parameters that will be accepted by the Neuron®, as well as the Legal Identity identifier for the TrustProvider Role, can be retrieved by calling the GetCreationAttributes resource using the Agent API. After retrieving these values, you can preset the parameter values accordingly.
Buying Neuro-Credits™
When you know the amount of eDaler® that is required to create a token, or the tokens, you can generate eDaler® on credit, by buying Neuro-Credits™. You can also generate more eDaler® than the token creation requires, and use it for multiple operations, to save on invoicing fees. Use the following resources in the AgentAPI to manage eDaler® in the wallet:
To get the current balance of the wallet, call the GetBalance resource.
To generate eDaler® in the wallet, you buy eDaler®. To see options available for buying eDaler®, call the GetServiceProvidersForBuyingEDaler resource. It will present configured options available for your choice of country and currency. Some of these providers are contract-based (i.e. they are initated by signing a smart contract with relevant information), and some are initiated by collecting information from the user via an external web page.
If you already know what service provider you want to use, like in the case for using Neuro-Credits™, you can skip this part. The Service Provider ID in this case is
TAG.Payments.NeuroCredits, the Service ID isTAG.Payments.NeuroCredits.NeuroCreditsService, and the ID of the smart contract template for initiating the process is2cdbfa69-6c21-82d9-880e-301af77b53f6@legal.paiwise.tagroot.io(at the time of writing; you might want to double-check this regularly).To initiate the process of buying eDaler®, you can call the InitiateBuyEDaler if the service collects information from external web pages. If the process is started via smart contracts (like in the case for Neuro-Credits™) you simply create and sign a smart contract based on the template provided for the service.
Following is some information required to create a smart contract for buying Neuro-Credits™:
Defined roles Role Description BuyerThe one buying eDaler®, i.e. the Agent API client. TrustProviderThe Neuron® itself, giving the credit to the buyer. The following parameters need to be provided:
Required parameters Name Type Description Amount¹Numeric Amount of eDaler® to buy. Currency²String Currency to buy. InvoiceFee³Numeric A fee for each invoice that is sent. MessageString A text message that will be included in invoices sent to the client, for reference. Period³Duration The duration of the credit, or the time between installments, if multiple installments are used. PeriodInterest³Numeric The interest rate of the (remaining) amount, calculated over the period. Installments4Integer Number of installments desired. Some of the parameters are limited in range, and some must be set to a fixed value, depending on the configuration of the Neuro-Credits™ service on the Neuron®. To get these values and ranges, you call the GetServiceProvidersForBuyingEDaler resource:
- Amount is restricted to the maximum remaining credit allowed to the client.
- Currency must be the same as defined in the wallet of the client.
- The fees, period and interest rates are fixed by the service.
- The amount of installments allowed may vary on client.
Note: A smart contract with parameters outside of the authorized ranges will fail the contract.
The following parameters will be required to exist in the legal identity of the buyer, and will be visible to auditors of the contract, if a personal credit is requested:
- Full Name
- Personal Number
- Full Address
- Postal Code
- City
- Country
If an organizational credit is requested, the following additional information must be available in the legal identity of the buyer. This information will be visible to auditors of the contract:
- Organization Name
- Organization Number
- Department
- Role
- Organization Address
- Organization Postal Code
- Organization City
- Organization Country
Additional information that may be required include an associated e-mail address and phone number of the client. These will not be engraved into the contract however, for privacy reasons, and only be available to the operators of the service.
Once the parameter values have been determined, you create the smart contract by calling the CreateContract resource, and then sign it using the SignContract resource. Once everyone has signed the contract except the Trust Provider, the contract is analyzed, and the Neuron® signs as Trust Provider given that all parameters are correct. If information is incorrect or the process fails, the contract will be set to a
Failedstate, otherwise the contract will be set to aSignedstate and the corresponding eDaler® will be generated and placed in the wallet of the client. Al lasynchronous processes generate messages sent to the client, which the client can read by calling the PopMessages resource.
Note: Any changes to the balance of the wallet, or transactions being performed, are notified to the client asycnrhonously (i.e. as they happen). You can use the PopMessages resource to retrieve all such asynchronously sent messages to you.
Getting the human-readable text of a smart contract
The GetContract resource allows you to get the contents of a smart contract (that you have access rights to). If you want to present the contents of the contract to the user, you have to choose if you will render the contents, based on the existing object-model for human-readable text, or if you want the Nueuron® to format it for you. The default is to let the client render the contents in its own way. If you provide a value in the Format argument, in the call to the GetContract resource, you can get the human-readable texts pre-rendered instead in the corresponding format. The following formats are supported (at the time of writing):
| Human-readable text formats | |
|---|---|
| Value | Format |
Markdown |
Texts are returned in Markdown format. Markdown is easy to edit in text editors, and can be transformed to any of a series of other formats. |
Html |
Text is converted to HTML for insertion into existing HTML (i.e. it does not include HTML, HEAD and BODY tags.) |
Text |
Contents is converted to plain, unformatted text. |
Xaml |
XAML is generated for use together with Windows Presentation Foundation (WPF). |
XamarinXaml |
A special dialect of XAML, for use in Xamarin Forms, is returned. |
SmartContract |
An XML string containing the contents using the smart contract object model is returned. |
Signing smart contract to create tokens
When it is time to sign the contract, you call the SignContract resource for each signature you perform. You will sign the contract using the legal identity referred to in the call, and using the associated key. A contract becomes signed when all required signatures have been provided.
When then smart contract is to create a Neuro-Feature™ token, one of the roles is that of a Trust Provider. This role is reserved for the Neuron® itself, and represents the party that will host the token. Typically, a smart contract for token generation includes at least a Creator role, and often (but not always) an Owner role as well (if different from the Creator. If no Owner role is available, the Creator becomes the initial Owner.
When all signatures, except then Trust Provider has signed, the Neuron® validates the contract and signatures, and if all is OK, signs the contract itself. Once the contract has been signed, the token creation process begins. In this step, if the Neuron® detects there are missing funds, or other prohibited content is detected within the token itself, the contract becomes failed, and a message is sent to the creator.
Note: All changes to the contract, and generated token or tokens are notified to the concerned parties asynchronously. Use the PopMessages resource to receive such notification messages.
Transferring ownership of token
Once a token is created and alive, it can be transferred to a new owner. Such a transfer is basically a contract in itself. In this contract, the prospective new owner (or buyer) agrees with the current owner (or seller) to transfer the token from the seller to the buyer, and transfer an agreed amount of eDaler® from the buyer to the seller. The amount of eDaler® transferred is logged on the token itself, and visible to future buyers, and acts as the basis for the current value of the token.
The LegalLab repository contains example contracts for transferring ownership of a token between owners.
Note: The process of creating a transfer contract, and signing it, is the same as creating the token in the first place: You refer to a template when creating the contract, providing the corresponding parameters, and sign the contract accordingly. The Neurons take care of the rest.
#agent, #api, #neuro-feature, #credit, #edaler, #recipe, #legallab
Posts tagged #neuro-feature
No more posts with the given tag could be found. You can go back to the main view by selecting Home in the menu above.