Page retrieved from simulation
This page is retrieved as part of a multi-modal simulation, available in the ComSim repository. It simulates web actors that also connect using web-sockets and use digital identities via XMPP, which they use for MFA and for QuickLogin. The report contains more details about an execution of the simulation.
Processing signed contracts in a state machine: Open Vote example
The LegalLab repository contains a new example that illustrates how Neuro-Feature token state machines can be used to process signed smart contracts. The example implements a simple open voting system that tokenizes each vote, counting ballots within a given time frame, as they are cast. Each ballot is a smart contract signed by a participant. The state-machine of the vote counts accepted ballots, rejects incorrect ballots, and logs events to the Neuro-Ledger for transparency and auditability.
Note: The same architecture as exemplified by the Open Vote set of contracts (Vote + Ballot contracts) can be used in many technically similar (albeit conceptually different) cases. One such example is the tokenization of agriculture, for example, where each cultivation can be tokenized, and it can keep track of its current state transparently (for the end consumer) by processing observations, each observation recorded as a signed smart contract with information about what has occurred. Another example can be the tokenization of medical journals, for interoperability and privacy protection. The journal observes diagnoses and tests being performed, each one recorded as a signed smart contract with the appropriate information.
Vote Contract
The first contract in the Open Voting model (OpenVoteYesNoAbstain.xml), contains the state-machine Neuro-Feature token definition and contract. It defines the basic states of ballot processing. It assumes each ballot contains machine-readable information, as defined by the schema OpenVote.xsd, also downloadable online via its target namespace: https://paiwise.tagroot.io/Schema/OpenVote.xsd.
Note: Each contract containing machine-readable instructions will only be accepted if each Neuron® can validate the XML it contains. This is done by downloading the schema files from the corresponding target namespaces and using these schemas for validation. If the validation does not complete successfully, the contract is automatically rejected.
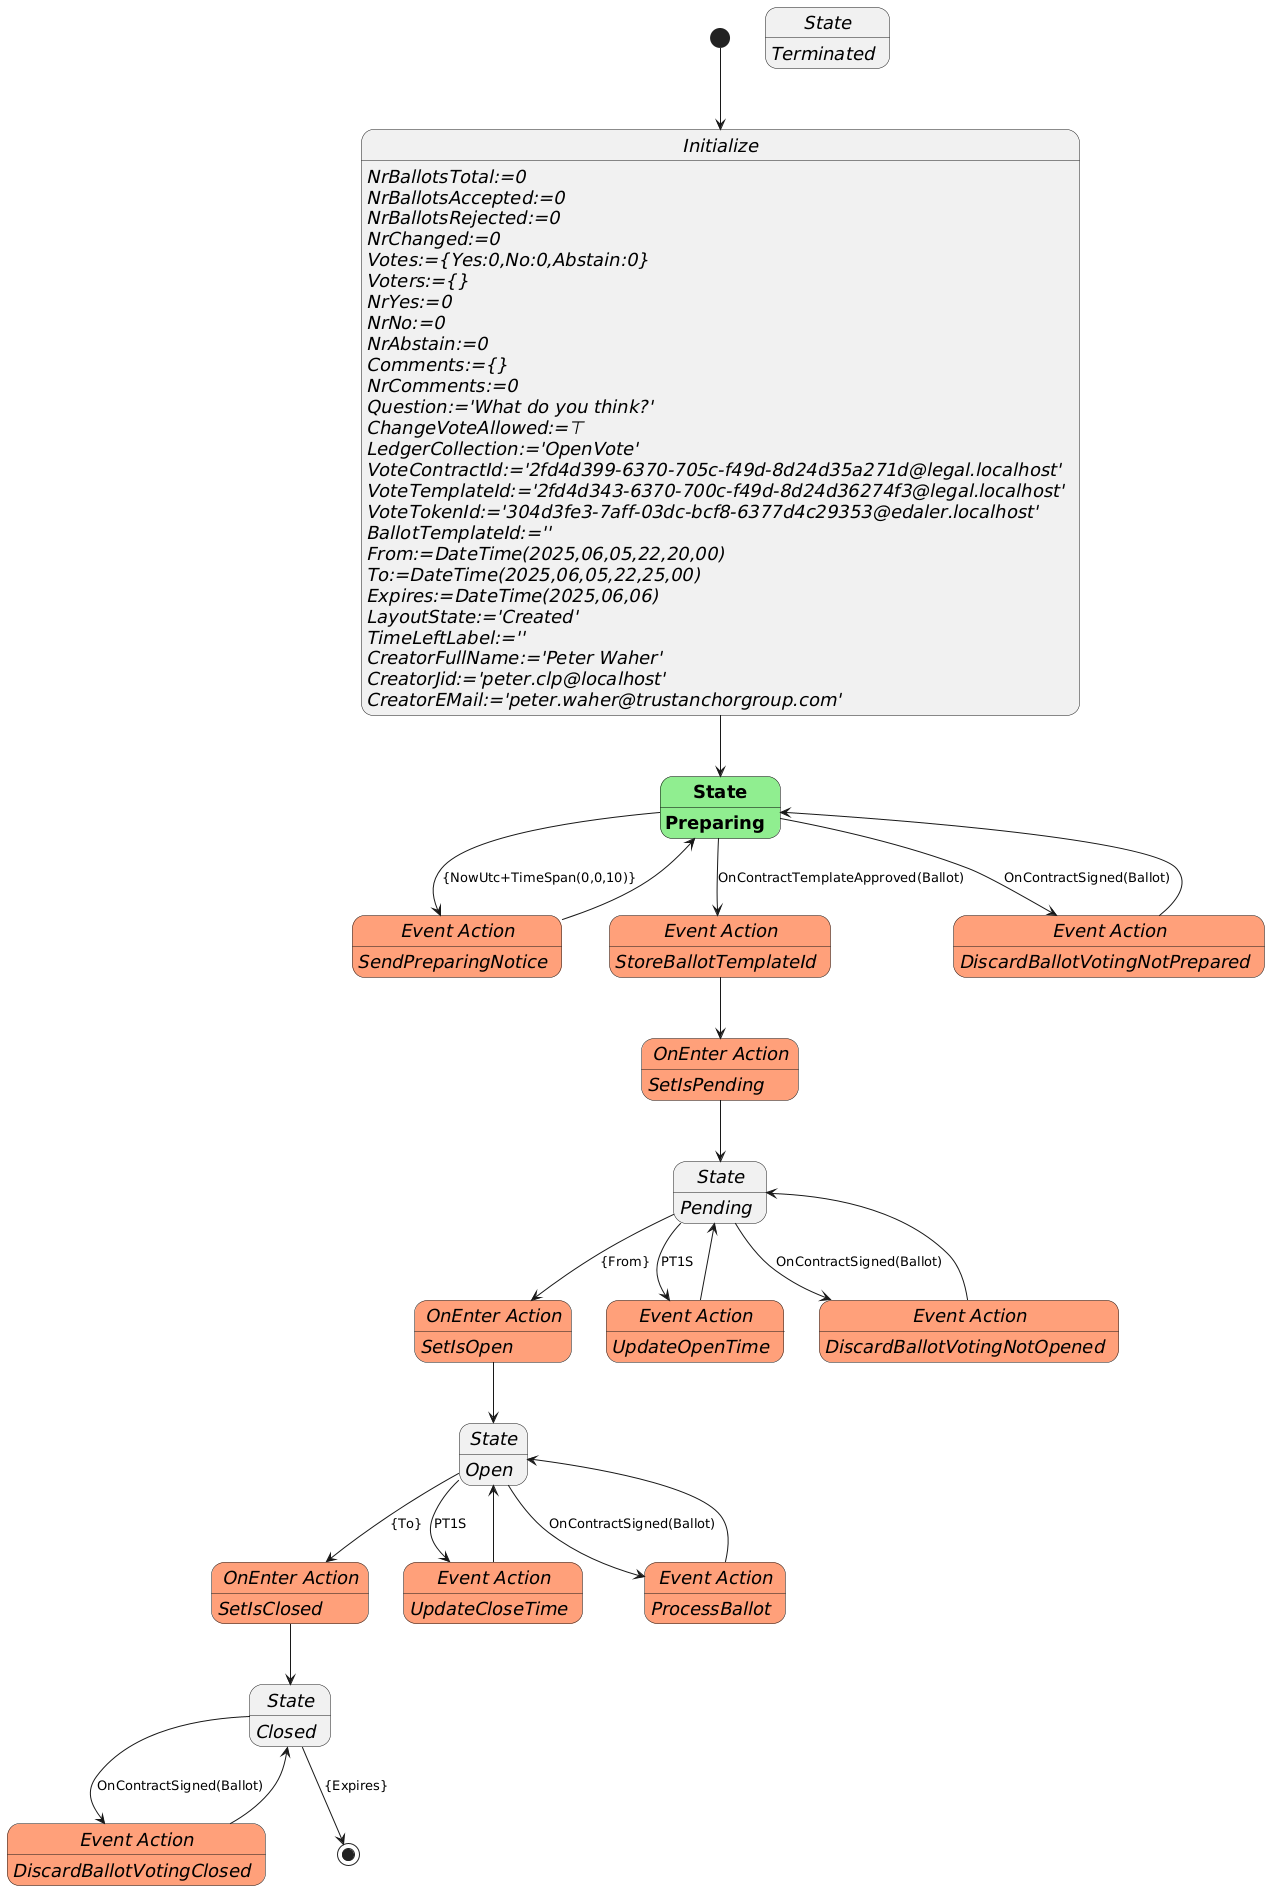
The states defined in the contract can be illustrated with the following state diagram:
The voting contract allows the creator to pose a question, define if participants are allowed to change their votes, and between what times the vote will be active. Times are defined in UTC. Participants need personal digital IDs with at least a validated country code, personal number and full name. Only one ballot per (Country, Country Code) will be counted. Apart from a Creator, the contract also requires a Certifier, which can be the same as the creator. The Certifier are given rights to cancel (invalidate) an election.
The states a voting procedure passes through are:
During the Preparing state, the state machine checks if it is paired with a Ballot template that points to it. The Ballot template needs to define a contract reference parameter to the vote, and it needs to enforce the template of the vote to match the template used to create the vote. If one such Ballot template is found, it progresses automatically to the next state. If one is not found, it awaits until such a template is approved on the Neuron®.
The Pending state, is a state where the vote is prepared, but has not commenced yet. During this state, the present view can be displayed, and links to the vote can be distributed. Any ballots cast during this state will be automatically rejected. Once the time to open the vote has been reached, the state-machine progresses to the next state.
The Open state is where participants can vote by signing Ballot contracts. If they are signed using the appropriate template, and pointing to the vote, the state-machine will process the ballots. If any errors are encountered, the corresponding ballot is rejected, and error logged. When the finishing time has been reached, the state-machine progresses to the next state.
The last state is the Closed state. Here, the voting machine is kept alive, to present results, but no ballots are processed, so the tally cannot be changed. Once the expiry time is reached, the state-machine is ended.
During state changes, the creator is notified by XMPP (Instant Chat Message) and e-Mail about the state of the vote. The messages contain links to the vote. These can be distributed to participants of the vote. The vote can also be shown in a browser. If published, voters and other participants can follow the results in real-time.
Ballot Contract
The second contract template is the OpenBallotYesNoAbstain.xml contract. It defines the ballot contract that can be used to participate in any votes generated by the corresponding voting template. The two templates must be paired. So, once the voting template has been proposed and apporved, its ID must be set into the Ballot template contract, before it can be proposed. Once this has been done, it can be proposed and approved accordingly. Then, the pair can be used with as many votes as desired.
The Ballot template defines the Boolean parameters necessary to be able to select Yes, No or Abstain. The Machine-readable part (defined by the https://paiwise.tagroot.io/Schema/OpenVote.xsd namespace) instructs the vote state-machine how the ballot is to be interpreted. The Ballot template has a contract reference parameter of a given name, and it must require a contract reference having a template ID restriction equal to the ID of the voting template. Once the voting state-machine is running, it will provide links to the corresponding Ballot contract template, with these references pre-set, so the user does not need to worry about providing the values for thse references. The user will only scan a QR code to vote.
Approved templates for experimentation
If you want to experiment with the open voting solution described, you can use the following approved contract templates. You can either copy the contract IDs and use in your application, or if you use an App, scan the corresponding QR code to access it.
To create a vote, i.e. define a question partiticpants will vote on, use the following template by scanning the code or entering its ID in the appropriate interface:
The matching Ballot template (which you will not need to scan here directly, as it will be presented pre-filled for you, see below), is:
After scanning the code, a new vote contract will be displayed. Fill in the details (question, if votes can be changed and the time interval the vote will be open; remember the times need to be provided in Universal Time Coordinates, or UTC). Sign the contract, both as Creator and Certifier (unless you want another person to sign as Certifier). Once the vote has been created and been properly signed, a Neuro-Feature token will be created. It will send you an e-mail with a link to the voting results page. The vote only passes slightly the preparation state, as an approved ballot template already exists. The vote page will look something as follows. Note the QR code to the right. It will point to the ballot contract template to use to cast a ballot, and also contain the reference to the current vote pre-filled. All you need to do after scanning the QR-code, is to select how you want to vote.
Note: The vote token is defined to be unique. This means, you can only create one token (one vote) with the same set of parameters. This means, you need to change any of the parameters from previous versions, including the question or time parameters, before you can create additional votes.
Vote Count & real-time presentation
The token that is generated by the vote contract has a present report that displays the current state of the vote. The creator can access the present report from the client used to create the vote contract, and by extension the token. The creator will also get an Instant Chat Message and an e-Mail, containing the present report and current vote count (which would be zero and pending, before the count starts). There will also be a web URL which can be distributed, that will show the vote to any online viewer. The URL will have a format similar to https://sa.id.tagroot.io/NF/a86d6033-b694-7b5e-c8d3-42d5200ec85c@edaler.sa.id.tagroot.io. The ID in the URL corresponds to the ID of the Vote. You can match this ID with the ID displayed for the vote (see below). The present report can be projected and displayed in kiosk mode as well. It will be updated in real-time as votes are counted. The initial view may be something as follows:
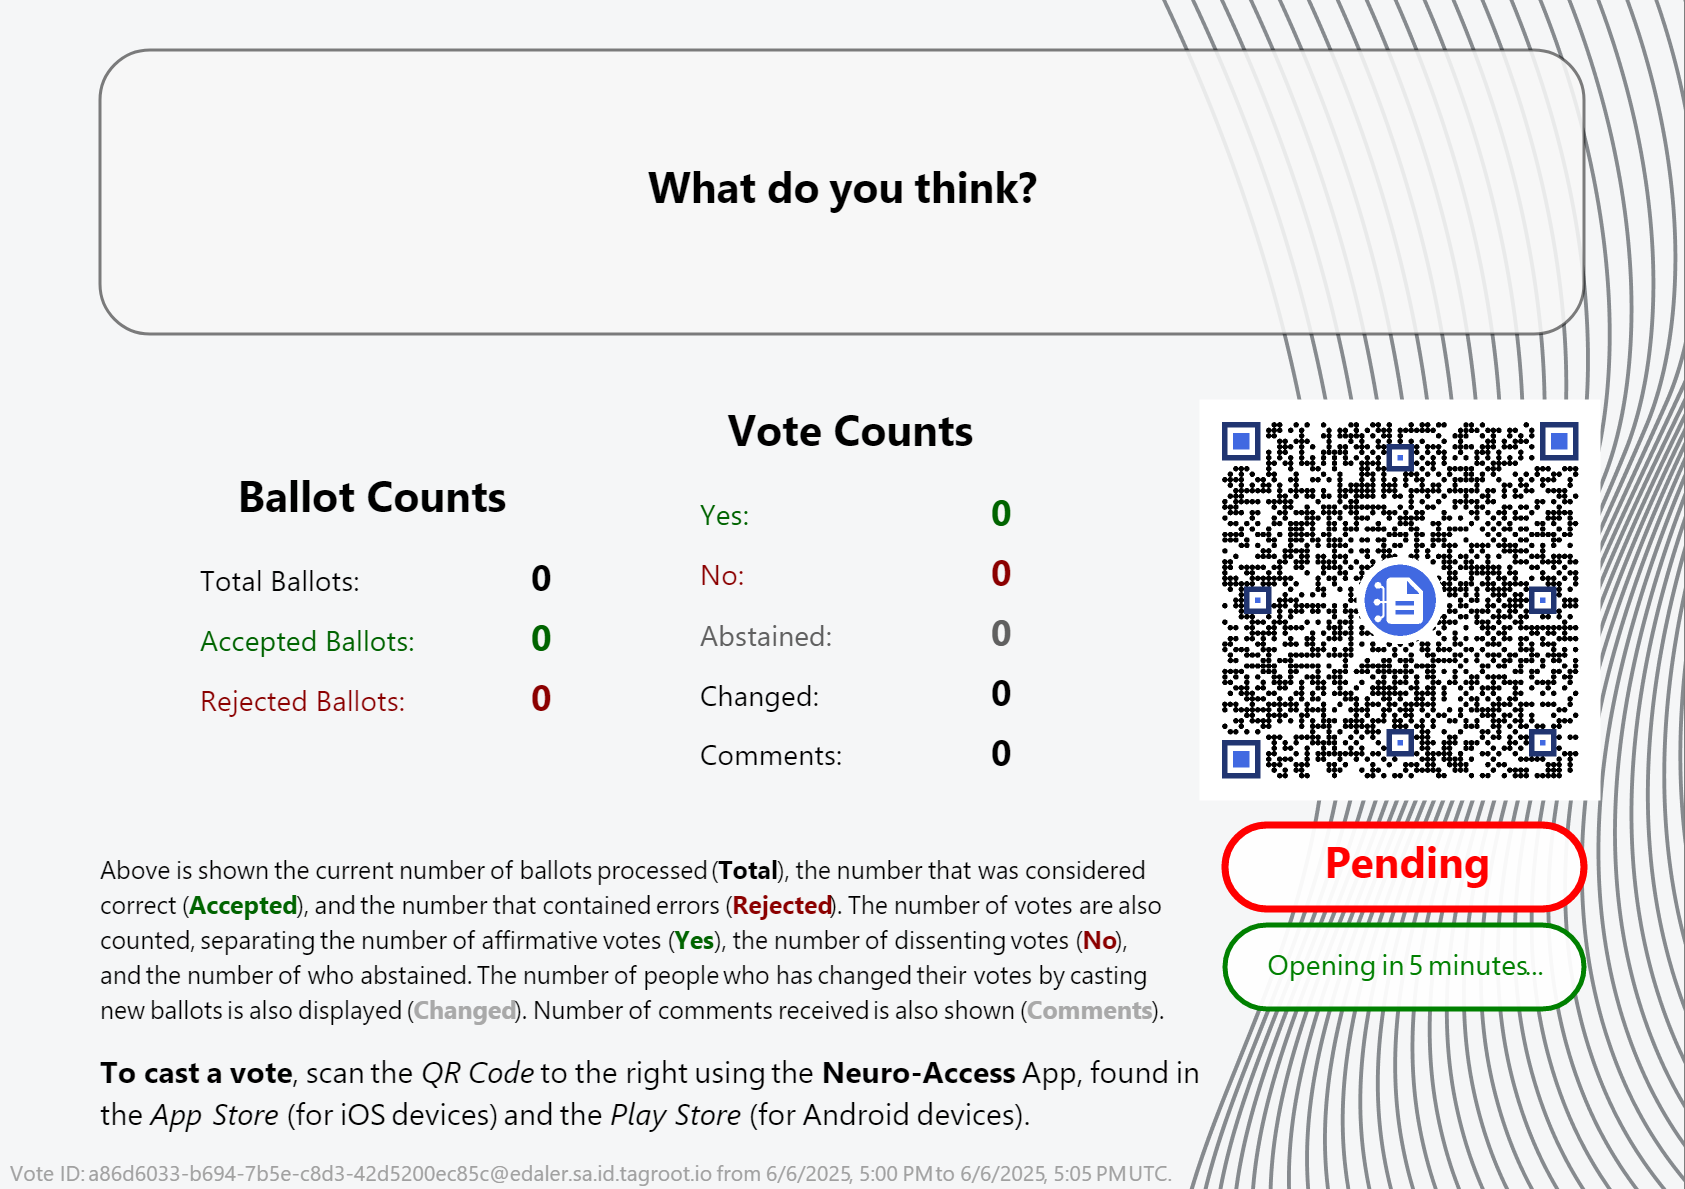
Note The QR code in the report can be scanned by participants, and will point to the ballot template, with the vote reference pre-filled in. All the participant needs to do, is vote, and sign the ballot and the vote will be counted. Once the vote closes, the report will be updated accordingly also.
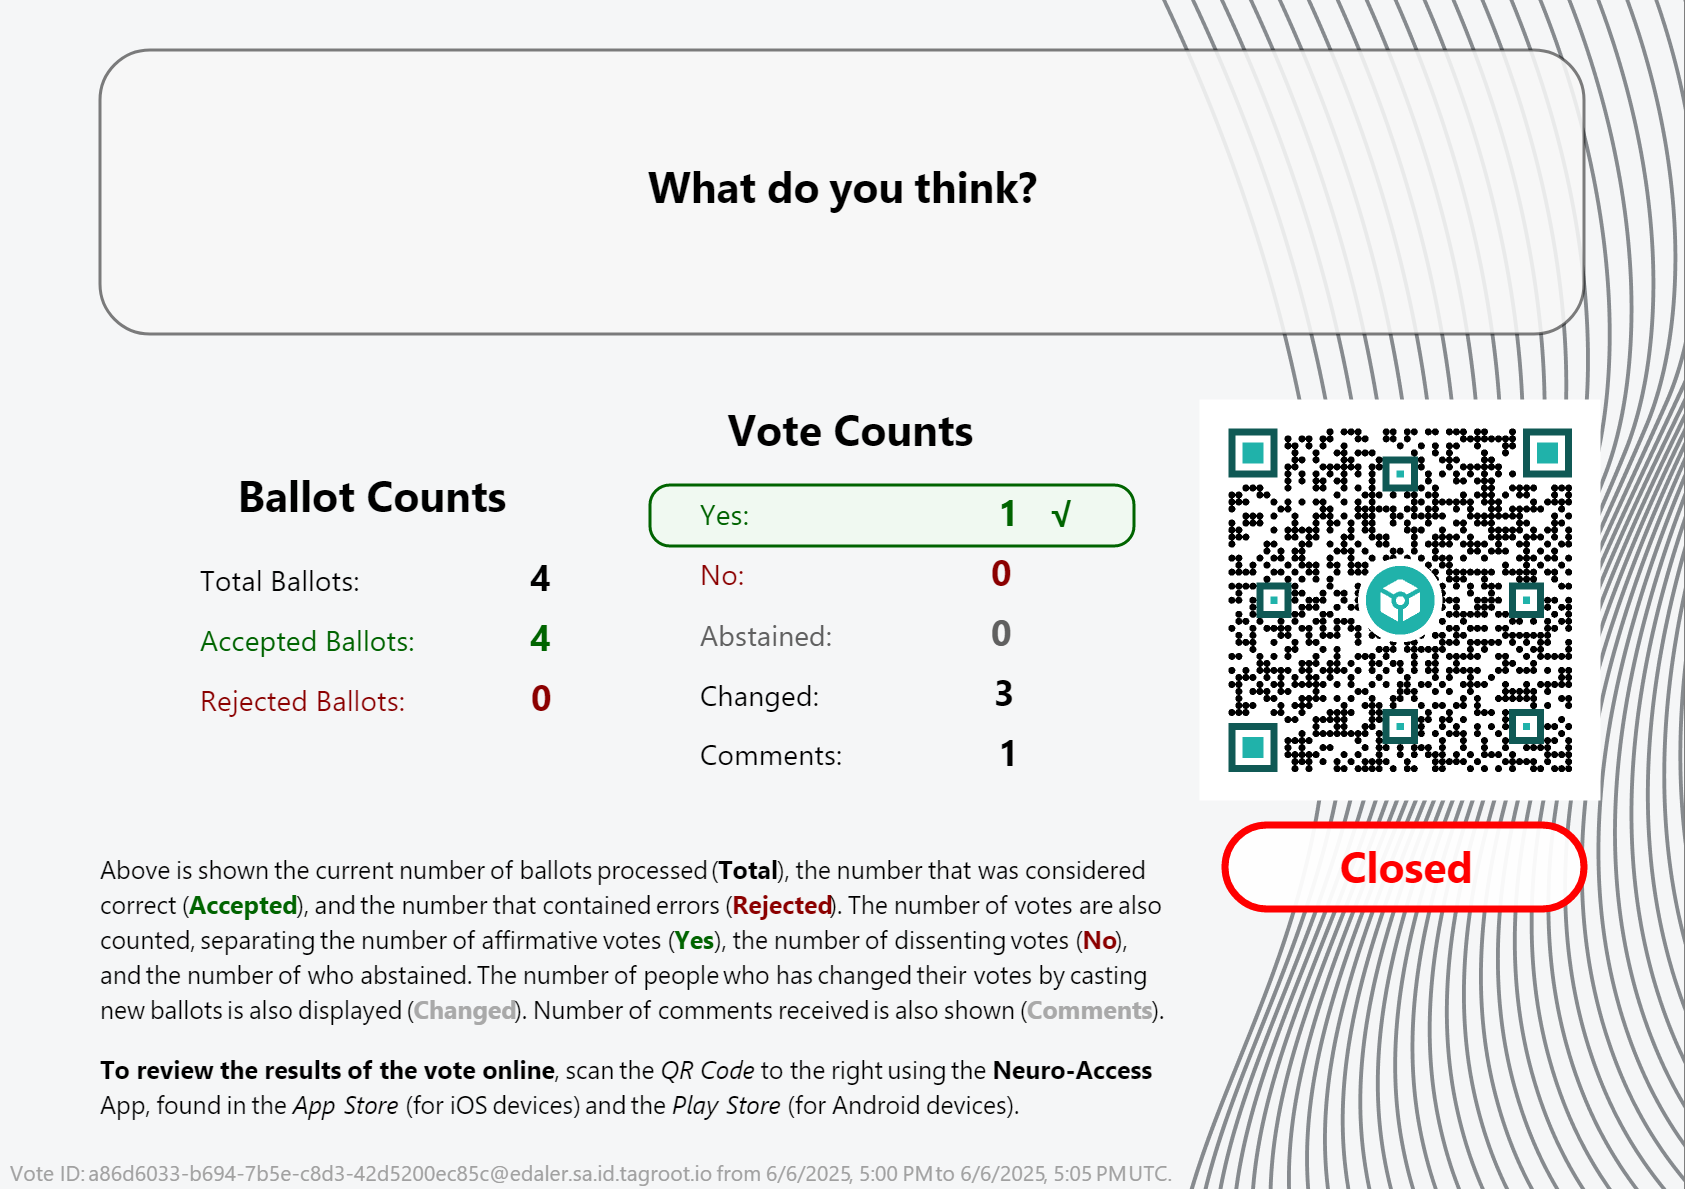
Note: Once the vote closes, the QR code changes. It is no longer pointing to the ballot template, but instead to the token that performed the count. Scanning it will give access to the token, and the reports it publishes.
Presentation Layout
The layout presenting the vote count is generated by the voting token itself, and is part of the vote contract template, and can therefore be reviewed as well. It is an XML Layout format, availble in the OpenVoteResultLayout.xml file. You can edit such XML files and preview the layout using LegalLab as follows:
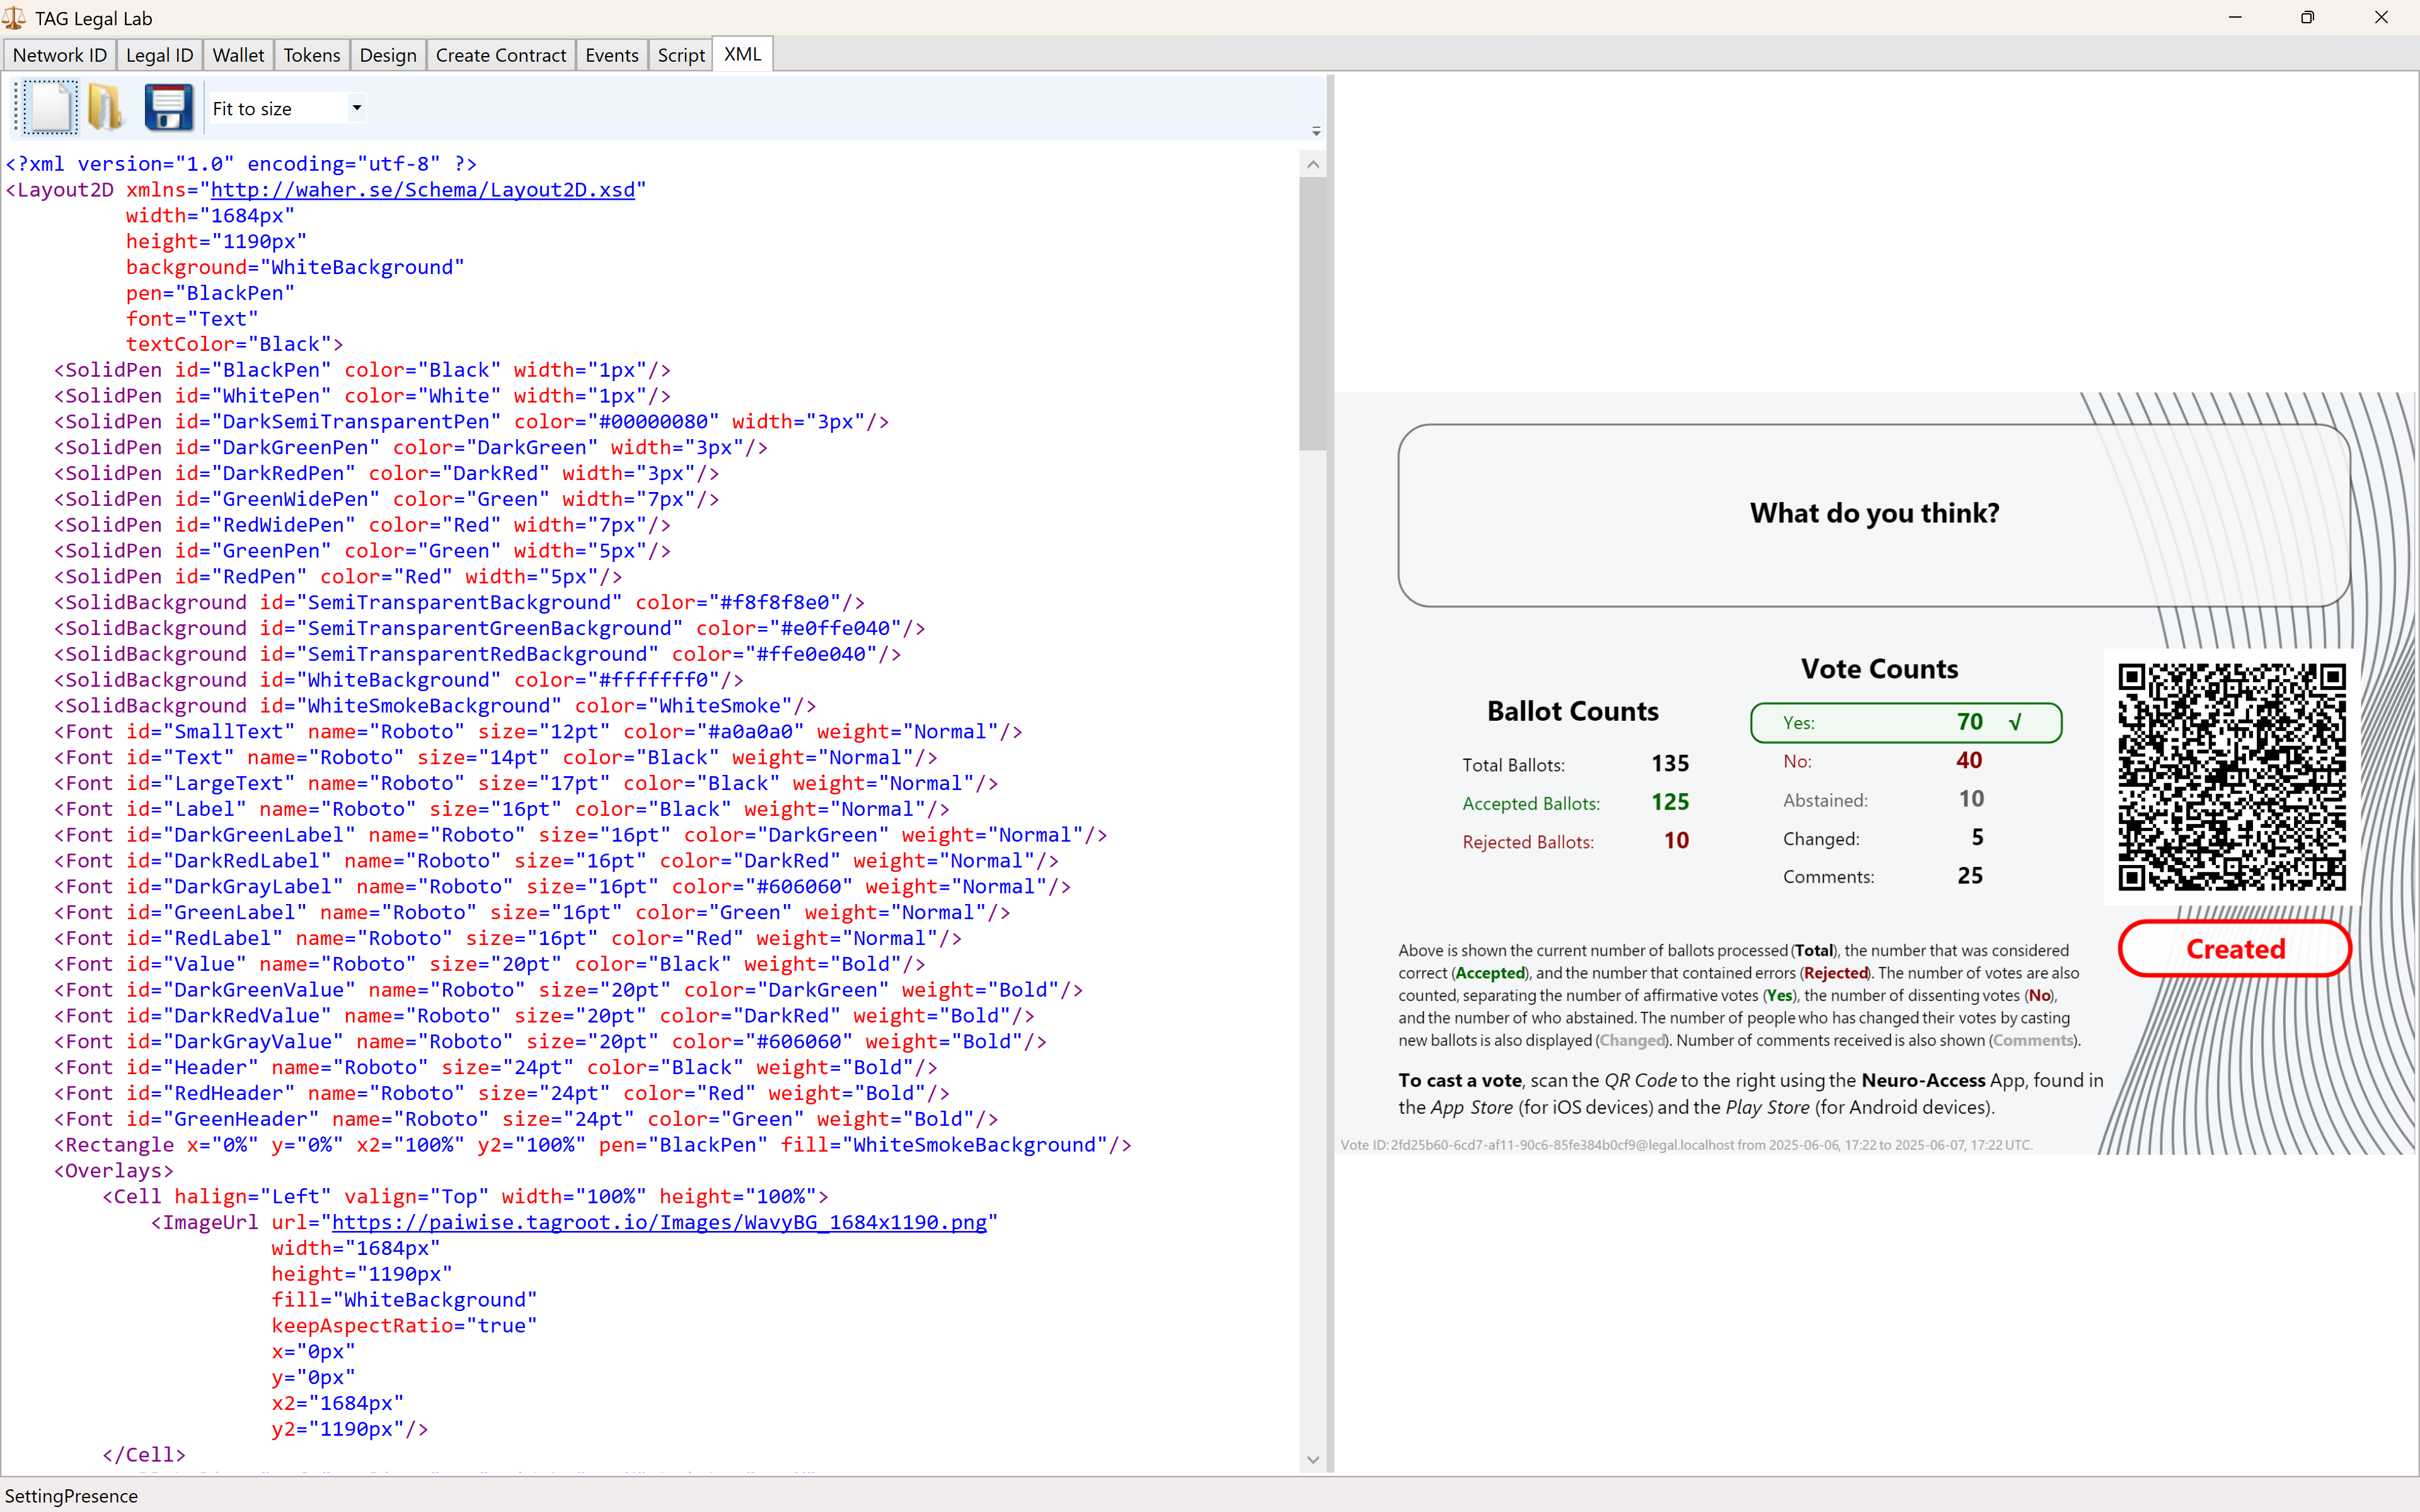
The variables and script functions used in the layout need to be initialized. This can be done in the Script tab. You can use the initialization script published in the repository: OpenVoteResultLayoutInit.script to generate the view above.
Neuro-Ledger entries recorded
Apart from all entries recorded regarding Digital Identities, Smart Contracts, Tokens and State-Machines, the Open Vote example records several entries by itself. These include:
| Entry | Description |
|---|---|
BallotCounted |
A ballot has been counted. |
BallotRejected |
A ballot has been rejected. |
BallotRevoked |
When an older ballot has been revoked because the participant submits a new ballot. |
CommentReceived |
A comment by a participant has been received. |
Note: The vote contract defining the vote, also defines the Neuro-Ledger Collection these entries are recorded in.
The other common Neuro-Ledger collections annotating entries are:
| Neuro-Ledger Collections | |
|---|---|
LegalIdentities |
Contains entries related to digital identities, including Neuro-Access digital identities. |
Contracts |
Contains entries related to smart contracts, including the voting contract and the ballot contracts used during voting. |
NeauroFeatureTokens |
Contains information regarding Neuro-Feature tokens, including the token definition of the open voting logic. |
StateMachines |
State-Machine information is recorded in this collection. This includes the open voting process performing the ballot counting and presentation. |
StateMachineCurrentStates |
Contains current states of different State-Machines. |
StateMachineSamples |
Contains variable changes as they are persisted by State-Machines. These samples can be used to track the counting process. |
#tutorial, #example, #legallab, #contracts, #neuro-feature, #neuro-ledger, #state-machine
Automating the creation of broker accounts
There are multiple ways for users to create broker accounts on a TAG Neuron®. With a broker account, a user can communicate on the federated XMPP network. They can also hold eDaler®, Neuro-Feature™ tokens, have legal identities and sign smart contracts, and use other related TAG services. Sometimes, a service provider using TAG Neurons must automate the creation of broker accounts, for instance, for integration with existing services. This article describes how this can be performed.
Account object
The TAG Neuron® uses an object database to store information it uses to operate accounts. So, to create an account, you need to create an account object. In script you use the Create function to create an object instance, from its type name. You can specify the type name, either using its local name, if there’s only one class with that name, or a qualified name or its fully qualified name. The fulle qualified name is the entire namespace + . + the local name. A qualified name is a portion of the fully qualified name that is uniquelly understood.
In the following example, the difference between the local name, a qualified name and the fully qualified name is shown. When there’s only one class matching a name, that type name is returned. If there are multiple classes that match the name, an array of type names is returned. (Example is done using the script prompt, so they should be read from bottom to top.)

To avoid conflict in script over time (as new modules are added), fully qualified names are encouraged. To avoid making the code too cumbersome, you can assign namespaces and type names to variables. For instance, you can reference the Account class in the following manner:

You can now create the new Account instance. Notice that above, you only referred to the type, while the result after this instruction is a newly created object instance. The output looks the same in this case, because the default ToString() method of the Account object simply returns the type name.

Account properties
You are now ready to set the properties of the object instance, for the new account. To know what properties are available, use the properties function:
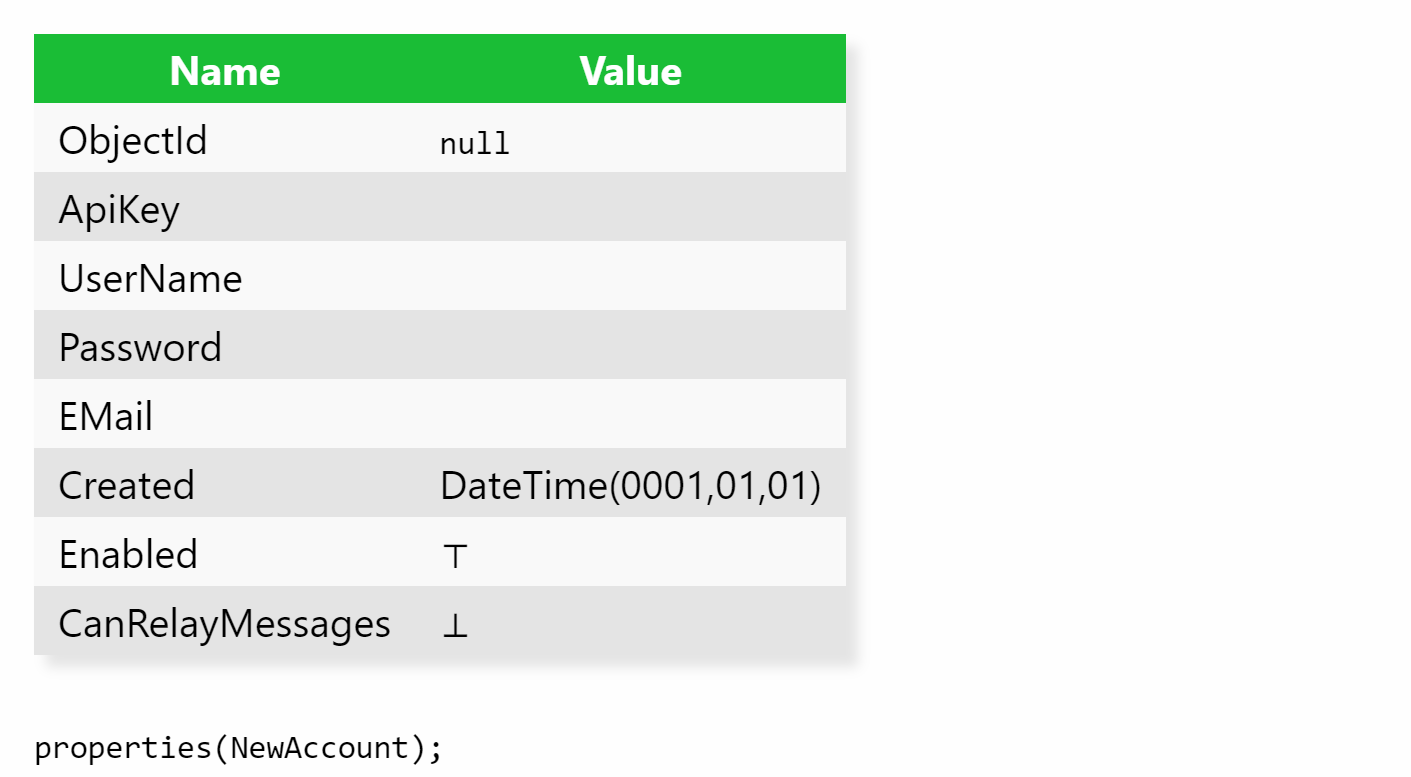
With this information, you just set the properties according to your requirements, one at a time:
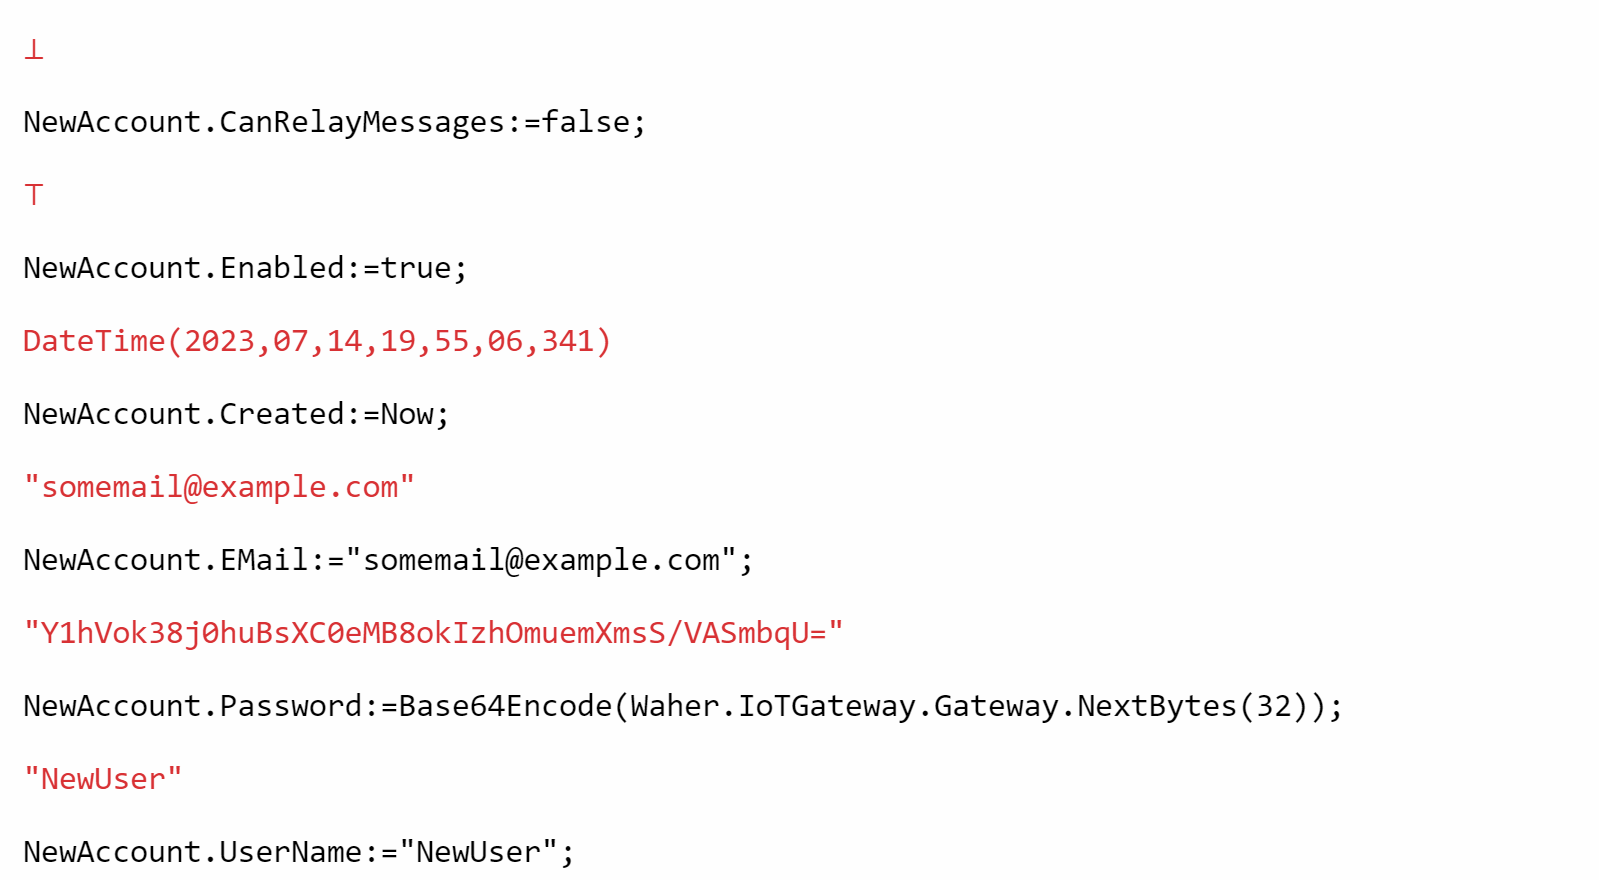
Saving object
After setting the properties, the object is ready to be saved in the object database. As it is an object database, persistance of the object is done seamlessly. You do not need to know they underlying database structure or schema. All information required to persist the object, is available in the class definition itself. All you need to do, is call the SaveNewObject function. The function will return the saved object, which will now have an Object ID identifying the object in the object database.

The account is now ready to be used.
Security Considerations
Below, are some security considerations, you need to be aware of.
Man-in-the-Middle attacks
It is recommended the user change the password as soon as possible. The password generated must be transmitted to the user somehow, and all transmission channels out-of-band should be considered vulnerable. A Man-in-the-middle (MITM) might hijack the password. With it, the MITM can do one of two things:
Choose to use the credentials invisibly, i.e. without changing it. This will allow them to gain access to sensitive material, until the password is changed. Once it has been changed, the old credentials are no longer usable, and the MITM can no longer access the account.
Try to alter the credentials before the real user does so, to gain access of the account. If so, the real user detect it on the next attempt to login. Through contact with support, account password can be reset and account given back to the real user. The faster the user changes the password, the better.
The risk here, is if account is not used by real user. A MITM would then gain access to the account, without it being noticed. One way to reduce the risk even further, is to transmitt parts of the password on different channels, hoping the MITM is not able to gain access to all of them. Still, it is wiser to assume credentials are compromized, as soon as they are transmitted out-of-band (meaning out of the scope of the encrypted protocol for which they are intended).
Entropy in passwords
The example above creates a 32-byte random string, that it BASE64-encodes into a usable password. This provides a security strength of 256 bits, which is usually higher than other protocols and algorithms provide, and so it should be sufficient for most use cases. However, if you decide to employ entropy checks on computer-generated passwords, you might need to adapt the password generation algorithm to filter out passwords that should be ignored, at the cost of reducing the security strength somewhat. See the article On entropy in passwords for more information about this.
On entropy in passwords
Entropy can be seen as a measurement of the amount of randomness or chaos that exists in something. When it relates to passwords, it can be sean as a measurement of how difficiult it is to guess (using brute force). As computers become more powerful, and access to processors that can perform a huge amount of computations rapidly increases, it becomes more and more important to protect passwords and user credentials. this article shows some ways to increase the entropy in credentials used (to improve security), and therefore make it more difficult for malicious actors to access your system and information without you knowing or consenting.
Password-less solutions (Quick-Login)
It is important to realize humans are very poor random number generators (i.e. they are often very predictable). So, to avoid letting humans choose a password at all, maybe the best option to create a more secure system. One way to do this, is to use a device with a digital identity app, that allows you to sign in to a service. The app generates credentials in a much more secure manner, and can manage the signing in for the user, with a security strength beyond what human users normally can achieve. One such solution, is to use the TAG ID together with the Quick-Login feature of the TAG Neuron®. Benefits from this kind of solution includes:
- Humans do not invent vulnerable passwords.
- The service does not need to create a separate users database, with all the complexities of managing credentials, etc. The service gets the necessary information directly from the app, during quick-login.
- You can use the same device/identity on multiple services on the federated Internet. This also means, different services can cooperate and interoperate, as the identity is the same.
- Apps can use more methods to authenticate a person, than a web-page can. This includes usage of finger-prints, facial recognition, access to NFC or Bluetooth devices, etc., such as e-Passports or e-IDs, and so on.
Differentiate between local and network passwords
Sometimes, it is necessary to create a humanly-generated password. Understanding that such do not have sufficient entropy for use over the Internet, they should be restricted for local use only. One way to use such humanly-generated local passwords is to protect information in a secure storage on the device, and never use it in any communication setting, even in hashed form. The secure storage can then be used to store a much more secure password that is randomly generated using a cryptographic number generator, by the application itself. Once such a generated password can be securely stored and retrieved using the local password, it can be used for network communication purposes. The local password might be sufficiently strong to evade breach by a dedicated human local user, but not sufficiently strong to evade breach by dedicated malicious users on the Internet, especially if there are a lot of users using the same communication interfaces.
Encrease entropy in humanly created passwords
If you still need to provide human users with the ability to generate passwords and use them on the Internet, perhaps because of business, technology or knowledge boundaries, you must try to limit the possibilities of generating passwords that are too weak. One way to do this, is to enforce passwords to be of a certain length. But that is not sufficient, as a user who has chosen the password 123456 before, and is now forced to use 10 characters, would probably just use the password 1234567890. such a password would not be more secure, even if it’s longer. Another way to do this, is to count the number of occurrences of different character classes in the password, and force users to select passwords using characters from different classes. While this is annoying for the user, it increases the entropy of the passwords somewhat.
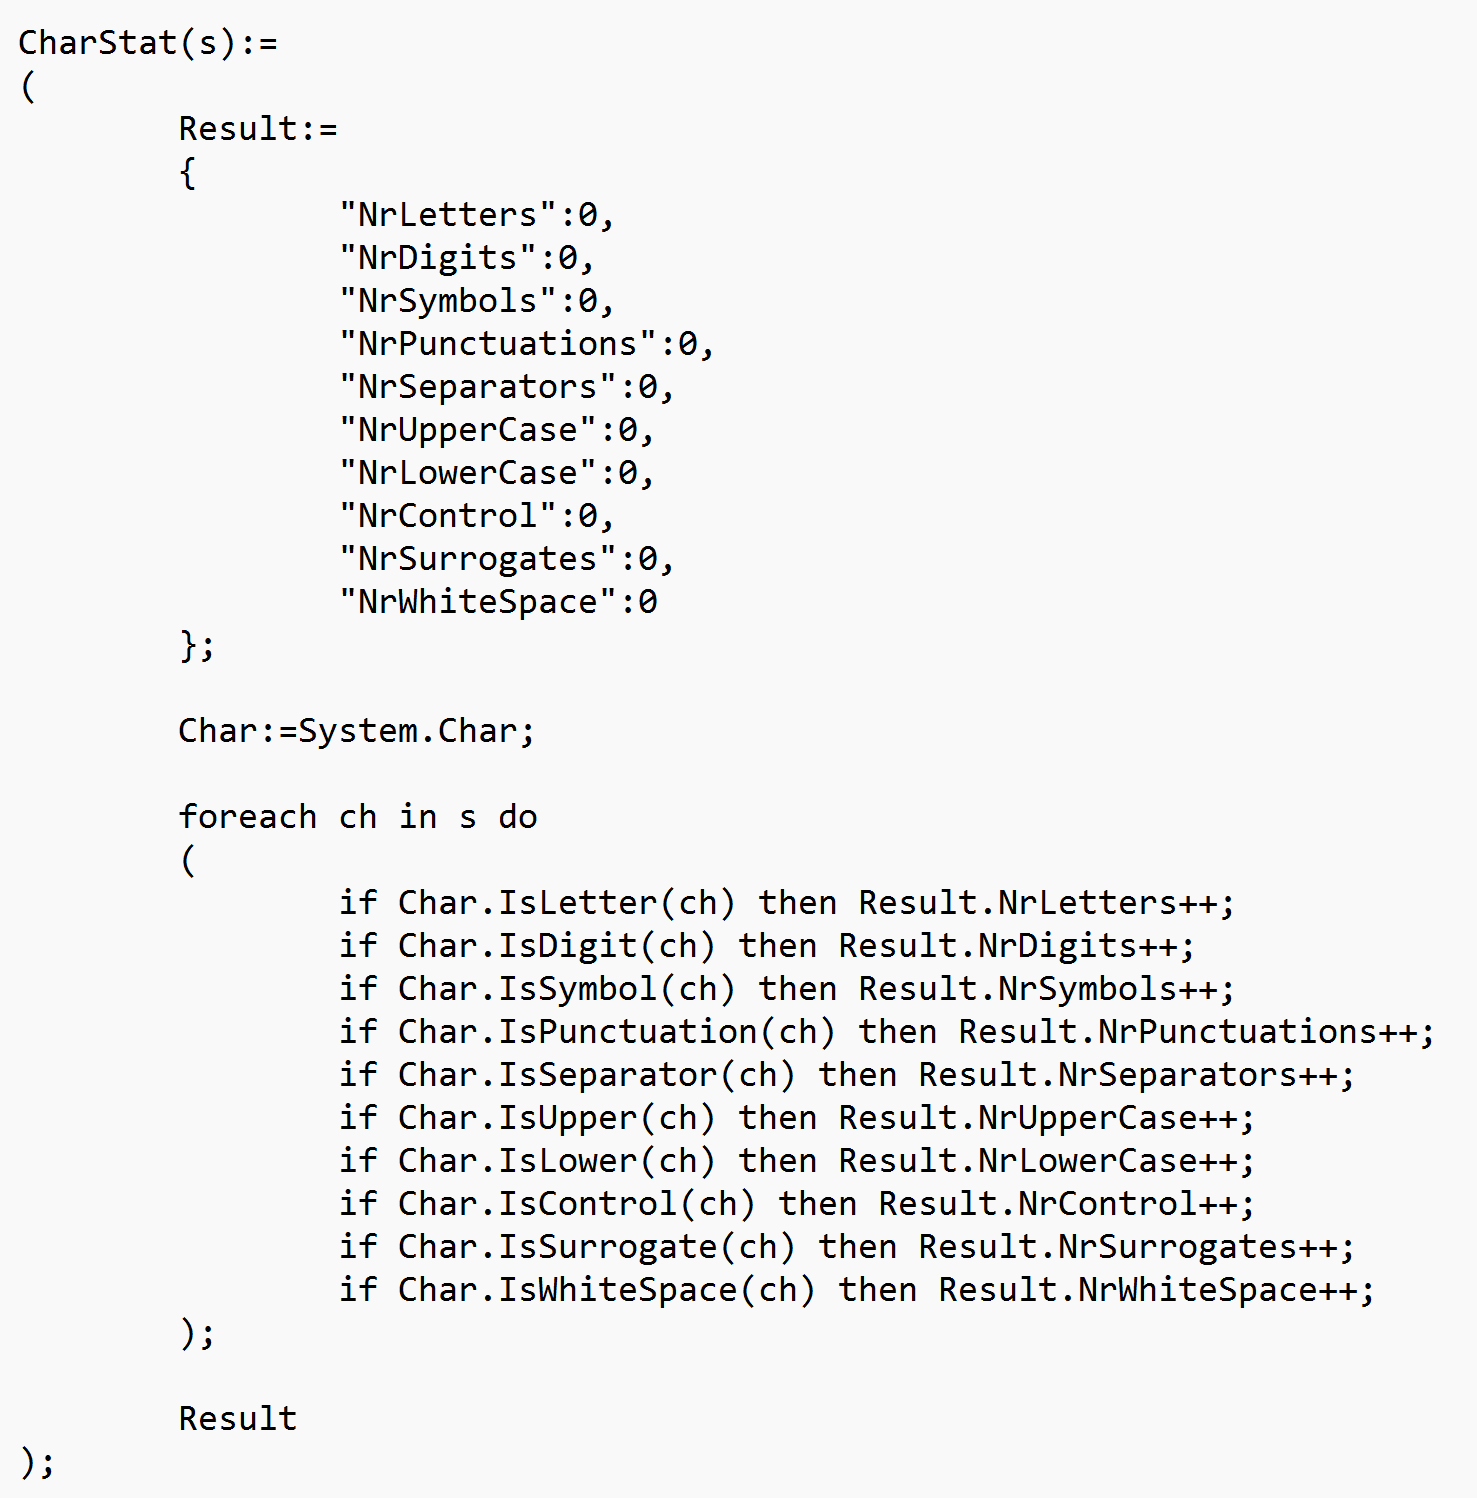
The following script example shows how to compute the number of occurrences of different character classes in a password, by using the .NET Char class, and its static methods to check individual characters in a string. (The code here assumes a character can belong to multiple classes.)
Check for randomness in computer-generated passwords
If a computer generates a password on the other hand, it will be a binary string, not necessarily representable by characters in a humanly-readable way. To solve this, random passwords are typically encoded using a limited alphabet, such as BASE64. Such passwords would be longer, have more entropy than a humanly generated password, but would fail a test based on character classes, as it would not use characters from a sufficient number of character classes. So a separate test of entropy needs to be performed on such passwords.
Assuming the password will be BASE64 encoded, the first step would be to decode the password into a binary string. Testing for entropy and randomness is a large field of study in itself, but we can perform a simple test on a proposed password, to check it is sufficiently random: We can create a histogram of the byte values in the password, and check that all buckets in the the result contain at least one value. This way, we know the bytes are distributed over the entire range of byte values, and a brute force-attacker must test for all possible values, greatly increasing the security strength of the solution. While this test does not catch passwords such as 0, 1, 2, 3, 4, 5, …, 255 (which has very little entropy), an app that generates such an insecure password is most probably developed to be wilfully insecure. And if the user (or developer) is wilfully insecure, they will be able to create an insecure password that passes any entropy test (as long as they know the methods to test the password).
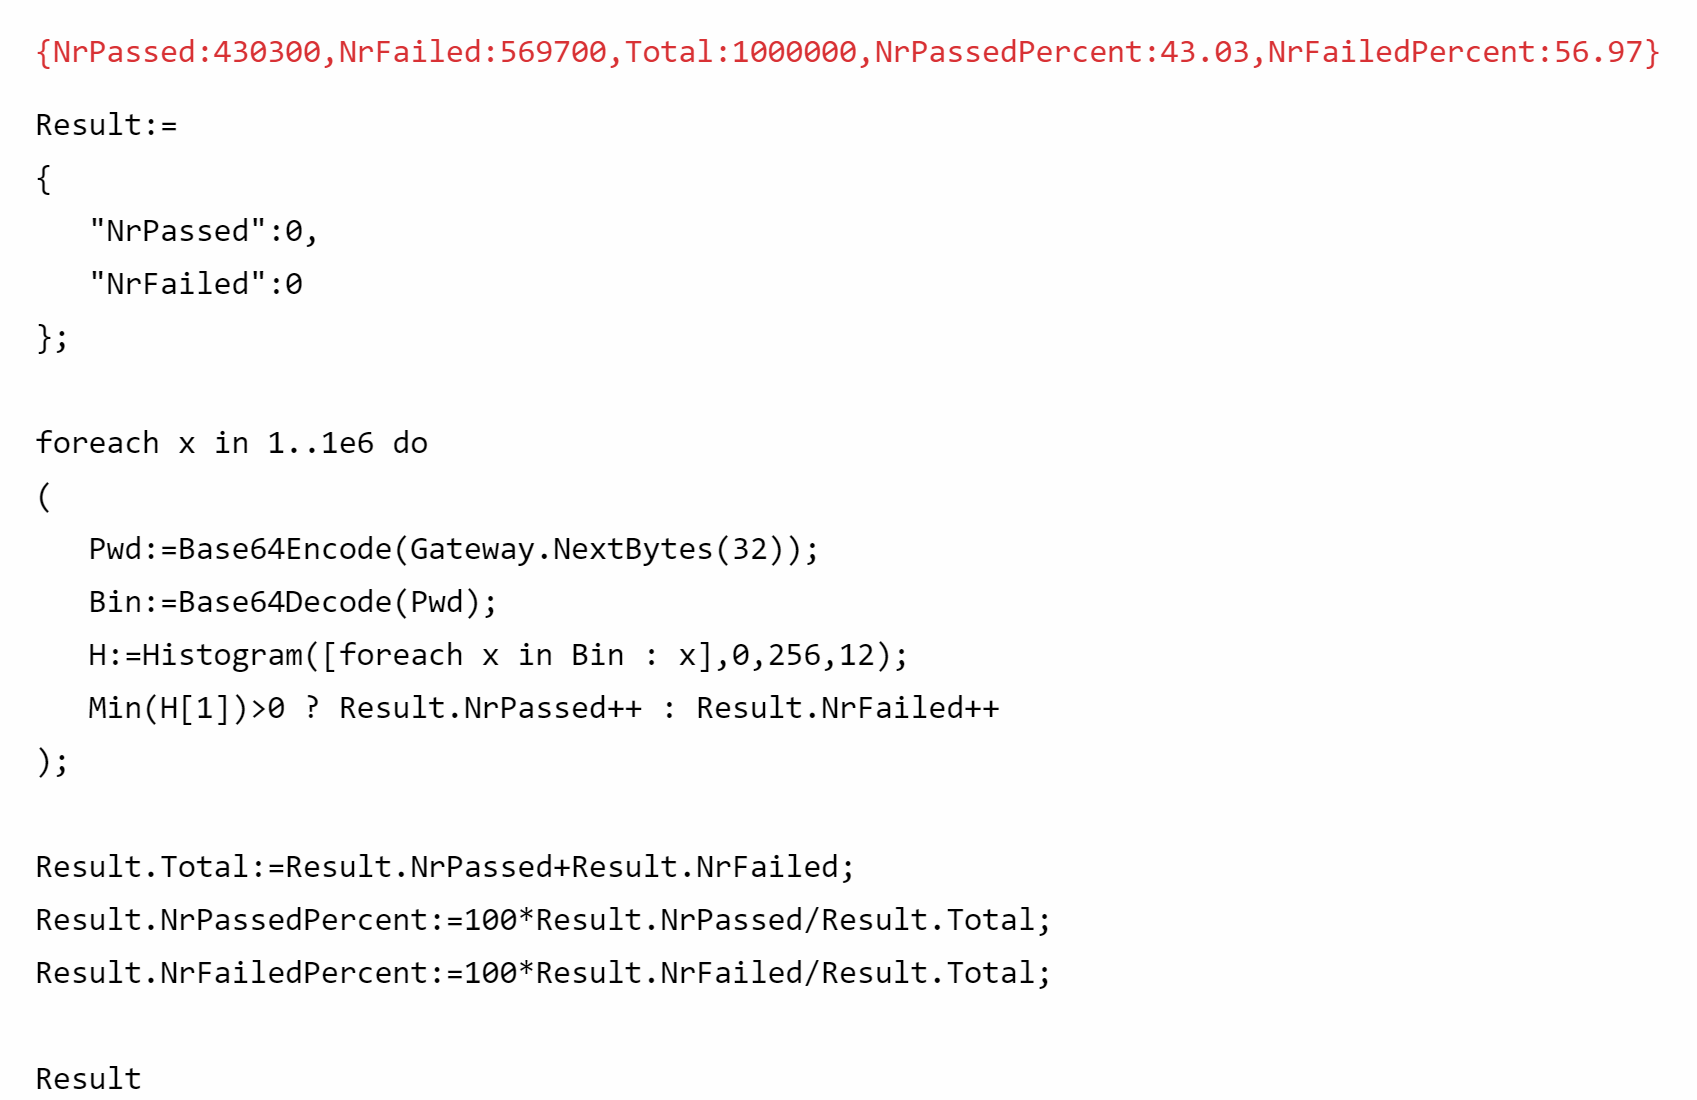
Note: When performing a test using a histogram, the number of buckets to be used in the test is an important factor. For passwords based on 32 random bytes, 12 buckets will check for uniform distribution, and remove about half of generated passwords (see below). This means that accepted passwords would generate a security strength of 256-1=255, which is sufficently high, as other parts of the communication framework in a “normal” setting probably has security strengths ranging from 128 and up. (Note: security strengths are exponents of 2, so a security strength of 256 means a brute force attacker would require 2256 attempts to break a password. If half of passwords are removed, they need approximately 2256/2=2256-1=2255 attempts, i.e. the security strength is 255.)
The following script shows how such a randomness check could be implemented. (Here, the ??? operator is a short form of the traditional TRY ... CATCH ... operator. So if any of the function calls fail, the result will be false.

Login auditor
While the above checks limit the use of unsecure passwords somewhat, malicious users (and robots made by malicious users) will still attempt to access the system continuiously, hoping to find a breach, at some point in time, on some server, for some user. Robots have patience, especially if funded by determined actors. The TAG Neuron® therefore also includes a Login Auditor, that if used monitors login attempts, and can block perceived malicious use, first temporarily, then permanently. Permanently blocked endpoints are furthermore logged in the Neuro-Ledger™, and distributed between Neurons, so that all neurons can benefit from knowing what endpoints to refuse. The auditor monitors these login-attempts, via logged events. It is therefore important to log successful and failed login attempts properly, so the login auditor can analyze them. Apart from distributing the results of blocks to other Neurons via the Neuro-Ledger™, different services running on the same Neuron®, or using different protocols, benefit from sharing this information. If you use the .NET framework for logging in a user in a Neuron®, such logging is performed automatically. All you need to do, is to check if there exists a temporary or permanent block, and present this information to the user, so they know when they can try again.
Tying it together
Let’s tie the above together, in an example that is implemented in a Markdown page on a TAG Neuron®. The page allows the currently logged in user to change its password. The user has just performed a POST to the page, the POST containing a JSON object, with three fields: CurrentPassword, Password and Password2. The contents has been provided to the page, which is currently being generated for the user, with the response. The processing of the request is embedded in script on the page itself. Using the function defined above, the first step is to check for randomness in the proposed password (and that the repeated password is equal to the first proposed password):
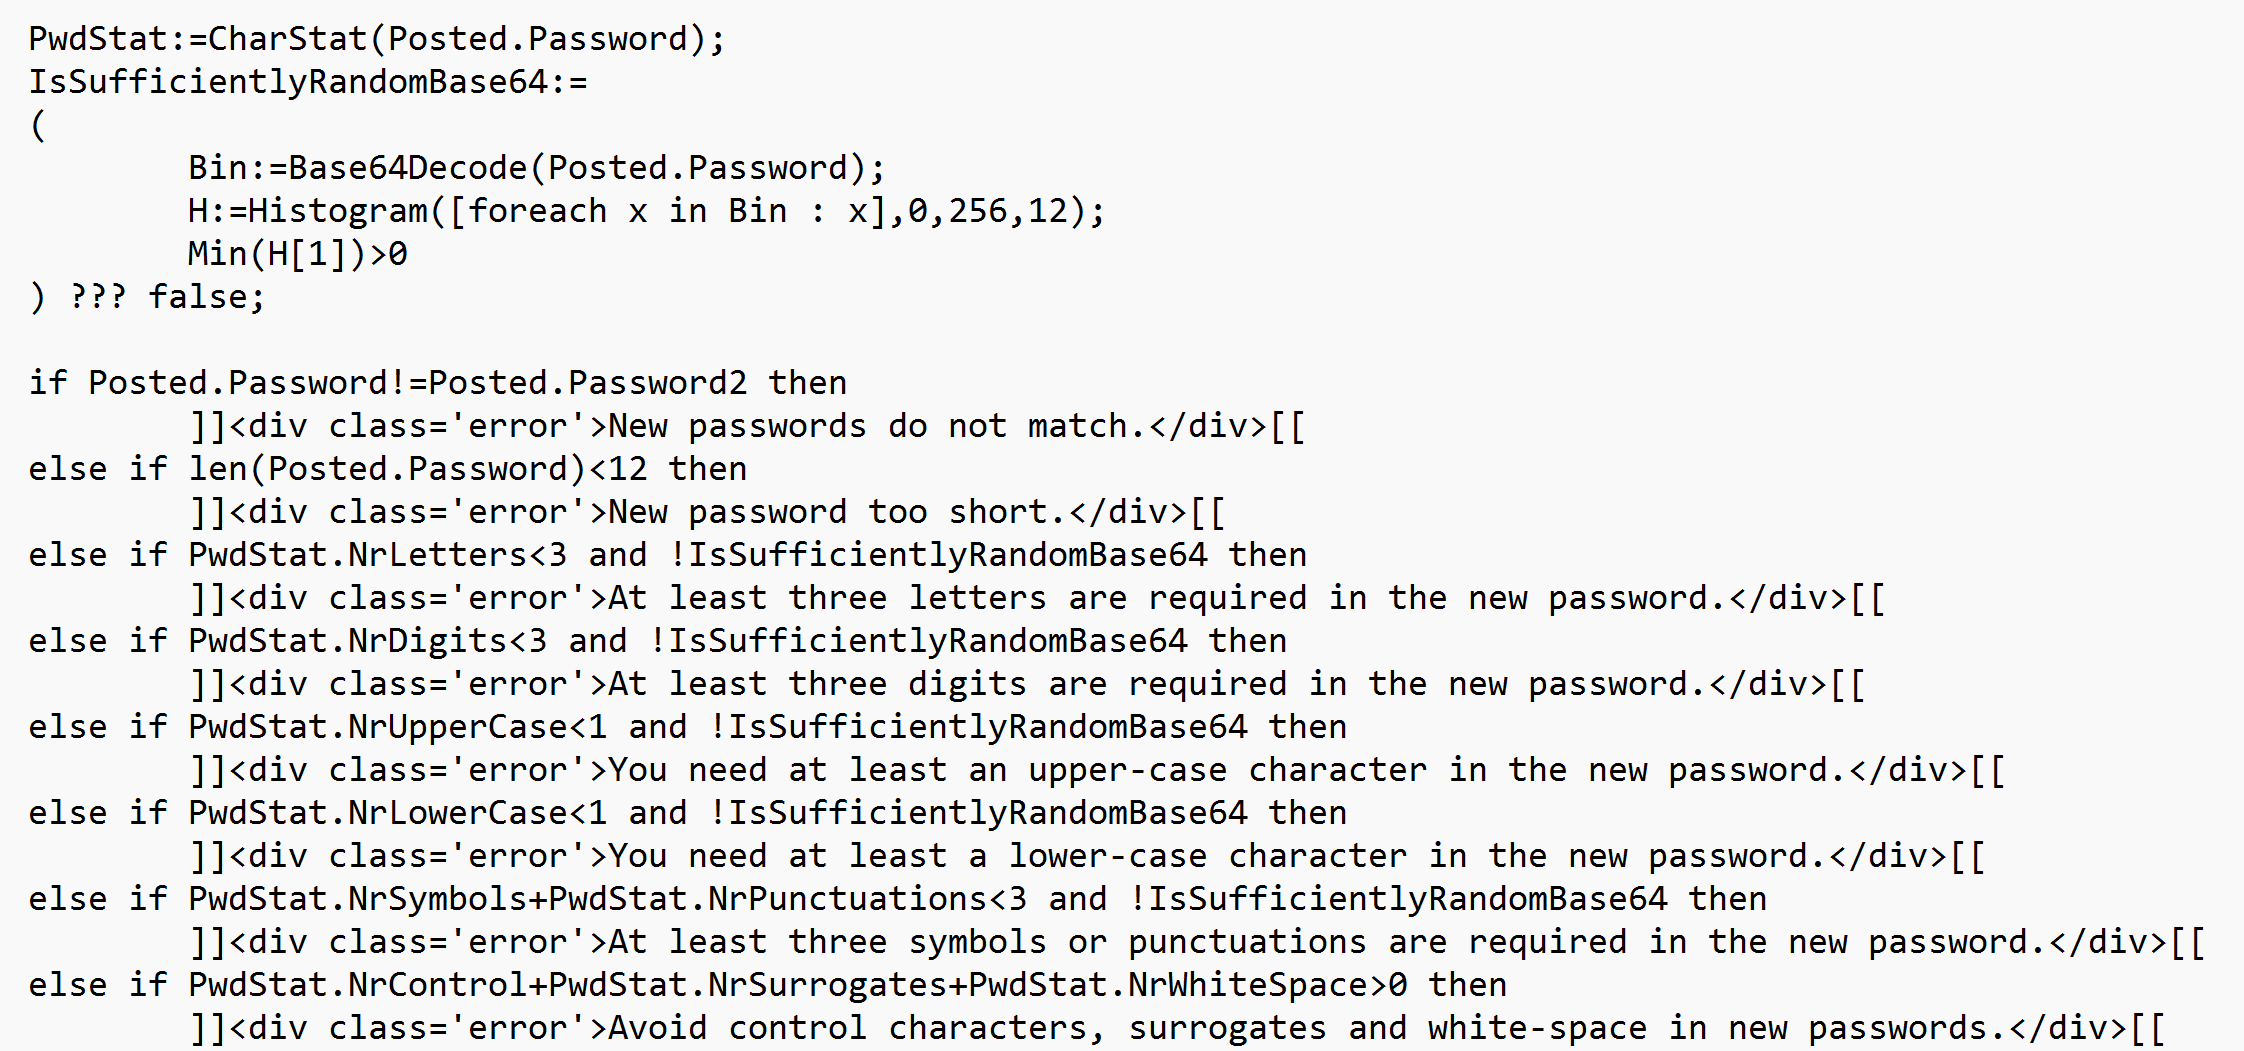
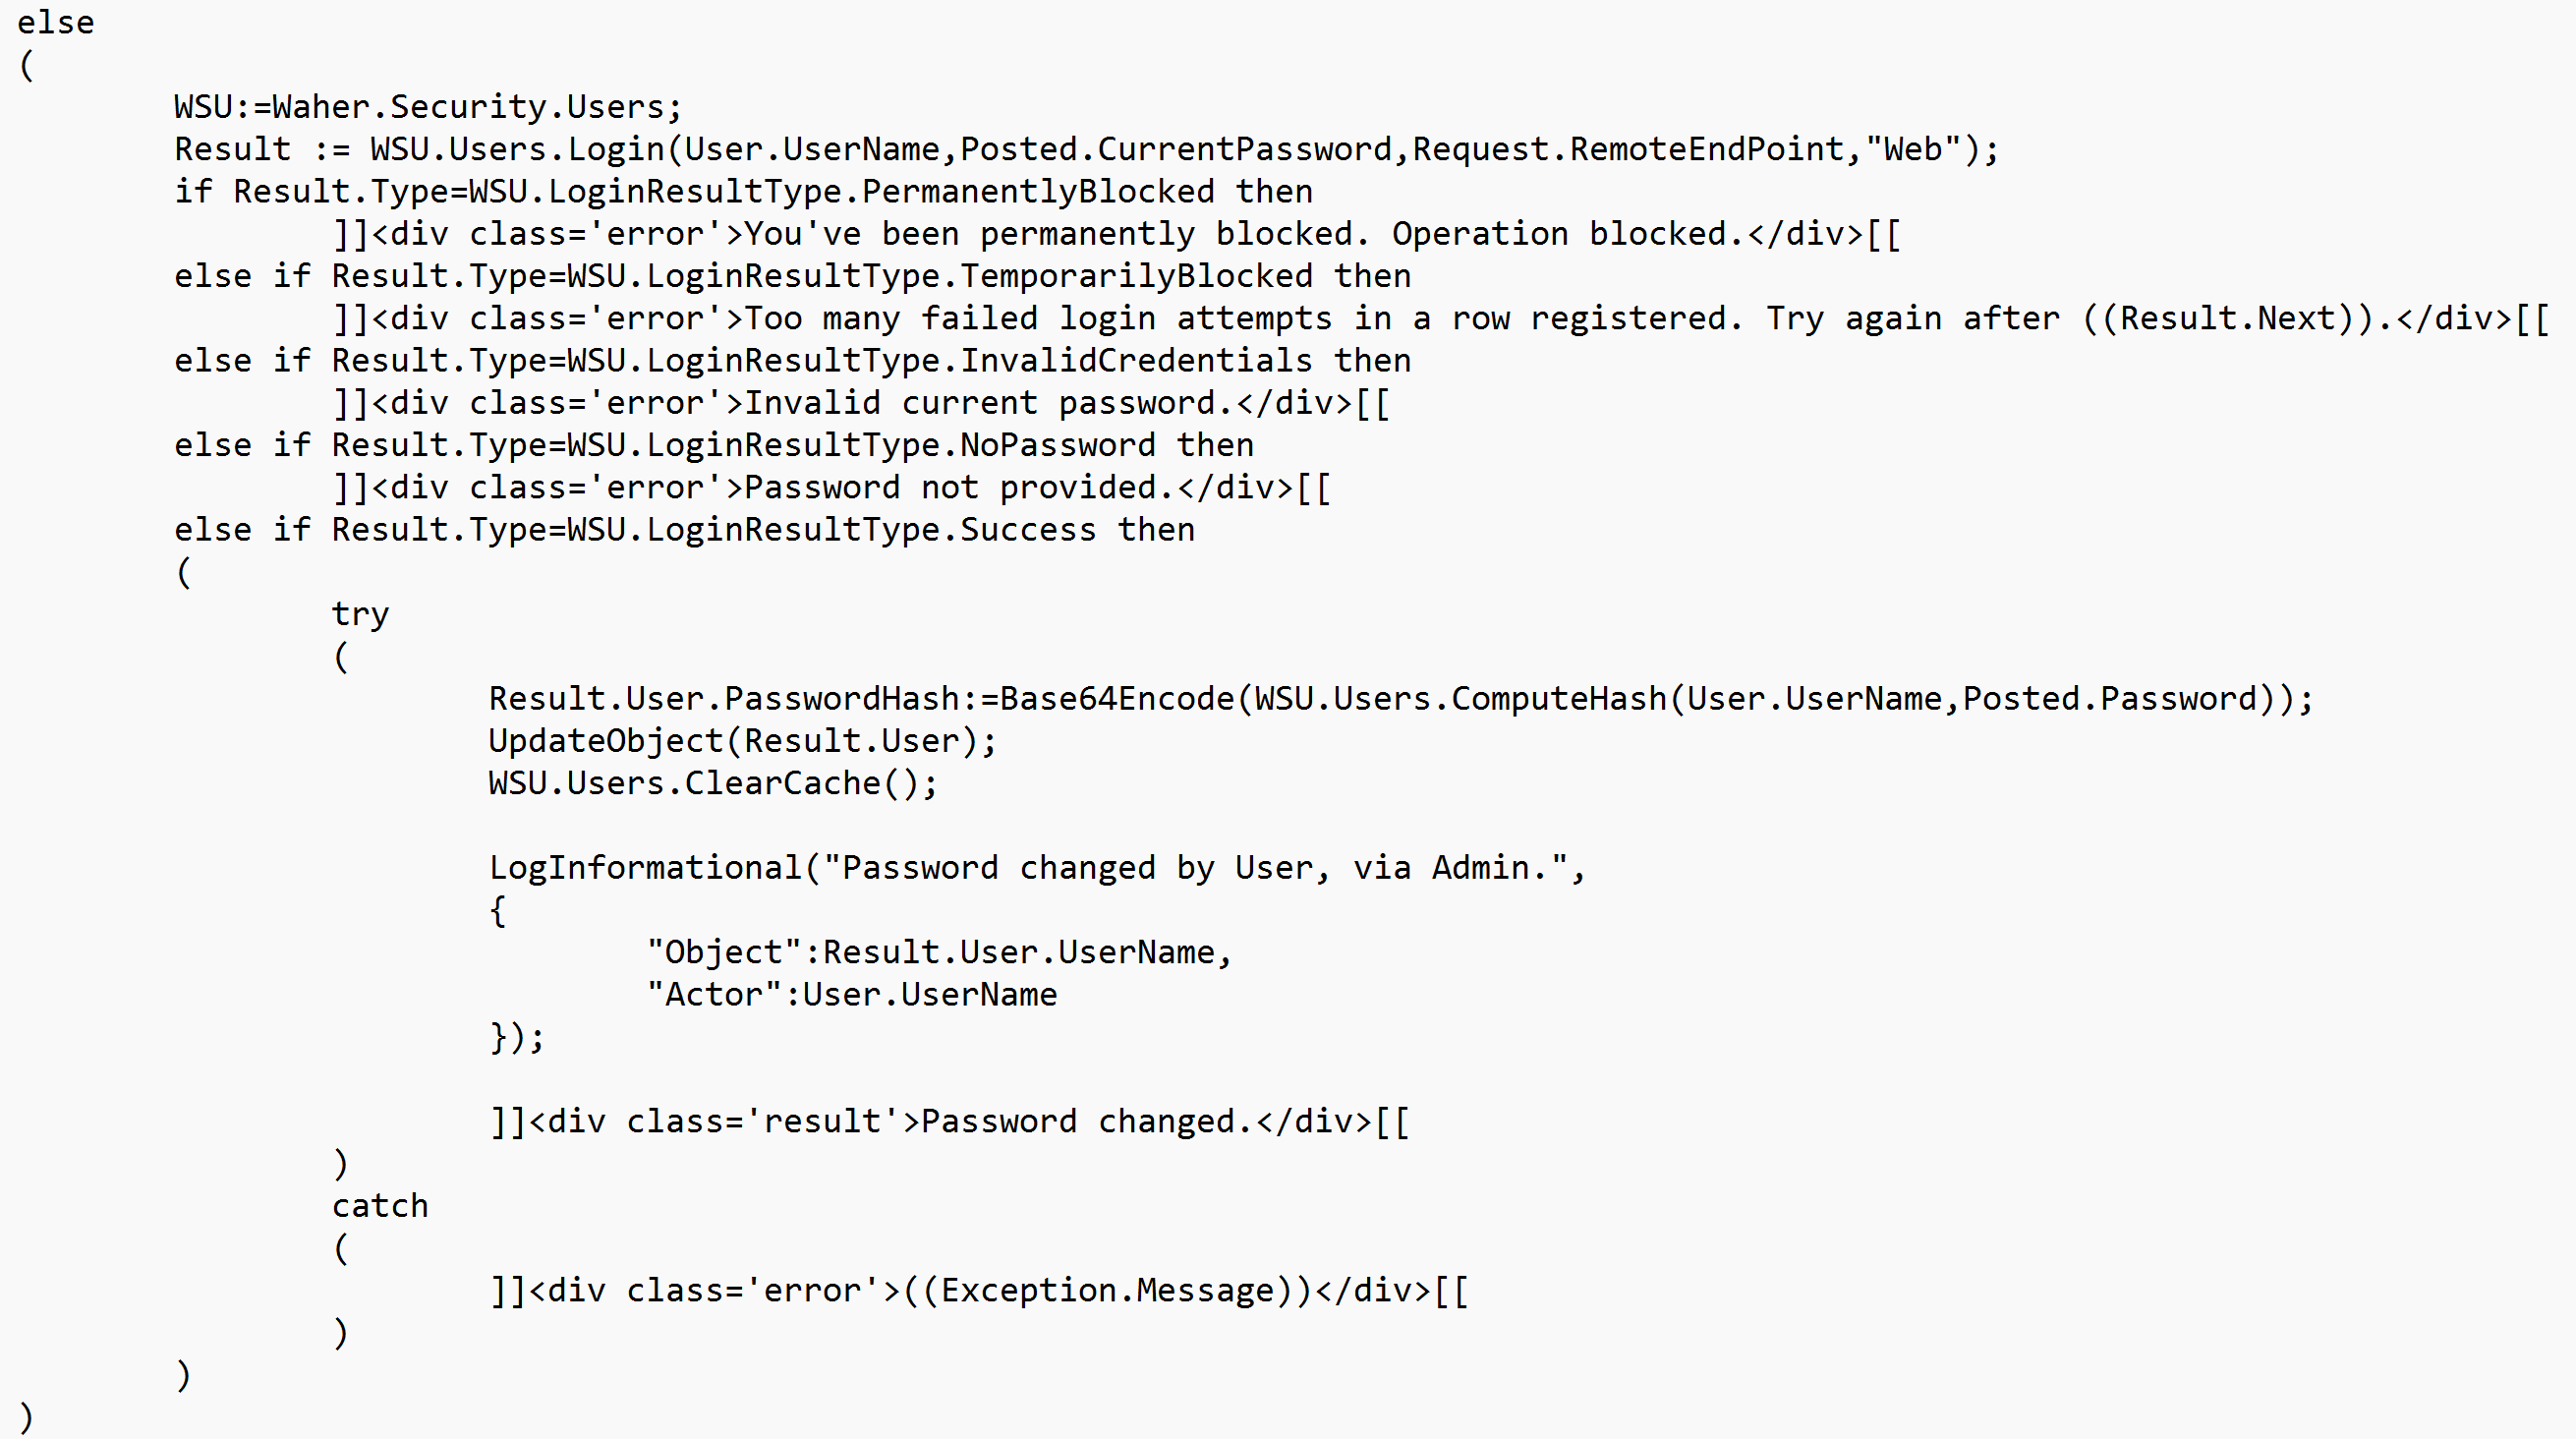
If the initial checks pass, we then continue to perform an actual login attempt, using the credentials provided. This login-procedure will check for blocks, and also appropriately log the attempt for the login auditor to analyze. The code then checks the results from the login attempt and presents the user with information what has been done. If successful, the password is changed. Information about the user is stored in an encypted database, but still, passwords are hashed, to avoid passwords from leaking by mismanagement of the contents of the database. Clearing any caches is also important, to make sure any cached user objects in any service are not used, and the new updated version is used instead.
Reduction of security strength due to distribution check
As explained above, by refusing a number of randomly generated password, you reduce the security strength of the solution, as you reduce the number of available options of passwords. Empirically, we can easily measure how many passwords are removed using the parameters outlined above (i.e. using a 32-byte random password, and a historgram using 12 buckets to check for distribution). The test comes down to approximately 43% of generated passwords pass, and 57% of passwords are rejected, reducing the security strength from 32*8=256 to 255.
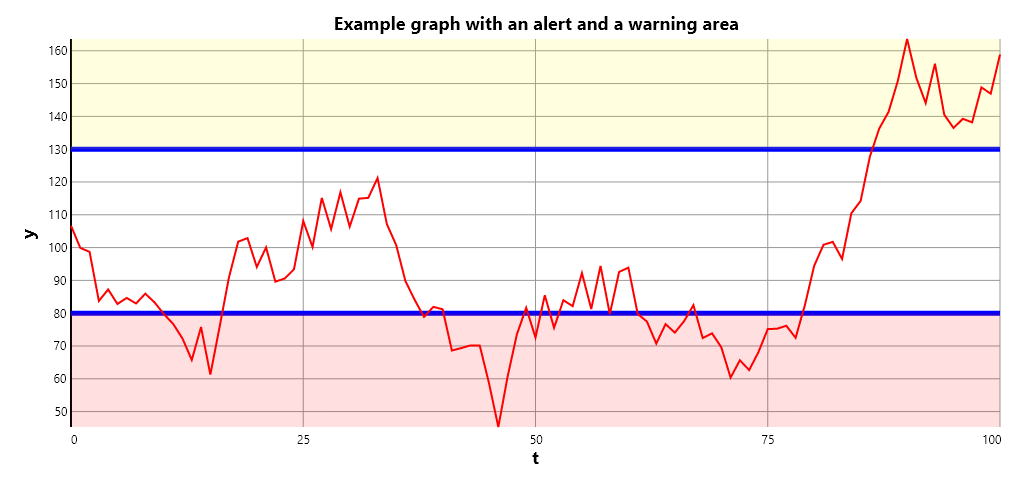
Drawing a graph with alert and warning areas
The following script draws a plot graph, with two visible areas, one alert area, and one warning area. This script can be used as an example of how such a graph computation can be performed. It also illustrates graph arithmetics, where simpler graphs can be combined into a composite graph, using the + operator.
Example:
Next(x,a,c,d):=x+(a-x)/c+Uniform(-d,d);

t:=0..100;
x0:=100;
y:=[foreach x in t do (x1:=Next(x0,100,50,15);x0:=x1)];

GraphWidth:=1024;
GraphHeight:=480;

MinLimit:=80;
MaxLimit:=130;
MinT:=Min(t);
MaxT:=Max(t);
MinY:=Min(y);
MaxY:=Max(y);

LowerLimit:=plot2dline([MinT,MaxT],[MinLimit,MinLimit],"Blue",5);
if MinY<MinLimit then LowerLimit+=polygon2d([MinT,MaxT,MaxT,MinT],[MinLimit,MinLimit,MinY,MinY],Alpha("Red",32));

UpperLimit:=plot2dline([MinT,MaxT],[MaxLimit,MaxLimit],"Blue",5);
if MaxY>MaxLimit then UpperLimit+=polygon2d([MinT,MaxT,MaxT,MinT],[MaxLimit,MaxLimit,MaxY,MaxY],Alpha("Yellow",32));

G:=LowerLimit+UpperLimit+plot2dline(t,y,"Red");
G.Title:="Example graph with an alert and a warning area";
G.LabelX:="t";
G.LabelY:="y";
G
Would generate something like;
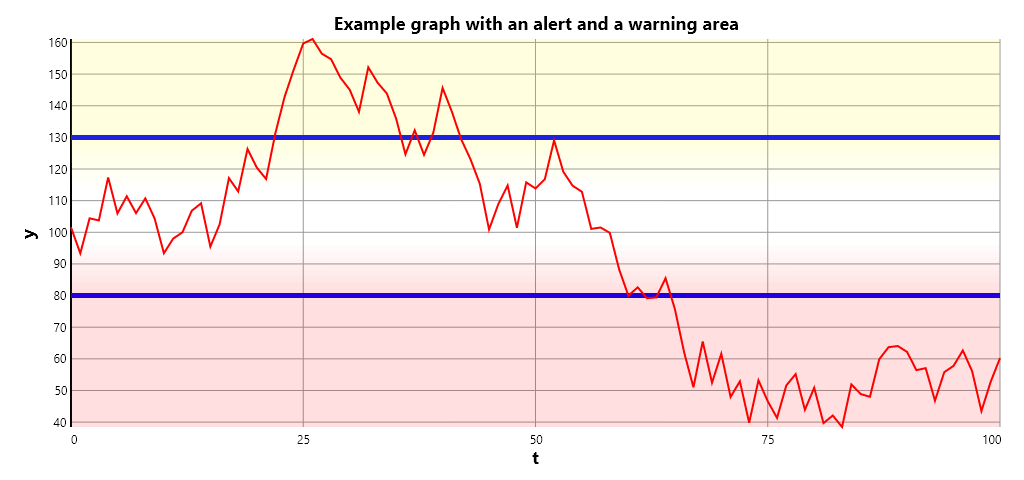
If you want to add a smooth gradient, you can sum a sequence of polygon areas with increasing degrees of alpha as well.
Example:
Next(x,a,c,d):=x+(a-x)/c+Uniform(-d,d);

t:=0..100;
x0:=100;
y:=[foreach x in t do (x1:=Next(x0,100,50,15);x0:=x1)];

GraphWidth:=1024;
GraphHeight:=480;

MinLimit:=80;
MaxLimit:=130;
MinT:=Min(t);
MaxT:=Max(t);
MinY:=Min(y);
MaxY:=Max(y);

LowerLimit:=plot2dline([MinT,MaxT],[MinLimit,MinLimit],"Blue",5);
foreach a in 1..8 do
(
	b:=2*(8-a);
	LowerLimit+=polygon2d([MinT,MaxT,MaxT,MinT],[MinLimit+b,MinLimit+b,MinLimit+b+2,MinLimit+b+2],Alpha("Red",a*4))
);
if MinY<MinLimit then
	LowerLimit+=polygon2d([MinT,MaxT,MaxT,MinT],[MinLimit,MinLimit,MinY,MinY],Alpha("Red",32));

UpperLimit:=plot2dline([MinT,MaxT],[MaxLimit,MaxLimit],"Blue",5);
foreach a in 1..8 do
(
	b:=2*(9-a);
	UpperLimit+=polygon2d([MinT,MaxT,MaxT,MinT],[MaxLimit-b,MaxLimit-b,MaxLimit-b+2,MaxLimit-b+2],Alpha("Yellow",a*4))
);
if MaxY>MaxLimit then
	UpperLimit+=polygon2d([MinT,MaxT,MaxT,MinT],[MaxLimit,MaxLimit,MaxY,MaxY],Alpha("Yellow",32));

G:=LowerLimit+UpperLimit+plot2dline(t,y,"Red");
G.Title:="Example graph with an alert and a warning area";
G.LabelX:="t";
G.LabelY:="y";
G
Gives a graph similar to this:
Posts tagged #example
No more posts with the given tag could be found. You can go back to the main view by selecting Home in the menu above.