Page retrieved from simulation
This page is retrieved as part of a multi-modal simulation, available in the ComSim repository. It simulates web actors that also connect using web-sockets and use digital identities via XMPP, which they use for MFA and for QuickLogin. The report contains more details about an execution of the simulation.
10 Simulated Accounts with Digital Identities online for test
10 accounts with simulated digital identities are now available online, accessible via XMPP. They can be used for test, for instance, if you are implementing a service relying on Multi-Factor Authentication using the Remote Login API, or similar.
Following is the list of accounts being used, and the corresponding digital identities:
| Simulated identities | |
|---|---|
| JID | Legal ID |
SimLegal1@lab.tagroot.io |
30f421e9-c12c-4731-d432-0c297a1697db@legal.lab.tagroot.io |
SimLegal2@lab.tagroot.io |
30f421ea-c12c-4736-d432-0c297a3d84c9@legal.lab.tagroot.io |
SimLegal3@lab.tagroot.io |
30f421ea-c12c-4750-d432-0c297a14f4b8@legal.lab.tagroot.io |
SimLegal4@lab.tagroot.io |
30f421ea-c12c-4758-d432-0c297aaeb627@legal.lab.tagroot.io |
SimLegal5@lab.tagroot.io |
30f421eb-c12c-476d-d432-0c297a7108a0@legal.lab.tagroot.io |
SimLegal6@lab.tagroot.io |
30f421eb-c12c-4788-d432-0c297a728f7e@legal.lab.tagroot.io |
SimLegal7@lab.tagroot.io |
30f421eb-c12c-4794-d432-0c297ae03870@legal.lab.tagroot.io |
SimLegal8@lab.tagroot.io |
30f421ec-c12c-47aa-d432-0c297a24fd6c@legal.lab.tagroot.io |
SimLegal9@lab.tagroot.io |
30f421ec-c12c-47b8-d432-0c297a2fade1@legal.lab.tagroot.io |
SimLegal10@lab.tagroot.io |
30f421ec-c12c-47be-d432-0c297a74a7e4@legal.lab.tagroot.io |
QR Codes
The following QR codes are available for ease of access to the above devices.
Petitions
The accounts will automatically accept the following petitions:
Identity Petitions: Scan the QR Codes (or enter the Legal IDs manually) using the Neuro-Access App to send an Identity Petition to the account. The petition will be accepted and approved automatically.
Signature Petitions: Initiating a Remote Login using the Remote Login API will send a Signature Petition to the account. This petition will be automatically approved as well. The Remote Login API will return a JWT token as soon as the petition has been approved and signed.
Note: The model controlling the simulation can be reviewed in the ComSim repository
Simulating Identity and Signature Petitions
A new ComSim simulation called LegalIdentities.xml simulates a series of XMPP-connected devices that apply for digital identities, and automatically respond to identity and digital signature requests. This simulation can be used for test purposes, to test function and load, as well as measure performance. It can also be used during development of other services interacting with users of digital identities for the purposes of Multi-Factor authentication. By using the digital identities of the simulated users, automatic signatures are created, which simplifies the development life-cycle, as the developer does not need to manually sign each time the MFA procedure takes place.
Report
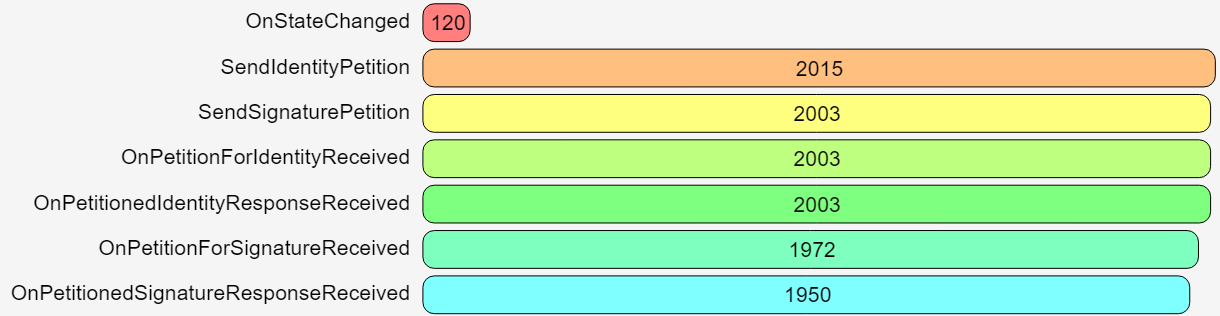
To review the simulation model, check out the XML definition. It contains references to both the XMPP and XMPP Legal modules of ComSim. Each actor checks if they have a digital identity. If not, the actor applies for a new simple digital identity. From Build 2026-01-07 of the Neuron®, such digital identities are automatically approved. Once such approved digital identities exist, the actors stochastically send identity and signature petitions to each other. They also accept each other’s petitions automatically. This means that they will approve external requests also. This allows them to be used for other purposes as well, as mentioned earlier. You can use this simulation together with integration of the QuickLogin API and RemoteLogin API for instance.
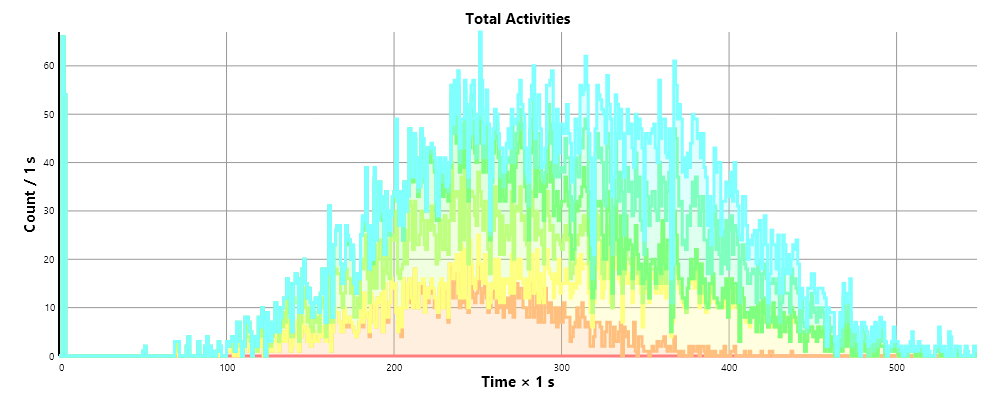
Also review the full report generated by one simulation of the model, for more information.
40 Simulated Modbus devices now online for test
40 simulated devices (mix of sensors, actuators and controllers) now available online, accessible via Modbus and XMPP (for comparison). They can be used for test, both of infrastructure, token generation, or interface via ID App, etc. The first 4 columns contain Modbus connection information. The three last columns, represents XMPP and 1451.99 connection information, using the concentrator avility to bridge procotols (in this case XMPP <-> Modbus). In XMPP and 1451.99 you can also address parent nodes directly. In Modbus, this representation is symbolic, as you only address registers directly. QR codes are be provided at the bottom. There’s also an import file that can be used to import references to the nodes on other development neurons, if this is of interest.
| Modbus interface | XMPP interface | ||||||
|---|---|---|---|---|---|---|---|
| Host | Port | Device | Register | Description | JID | Node ID | Source ID |
lab.tagroot.io |
502 | 10 | Outdoor temperature sensor 1. | lab.tagroot.io@tagroot.io |
Outdoor__1 |
MeteringTopology |
|
lab.tagroot.io |
502 | 10 | 0 | Outdoor temperature 1. | lab.tagroot.io@tagroot.io |
Outdoor Temperature 1 |
MeteringTopology |
lab.tagroot.io |
502 | 11 | Outdoor temperature sensor 2. | lab.tagroot.io@tagroot.io |
Outdoor__2 |
MeteringTopology |
|
lab.tagroot.io |
502 | 11 | 0 | Outdoor temperature 2. | lab.tagroot.io@tagroot.io |
Outdoor Temperature 2 |
MeteringTopology |
lab.tagroot.io |
502 | 12 | Outdoor temperature sensor 3. | lab.tagroot.io@tagroot.io |
Outdoor__3 |
MeteringTopology |
|
lab.tagroot.io |
502 | 12 | 0 | Outdoor temperature 3. | lab.tagroot.io@tagroot.io |
Outdoor Temperature 3 |
MeteringTopology |
lab.tagroot.io |
502 | 13 | Outdoor temperature sensor 4. | lab.tagroot.io@tagroot.io |
Outdoor__4 |
MeteringTopology |
|
lab.tagroot.io |
502 | 13 | 0 | Outdoor temperature 4. | lab.tagroot.io@tagroot.io |
Outdoor Temperature 4 |
MeteringTopology |
lab.tagroot.io |
502 | 14 | Outdoor temperature sensor 5. | lab.tagroot.io@tagroot.io |
Outdoor__5 |
MeteringTopology |
|
lab.tagroot.io |
502 | 14 | 0 | Outdoor temperature 5. | lab.tagroot.io@tagroot.io |
Outdoor Temperature 5 |
MeteringTopology |
lab.tagroot.io |
502 | 15 | Outdoor temperature sensor 6. | lab.tagroot.io@tagroot.io |
Outdoor__6 |
MeteringTopology |
|
lab.tagroot.io |
502 | 15 | 0 | Outdoor temperature 6. | lab.tagroot.io@tagroot.io |
Outdoor Temperature 6 |
MeteringTopology |
lab.tagroot.io |
502 | 16 | Outdoor temperature sensor 7. | lab.tagroot.io@tagroot.io |
Outdoor__7 |
MeteringTopology |
|
lab.tagroot.io |
502 | 16 | 0 | Outdoor temperature 7. | lab.tagroot.io@tagroot.io |
Outdoor Temperature 7 |
MeteringTopology |
lab.tagroot.io |
502 | 17 | Outdoor temperature sensor 8. | lab.tagroot.io@tagroot.io |
Outdoor__8 |
MeteringTopology |
|
lab.tagroot.io |
502 | 17 | 0 | Outdoor temperature 8. | lab.tagroot.io@tagroot.io |
Outdoor Temperature 8 |
MeteringTopology |
lab.tagroot.io |
502 | 18 | Outdoor temperature sensor 9. | lab.tagroot.io@tagroot.io |
Outdoor__9 |
MeteringTopology |
|
lab.tagroot.io |
502 | 18 | 0 | Outdoor temperature 9. | lab.tagroot.io@tagroot.io |
Outdoor Temperature 9 |
MeteringTopology |
lab.tagroot.io |
502 | 19 | Outdoor temperature sensor 10. | lab.tagroot.io@tagroot.io |
Outdoor_10 |
MeteringTopology |
|
lab.tagroot.io |
502 | 19 | 0 | Outdoor temperature 10. | lab.tagroot.io@tagroot.io |
Outdoor Temperature 10 |
MeteringTopology |
lab.tagroot.io |
502 | 20 | Indoor temperature sensor 1. | lab.tagroot.io@tagroot.io |
Indoor__1 |
MeteringTopology |
|
lab.tagroot.io |
502 | 20 | 0 | Indoor temperature 1. | lab.tagroot.io@tagroot.io |
Indoor Temperature 1 |
MeteringTopology |
lab.tagroot.io |
502 | 21 | Indoor temperature sensor 2. | lab.tagroot.io@tagroot.io |
Indoor__2 |
MeteringTopology |
|
lab.tagroot.io |
502 | 21 | 0 | Indoor temperature 2. | lab.tagroot.io@tagroot.io |
Indoor Temperature 2 |
MeteringTopology |
lab.tagroot.io |
502 | 22 | Indoor temperature sensor 3. | lab.tagroot.io@tagroot.io |
Indoor__3 |
MeteringTopology |
|
lab.tagroot.io |
502 | 22 | 0 | Indoor temperature 3. | lab.tagroot.io@tagroot.io |
Indoor Temperature 3 |
MeteringTopology |
lab.tagroot.io |
502 | 23 | Indoor temperature sensor 4. | lab.tagroot.io@tagroot.io |
Indoor__4 |
MeteringTopology |
|
lab.tagroot.io |
502 | 23 | 0 | Indoor temperature 4. | lab.tagroot.io@tagroot.io |
Indoor Temperature 4 |
MeteringTopology |
lab.tagroot.io |
502 | 24 | Indoor temperature sensor 5. | lab.tagroot.io@tagroot.io |
Indoor__5 |
MeteringTopology |
|
lab.tagroot.io |
502 | 24 | 0 | Indoor temperature 5. | lab.tagroot.io@tagroot.io |
Indoor Temperature 5 |
MeteringTopology |
lab.tagroot.io |
502 | 25 | Indoor temperature sensor 6. | lab.tagroot.io@tagroot.io |
Indoor__6 |
MeteringTopology |
|
lab.tagroot.io |
502 | 25 | 0 | Indoor temperature 6. | lab.tagroot.io@tagroot.io |
Indoor Temperature 6 |
MeteringTopology |
lab.tagroot.io |
502 | 26 | Indoor temperature sensor 7. | lab.tagroot.io@tagroot.io |
Indoor__7 |
MeteringTopology |
|
lab.tagroot.io |
502 | 26 | 0 | Indoor temperature 7. | lab.tagroot.io@tagroot.io |
Indoor Temperature 7 |
MeteringTopology |
lab.tagroot.io |
502 | 27 | Indoor temperature sensor 8. | lab.tagroot.io@tagroot.io |
Indoor__8 |
MeteringTopology |
|
lab.tagroot.io |
502 | 27 | 0 | Indoor temperature 8. | lab.tagroot.io@tagroot.io |
Indoor Temperature 8 |
MeteringTopology |
lab.tagroot.io |
502 | 28 | Indoor temperature sensor 9. | lab.tagroot.io@tagroot.io |
Indoor__9 |
MeteringTopology |
|
lab.tagroot.io |
502 | 28 | 0 | Indoor temperature 9. | lab.tagroot.io@tagroot.io |
Indoor Temperature 9 |
MeteringTopology |
lab.tagroot.io |
502 | 29 | Indoor temperature sensor 10. | lab.tagroot.io@tagroot.io |
Indoor_10 |
MeteringTopology |
|
lab.tagroot.io |
502 | 29 | 0 | Indoor temperature 10. | lab.tagroot.io@tagroot.io |
Indoor Temperature 10 |
MeteringTopology |
lab.tagroot.io |
502 | 30 | Heater 1. | lab.tagroot.io@tagroot.io |
Heater__1 |
MeteringTopology |
|
lab.tagroot.io |
502 | 30 | 0 | Heater enabled 1. | lab.tagroot.io@tagroot.io |
Heater Enabled 1 |
MeteringTopology |
lab.tagroot.io |
502 | 30 | 2 | Heater temperature 1. | lab.tagroot.io@tagroot.io |
Heater Temperature 1 |
MeteringTopology |
lab.tagroot.io |
502 | 31 | Heater 2. | lab.tagroot.io@tagroot.io |
Heater__2 |
MeteringTopology |
|
lab.tagroot.io |
502 | 31 | 0 | Heater enabled 2. | lab.tagroot.io@tagroot.io |
Heater Enabled 2 |
MeteringTopology |
lab.tagroot.io |
502 | 31 | 2 | Heater temperature 2. | lab.tagroot.io@tagroot.io |
Heater Temperature 2 |
MeteringTopology |
lab.tagroot.io |
502 | 32 | Heater 3. | lab.tagroot.io@tagroot.io |
Heater__3 |
MeteringTopology |
|
lab.tagroot.io |
502 | 32 | 0 | Heater enabled 3. | lab.tagroot.io@tagroot.io |
Heater Enabled 3 |
MeteringTopology |
lab.tagroot.io |
502 | 32 | 2 | Heater temperature 3. | lab.tagroot.io@tagroot.io |
Heater Temperature 3 |
MeteringTopology |
lab.tagroot.io |
502 | 33 | Heater 4. | lab.tagroot.io@tagroot.io |
Heater__4 |
MeteringTopology |
|
lab.tagroot.io |
502 | 33 | 0 | Heater enabled 4. | lab.tagroot.io@tagroot.io |
Heater Enabled 4 |
MeteringTopology |
lab.tagroot.io |
502 | 33 | 2 | Heater temperature 4. | lab.tagroot.io@tagroot.io |
Heater Temperature 4 |
MeteringTopology |
lab.tagroot.io |
502 | 34 | Heater 5. | lab.tagroot.io@tagroot.io |
Heater__5 |
MeteringTopology |
|
lab.tagroot.io |
502 | 34 | 0 | Heater enabled 5. | lab.tagroot.io@tagroot.io |
Heater Enabled 5 |
MeteringTopology |
lab.tagroot.io |
502 | 34 | 2 | Heater temperature 5. | lab.tagroot.io@tagroot.io |
Heater Temperature 5 |
MeteringTopology |
lab.tagroot.io |
502 | 35 | Heater 6. | lab.tagroot.io@tagroot.io |
Heater__6 |
MeteringTopology |
|
lab.tagroot.io |
502 | 35 | 0 | Heater enabled 6. | lab.tagroot.io@tagroot.io |
Heater Enabled 6 |
MeteringTopology |
lab.tagroot.io |
502 | 35 | 2 | Heater temperature 6. | lab.tagroot.io@tagroot.io |
Heater Temperature 6 |
MeteringTopology |
lab.tagroot.io |
502 | 36 | Heater 7. | lab.tagroot.io@tagroot.io |
Heater__7 |
MeteringTopology |
|
lab.tagroot.io |
502 | 36 | 0 | Heater enabled 7. | lab.tagroot.io@tagroot.io |
Heater Enabled 7 |
MeteringTopology |
lab.tagroot.io |
502 | 36 | 2 | Heater temperature 7. | lab.tagroot.io@tagroot.io |
Heater Temperature 7 |
MeteringTopology |
lab.tagroot.io |
502 | 37 | Heater 8. | lab.tagroot.io@tagroot.io |
Heater__8 |
MeteringTopology |
|
lab.tagroot.io |
502 | 37 | 0 | Heater enabled 8. | lab.tagroot.io@tagroot.io |
Heater Enabled 8 |
MeteringTopology |
lab.tagroot.io |
502 | 37 | 2 | Heater temperature 8. | lab.tagroot.io@tagroot.io |
Heater Temperature 8 |
MeteringTopology |
lab.tagroot.io |
502 | 38 | Heater 9. | lab.tagroot.io@tagroot.io |
Heater__9 |
MeteringTopology |
|
lab.tagroot.io |
502 | 38 | 0 | Heater enabled 9. | lab.tagroot.io@tagroot.io |
Heater Enabled 9 |
MeteringTopology |
lab.tagroot.io |
502 | 38 | 2 | Heater temperature 9. | lab.tagroot.io@tagroot.io |
Heater Temperature 9 |
MeteringTopology |
lab.tagroot.io |
502 | 39 | Heater 10. | lab.tagroot.io@tagroot.io |
Heater_10 |
MeteringTopology |
|
lab.tagroot.io |
502 | 39 | 0 | Heater enabled 10. | lab.tagroot.io@tagroot.io |
Heater Enabled 10 |
MeteringTopology |
lab.tagroot.io |
502 | 39 | 2 | Heater temperature 10. | lab.tagroot.io@tagroot.io |
Heater Temperature 10 |
MeteringTopology |
lab.tagroot.io |
502 | 40 | Thermostat 1. | lab.tagroot.io@tagroot.io |
Thermostat__1 |
MeteringTopology |
|
lab.tagroot.io |
502 | 40 | 0 | Thermostat enabled 1. | lab.tagroot.io@tagroot.io |
Thermostat Enabled 1 |
MeteringTopology |
lab.tagroot.io |
502 | 40 | 2 | Thermostat temperature 1. | lab.tagroot.io@tagroot.io |
Thermostat Temperature 1 |
MeteringTopology |
lab.tagroot.io |
502 | 41 | Thermostat 2. | lab.tagroot.io@tagroot.io |
Thermostat__2 |
MeteringTopology |
|
lab.tagroot.io |
502 | 41 | 0 | Thermostat enabled 2. | lab.tagroot.io@tagroot.io |
Thermostat Enabled 2 |
MeteringTopology |
lab.tagroot.io |
502 | 41 | 2 | Thermostat temperature 2. | lab.tagroot.io@tagroot.io |
Thermostat Temperature 2 |
MeteringTopology |
lab.tagroot.io |
502 | 42 | Thermostat 3. | lab.tagroot.io@tagroot.io |
Thermostat__3 |
MeteringTopology |
|
lab.tagroot.io |
502 | 42 | 0 | Thermostat enabled 3. | lab.tagroot.io@tagroot.io |
Thermostat Enabled 3 |
MeteringTopology |
lab.tagroot.io |
502 | 42 | 2 | Thermostat temperature 3. | lab.tagroot.io@tagroot.io |
Thermostat Temperature 3 |
MeteringTopology |
lab.tagroot.io |
502 | 43 | Thermostat 4. | lab.tagroot.io@tagroot.io |
Thermostat__4 |
MeteringTopology |
|
lab.tagroot.io |
502 | 43 | 0 | Thermostat enabled 4. | lab.tagroot.io@tagroot.io |
Thermostat Enabled 4 |
MeteringTopology |
lab.tagroot.io |
502 | 43 | 2 | Thermostat temperature 4. | lab.tagroot.io@tagroot.io |
Thermostat Temperature 4 |
MeteringTopology |
lab.tagroot.io |
502 | 44 | Thermostat 5. | lab.tagroot.io@tagroot.io |
Thermostat__5 |
MeteringTopology |
|
lab.tagroot.io |
502 | 44 | 0 | Thermostat enabled 5. | lab.tagroot.io@tagroot.io |
Thermostat Enabled 5 |
MeteringTopology |
lab.tagroot.io |
502 | 44 | 2 | Thermostat temperature 5. | lab.tagroot.io@tagroot.io |
Thermostat Temperature 5 |
MeteringTopology |
lab.tagroot.io |
502 | 45 | Thermostat 6. | lab.tagroot.io@tagroot.io |
Thermostat__6 |
MeteringTopology |
|
lab.tagroot.io |
502 | 45 | 0 | Thermostat enabled 6. | lab.tagroot.io@tagroot.io |
Thermostat Enabled 6 |
MeteringTopology |
lab.tagroot.io |
502 | 45 | 2 | Thermostat temperature 6. | lab.tagroot.io@tagroot.io |
Thermostat Temperature 6 |
MeteringTopology |
lab.tagroot.io |
502 | 46 | Thermostat 7. | lab.tagroot.io@tagroot.io |
Thermostat__7 |
MeteringTopology |
|
lab.tagroot.io |
502 | 46 | 0 | Thermostat enabled 7. | lab.tagroot.io@tagroot.io |
Thermostat Enabled 7 |
MeteringTopology |
lab.tagroot.io |
502 | 46 | 2 | Thermostat temperature 7. | lab.tagroot.io@tagroot.io |
Thermostat Temperature 7 |
MeteringTopology |
lab.tagroot.io |
502 | 47 | Thermostat 8. | lab.tagroot.io@tagroot.io |
Thermostat__8 |
MeteringTopology |
|
lab.tagroot.io |
502 | 47 | 0 | Thermostat enabled 8. | lab.tagroot.io@tagroot.io |
Thermostat Enabled 8 |
MeteringTopology |
lab.tagroot.io |
502 | 47 | 2 | Thermostat temperature 8. | lab.tagroot.io@tagroot.io |
Thermostat Temperature 8 |
MeteringTopology |
lab.tagroot.io |
502 | 48 | Thermostat 9. | lab.tagroot.io@tagroot.io |
Thermostat__9 |
MeteringTopology |
|
lab.tagroot.io |
502 | 48 | 0 | Thermostat enabled 9. | lab.tagroot.io@tagroot.io |
Thermostat Enabled 9 |
MeteringTopology |
lab.tagroot.io |
502 | 48 | 2 | Thermostat temperature 9. | lab.tagroot.io@tagroot.io |
Thermostat Temperature 9 |
MeteringTopology |
lab.tagroot.io |
502 | 49 | Thermostat 10. | lab.tagroot.io@tagroot.io |
Thermostat_10 |
MeteringTopology |
|
lab.tagroot.io |
502 | 49 | 0 | Thermostat enabled 10. | lab.tagroot.io@tagroot.io |
Thermostat Enabled 10 |
MeteringTopology |
lab.tagroot.io |
502 | 49 | 2 | Thermostat temperature 10. | lab.tagroot.io@tagroot.io |
Thermostat Temperature 10 |
MeteringTopology |
An XML file that can be used for importing devices is also available: SimModbus.xml.
Reference repository: https://github.com/rbrama79/dot99binding/blob/main/ModbusDevices.md
QR Codes
The following QR codes are available for ease of access to the above devices.
Outdoor temperature sensors
Indoor temperature sensors
Heaters
Thermostats
Simulating Modbus devices using ComSim
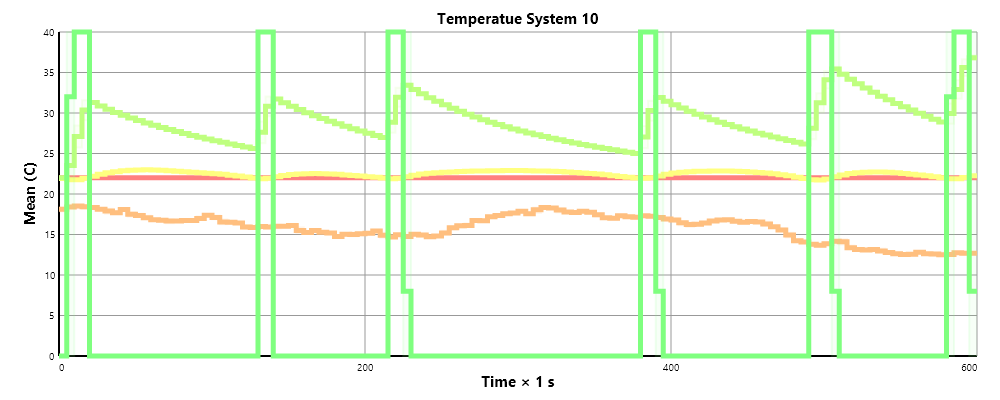
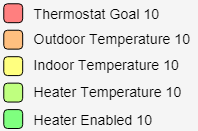
ComSim has been updated to support simulation of Modbus devices. A new example illustrates how this is done, by simulating ten different systems, each one including an outdoor temperature sensor, an indoor temperature sensor, a heater and a thermostat. The systems are then simulated in different conditions, and a resulting report is generated illustrating how the thermostat maintains the indoor temperature at the goal temperature, by simply controlling the heater on and off.
Defining a Modbus server (IP gateway)
In the simulation file, you add a simulated Modbus server (or Modbus IP gateway) using the ModBusServer element (from namespace http://lab.tagroot.io/Schema/ComSim/ModBus.xsd), and specify the port the server is going to use to listen to for incoming Modbus over TCP/IP requests. The Modbus server will be hosted on the same machine as is running the simulation.
		<modbus:ModBusServer port="502">
			...
		</modbus:ModBusServer>
Defining a Modbus device
Once the server is in place you can then add different Modbus devices as child nodes to the server element. The N attribute specifies the number of devices to create, and the startAddress the Modbus unit address of the first device. The other devices gets the following addresses.
		<modbus:ModBusServer port="502">
			<modbus:ModBusDevice id="OutdoorTemp" N="10" startAddress="10">
				...
			</modbus:ModBusDevice>
			<modbus:ModBusDevice id="IndoorTemp" N="10" startAddress="20">
				...
			</modbus:ModBusDevice>
			<modbus:ModBusDevice id="Heater" N="10" startAddress="30">
				...
			</modbus:ModBusDevice>
			<modbus:ModBusDevice id="Thermostat" N="10" startAddress="40">
				...
			</modbus:ModBusDevice>
		</modbus:ModBusServer>
Adding floating-point registers to a device
Once you have the devices defined, you can add registers. There are different types of registers, such as boolean registers (a.k.a. “coils”), word registers and floating-point registers. For sensor-data, floating-point registers are useful, as they permit communication of already scaled values. If word-registers are used, the reading software needs to be configured with multipliers, divisors, precision, etc., to present the value as a physical magnitude. In both cases, reader software need to know the precision and units. To add a floating-point register, use the ModBusHoldingFloatingPointRegister element, as follows:
		<modbus:ModBusServer port="502">
			<modbus:ModBusDevice id="OutdoorTemp" N="10" startAddress="10">
				<modbus:ModBusHoldingFloatingPointRegister register="0">
					...
				</modbus:ModBusHoldingFloatingPointRegister>
				...
			</modbus:ModBusDevice>
			...
		</modbus:ModBusServer port="502">
Adding coil registers to a device
A coil register is similarly added, by using the ModBusCoil element, as seen below. Notice you can add multiple registers to each device. For the Heater, both a coil and a floating-point register are added. The coil controls if the heater is on or off, while the floating-point register returns the heater temperature:
			<modbus:ModBusDevice id="Heater" N="10" startAddress="30">
				<modbus:ModBusCoil register="0">
					...
				</modbus:ModBusCoil>
				<modbus:ModBusHoldingFloatingPointRegister register="2">
					...
				</modbus:ModBusHoldingFloatingPointRegister>
			</modbus:ModBusDevice>
Handling external events on a register
If a client requests to read the Modbus register, an external event is raised. To handle such events, to return sensor-data, add an ExternalEvent element, as follows:
		<modbus:ModBusServer port="502">
			<modbus:ModBusDevice id="OutdoorTemp" N="10" startAddress="10">
				<modbus:ModBusHoldingFloatingPointRegister register="0">
					<ExternalEvent name="OnExecuteReadoutRequest" event="ReadOutdoorTemperatureEvent" actorName="Device">
						<Parameter name="e"/>
						<Parameter name="Register"/>
						<Parameter name="RegisterNr"/>
					</ExternalEvent>
				</modbus:ModBusHoldingFloatingPointRegister>
				...
			</modbus:ModBusDevice>
			...
		</modbus:ModBusServer port="502">
Read operations are named OnExecuteReadoutRequest, while control operations are named OnExecuteSetRequest. For handling a Coil (boolean register) get and set events, you define two external events, as follows:
			<modbus:ModBusDevice id="Heater" N="10" startAddress="30">
				<modbus:ModBusCoil register="0">
					<ExternalEvent name="OnExecuteReadoutRequest" event="ReadHeaterEnabledEvent" actorName="Device">
						<Parameter name="e"/>
						<Parameter name="Register"/>
						<Parameter name="RegisterNr"/>
					</ExternalEvent>
					<ExternalEvent name="OnExecuteSetRequest" event="SetHeaterEnabledEvent" actorName="Device">
						<Parameter name="e"/>
						<Parameter name="Register"/>
						<Parameter name="RegisterNr"/>
						<Parameter name="Value"/>
					</ExternalEvent>
				</modbus:ModBusCoil>
			</modbus:ModBusDevice>
The parameter names available for Modbus external events are:
| Name | Description |
|---|---|
e |
Event arguments |
Register |
Reference to register object. |
RegisterNr |
Modbus register number. |
Value |
Value to set (for set operations only). |
The actor for these external events will be the device object instance for which the event is related.
Events and event handlers
Once the external events have been defined, you associate them with their corresponding activities using Event Handlers. Example:
	<Events>
		...
		<EventHandler id="ReadIndoorTemperatureEvent" activity="ReadIndoorTemperature">
			<Description>Event raised when a client wants to read an indoor temperature sensor.</Description>
		</EventHandler>
		<EventHandler id="ReadHeaterEnabledEvent" activity="ReadHeaterEnabled">
			<Description>Event raised when a client wants to read the enabled register in a heater.</Description>
		</EventHandler>
		<EventHandler id="ReadHeaterTemperatureEvent" activity="ReadHeaterTemperature">
			<Description>Event raised when a client wants to read the temperature register in a heater.</Description>
		</EventHandler>
		<EventHandler id="SetHeaterEnabledEvent" activity="SetHeaterEnabled">
			<Description>Event raised when a control command is received enabling or disabling a Heater.</Description>
		</EventHandler>
		...
	</Events>
Returning sensor data
You use the ReturnValue element in the Modbus namespace to return a value in a Modbus readout event. The element will format the value accordingly (depending on if it’s a boolean, word or floating-point request). The following example shows an activity that returns a boolean value, and another that returns a floating-point value:
		<Activity id="ReadHeaterEnabled" logStart="false" logEnd="false">
			<Description>Performs a readout of the enabled register in a heater.</Description>
			<Start/>
			<Eval>Data:=Global["Data"+Device.InstanceId]</Eval>
			<modbus:ReturnValue>
				<Script>Data.Enabled</Script>
			</modbus:ReturnValue>
			<Stop/>
		</Activity>
		<Activity id="ReadHeaterTemperature" logStart="false" logEnd="false">
			<Description>Performs a readout of the temperature register in a heater.</Description>
			<Start/>
			<Eval>Data:=Global["Data"+Device.InstanceId]</Eval>
			<modbus:ReturnValue>
				<Script>Data.Temperature</Script>
			</modbus:ReturnValue>
			<Stop/>
		</Activity>
Setting control parameters
A set event however, can be used to control a simulated actuator. Here, the Value parameter of the external event is used to set the corresponding property in the simulated model. Example:
		<Activity id="SetHeaterEnabled" logStart="false" logEnd="false">
			<Description>Enables or disables a heater.</Description>
			<Start/>
			<Eval>
				<![CDATA[
				Data:=Global["Data"+Device.InstanceId];
				Data.Enabled:=Value
				]]>
			</Eval>
			<Stop/>
		</Activity>
Communicating with a Modbus device
To communicate with a Modbus device, you need to create one or more Modbus client actors in the simulation. This is done using the ModBusClient element, as in the following example:
		<modbus:ModBusClient id="ThermostatClient" N="10" host="localhost" port="502">
		</modbus:ModBusClient>
Each client connects to a given host and TCP/IP port, and assumes a Modbus IP Gateway is on the other end. As we host the Modbus server in the same simulation, we simply direct the clients to that server. The N attribute informs the simulator on the number of clients to create for the simulation.
The actual communication is then performed by selecting the corresponding actor, and use any of the following elements:
| Element name | Operation |
|---|---|
ReadModBusCoil |
Reads a boolean coil register (bit). |
ReadModBusDiscreteInput |
Reads a word discrete input register (bit). |
ReadModBusHoldingFloatingPointRegister |
Reads a floating-point holding register (two consequtive word holding registers). |
ReadModBusInputFloatingPointRegister |
Reads a floating-point input register (two consequtive word input registers). |
ReadModBusInputRegister |
Reads a word register. |
WriteModBusCoil |
Writes to a boolean coil register (bit) |
These operations can be illustrated by the control operation in the simulation:
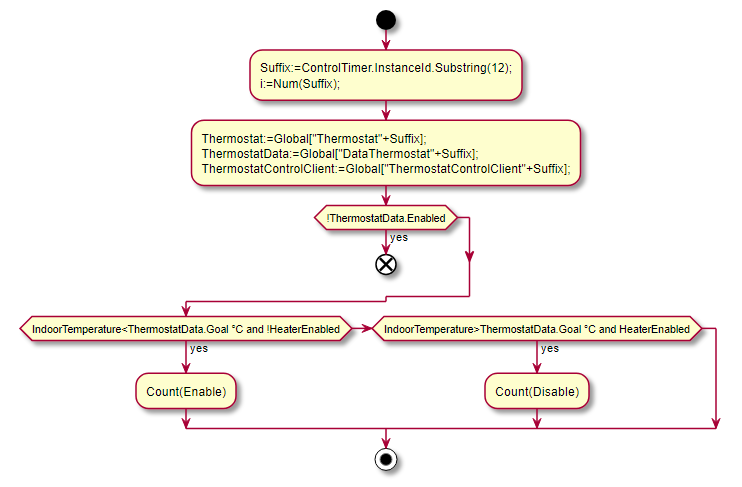
<Activity id="Control" logStart="false" logEnd="false">
<Description>Performs the actions of a thermostat, by reading the corresponding sensors and taking necessary actions to control the indoor temperature to match a preset and configurable goal temperature.</Description>
<Start/>
<Eval>
<![CDATA[
Suffix:=ControlTimer.InstanceId.Substring(12);
i:=Num(Suffix);
]]>
</Eval>
<Eval>
<![CDATA[
Thermostat:=Global["Thermostat"+Suffix];
ThermostatData:=Global["DataThermostat"+Suffix];
ThermostatControlClient:=Global["ThermostatControlClient"+Suffix];
]]>
</Eval>
<Conditional>
<Condition condition="!ThermostatData.Enabled">
<Finished/>
</Condition>
</Conditional>
<modbus:ReadModBusCoil register="0"
client="ThermostatClient\{Suffix\}"
address="\{i+29\}"
responseVariable="HeaterEnabled"/>
<modbus:ReadModBusHoldingFloatingPointRegister register="0"
client="ThermostatClient\{Suffix\}"
address="\{i+19\}"
responseVariable="IndoorTemperature"/>
<Conditional>
<Condition condition="IndoorTemperature<ThermostatData.Goal °C and !HeaterEnabled">
<Count counter="Enable"/>
<modbus:WriteModBusCoil register="0"
client="ThermostatClient\{Suffix\}"
address="\{i+29\}">
<Boolean value="true"/>
</modbus:WriteModBusCoil>
</Condition>
<Condition condition="IndoorTemperature>ThermostatData.Goal °C and HeaterEnabled">
<Count counter="Disable"/>
<modbus:WriteModBusCoil register="0"
client="ThermostatClient\{Suffix\}"
address="\{i+29\}">
<Boolean value="false"/>
</modbus:WriteModBusCoil>
</Condition>
</Conditional>
<Stop/>
</Activity>
Posts tagged #comsim
No more posts with the given tag could be found. You can go back to the main view by selecting Home in the menu above.