Accessing and editing files in the ProgramData folder
From Build 2024-03-12, it is now possible to manage content under the Neuron® ProgramData folder remotely, without the need to login to the server hosting the Neuron® via a Remote Desktop application (RDP). To be able to do this, you will need the following:
Use a client that supports the harmonized interfaces available via
XMPP. You can use the WPF Client in the IoT Gateway repository for this purpose.Once you run the client, connect to an XMPP account (or create a new XMPP account if you have both an API key and a secret), to any Neuron®. It does not have to be the Neuron® you will manage.

Click this button to create a new connection Once you have an account, add the Bare JID of this account to the list of recipients for operator notifications sent by the Neuron®. This will grant your account administrative rights via the XMPP connection that will be established.
You find the
Notificationbutton under theCommunicationheader in the admin menu on the Neuron®:
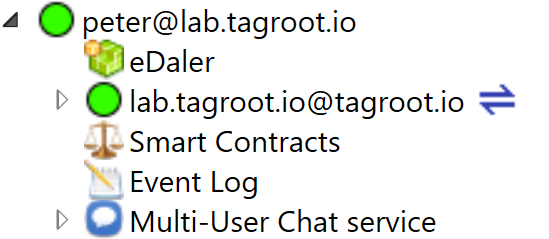
Notification Menu Once the connection has been properly made, and a bidirectional presence subscription is made, you will se the Neuron® as online. In the following example, the XMPP account used in the WPF client is
peter@lab.tagroot.io, and the XMPP address of the Neuron® islab.tagroot.io@tagroot.io.
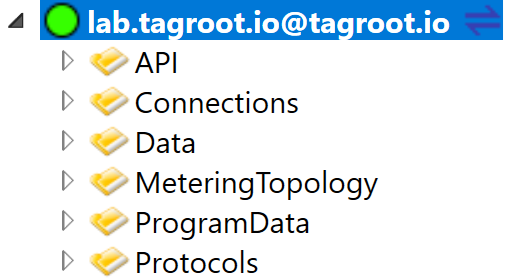
Bidirectional Presence Subscription Expand the Neuron® in the connection tree. You will se a list of published Data Sources that you are authorized to see. (If you are not an administrator of the Neuron®, a much shorter list is shown.)

DataSources.png Expand the
ProgramDatadata source, and all files and folders will be presented, in a tree structure matching the file and folder structure of the correspondingProgramDatafolder belonging to the Neuron®.To create a new file, right click on the containing folder node, and select any of the Create File commands that appear.
Note: You cannot upload files via this interface (yet).
Alternatively, you can select the folder, and press the Add command (
CTRL+INS), and select to create a new file or folder node.To delete a file or folder, simply select the file or folder, and delete it (
DEL).Note: You are not authorized to delete any files in the the root
ProgramDatafolder of the Neuron® (not to be confused with theRootfolder, which is the root folder for web content hosted by the Neuron®, and which is a sub-folder to the Neuron® rootProgramDatafolder.To rename a file or folder, select the corresponding node, and press the edit command (
ALT+ENTER). In the window that appears, change the local name, and then press OK. The corresponding file or folder will be renamed.Note: You are not authorized to rename any files or folders in the the root
ProgramDatafolder of the Neuron®.Press the configure button (
CTRL-ENTER) to edit the file or folder attributes of the selected node.If the file is some form of text file (i.e. text, Markdown, HTML, XML, CSS, CSSX, Javascript, Web script, etc.), you can edit the contents of the file, by right-clicking on the file, and select the Edit File command. A window with a text editor will appear, with the syntax highlighting activated to match the contents of the file.

Text Editor Note: Commands in the harmonized interface are fetched asynchronously from the Neuron® on demand. To reduce the load on the communication inteface, fetching commands of all nodes att all times is avoided. Commands are only fetched on nodes where the user requests them, or is expected to request them. This happens when you select a node, for instance. If you right-click a node that has not been selected previously, the popup menu might not show all available commands, as the response to the query may not be received in time for the menu to be displayed. If this happens, just open the popup menu again, and the command will be there. You can also avoid this, by selecting the node first, before right-clicking it.