Using Agent API to execute reports on a Neuron
Reports on the Neuron® exist in its Harmonized IoT Architecture, under a separate Data Source with ID Reports. An XMPP user with sufficient privileges can access these reports and execute them. A web client can use the Agent API, and its extension Agent Things API to do the same. This article outlines the steps to take to execute a report, using the Agent API:
The web client can use an Agent Account on any Neuron, provided the Neuron can connect to the Neuron hosting the report to be executed.
Login calling the Agent API
AgentAPI.Account.Login()method. The web client will receive a token that it can use in subsequent requests. If you use the Javascript implementation provided, this is done automatically.You can check the account has sufficient privileges by calling the
AgentAPI.Things.Concentrator.GetAllDataSources()method after logging in. You need to specify theJIDof the Neuron (as a client to its Parent Neuron). If access is granted, theReportsdata source should be listed in the response. If not, check the following:The Agent account must have presence subcription approved to Neuron JID that you provide. If such a presence subscription does not exist, a presence subscription request will be sent automatically, and a
ForbiddenerrorAccount lacks an approved presence subscription.will be returned.To check presence subscriptions on the Neuron, go to the
Rosterpage from the Administrative menu, and accept the request shown there.Example:

Presence Subscription Request in Roster If the Agent account is on the same Neuron, the XMPP account must have sufficient privileges. To be able to view and administer the Reports data source, and any reports they contain, the user must have the
Source.Reports.*privilege (or as a privilege regular expression:+Source\.Reports\..*). (Refine this privilege if a subset is required.).If the Agent account is on another Neuron, a user account with the user name equal to the Bare JID of the Agent account needs to be created. This user account needs to be assigned a Role having the required privileges mentioned above.
You can call the
AgentAPI.Things.Concentrator.GetRootNodes()andAgentAPI.Things.Concentrator.GetChildNodes()to browse available report folders and the reports they contain. You need to use the sameJIDargument as above, and set the Source ID argument toReports. If you want to retrieve reports from a report folder, for instance, you need to call theAgentAPI.Things.Concentrator.GetChildNodes()resource, and also provide the ID of the reports folder node. If you want to get information about a particular node (or test if you have the correct Node ID), you can call theAgentAPI.Things.Concentrator.GetNode()resource.By calling the
AgentAPI.Things.Concentrator.GetNodeCommands()you receive a list of commands the account has access to. There are three types of commands:Simple,ParametrizedandQuery.Simplecommands are just executed; they do not need parameters, and they do not return any information apart from if the execution succeeded or failed. AParametrizedcommand, requires the user to provide parameter values before it can be executed. LikeSimplecommands, they provide no detailed responses apart from executing successfully or not. AQuerytakes parameters for input, but also return a response (which may be long) asynchronously, as the query is being executed.If you are going to execute a Parametrized command or query, you need to provide parameters. If you do not know what parameters are expected from the command, you can get a parameter form by calling the
AgentAPI.Things.Concentrator.GetCommandParameters()method.Depending on type of command, you then call the
AgentAPI.Things.Concentrator.ExecuteSimpleCommand()method, if it is aSimplecommand, theAgentAPI.Things.Concentrator.ExecuteParametrizedCommand()method, if it is aParametrizedcommand, or theAgentAPI.Things.Concentrator.ExecuteQuery()method, if it is aQuery.
Agent Reports API
The Agent API has an extension simplifying the execution of reports: The Agent Reports API. With some knowledge of where and how reports are accessed, it reduces access to reports to the following steps (some are the same as above, some are simplifications):
The web client can use an Agent Account on any Neuron, provided the Neuron can connect to the Neuron hosting the report to be executed.
Login calling the Agent API
AgentAPI.Account.Login()method. The web client will receive a token that it can use in subsequent requests. If you use the Javascript implementation provided, this is done automatically.To get a list of reports you have access to, call
AgentAPI.Reports.GetReports(). It will return an array of the report identifiers you can view.Get parameters for the report by calling
AgentAPI.Reports.GetReportParameters(). You can edit or reduce this set of parameters (or provide your own parameter object if you know the parameters you need for the next step), for the next step.You execute a report by calling
AgentAPI.Reports.ExecuteReport()method. It collects all asynchronous responses, and returns a consolidated report result.
Counter Reports
The Neuron® contains runtime counters of different types. They reside in the collection RuntimeCounters that contain a collection of RuntimeCounter objects. They are efficiently maintained in-memory, so incrementing them frequently does not affect performance greatly. Each counter is either persisted after one minute of no activity, or after 15 minutes of regular activity (at least one action per minute). Since the most recent counter value is often stored in-memory, the database collection is not the most reliable source of what counter values exist. The counter keys can be taken from the collection, but the most recent values should be retrieved using script. The script functions DecCounter, FlushClunters, GetCounter, GetCounters and IncCounter can be used to access runtime counters from script.
Note: RuntimeCounters is a namespace in the underlying code. This means that the SELECT statement select count(*) from RuntimeCounters will fail, since the RuntimeCounters reference will refer to the namespace instead of the collection. To make SELECT statements referring to counters, use double quotes around the name, to ensure the name is treated as a label, and not a reference to something else, as follows: select count(*) from "RuntimeCounters". You can also use the script functions.
Counter Script primer
Before delving into counter reports, first some background in how to extract information about counters using script. Each counter is represented by a RuntimeCounter object. You can select data from the database, either by referring to the class name of the counter object RuntimeCounter, or to the collection name, but using double-quotes to avoid referring to the namespace: "RuntimeCounters". (Should there be another class named RuntimeCounter in the code-behind, you need to refer to the fully-qualified name of the class, rather than the local name. Referring only to the local name would return a vector of the different class types matching the local name reference.)
Getting the properties avialable in persisted objects of a class, use the properties() function:
properties(RuntimeCounter)
This gives:
["ObjectId", "Key", "Counter"]
To extract available counters, we therefore do as follows: (Note here the use of the script function GetCounter() to get the value in memory, if any.
SELECT
	Key,
	GetCounter(Key) Value
FROM
	RuntimeCounter
ORDER BY
	Key
There will most probably be a lot of counters there. Some are communication-related, others are service-related. Others relate to specific Neuron-operations that may be of interest for statistical purposes or billing.
Counter differences
The script engine contains a feature referred to as subtraction of two dictionaries that makes it simple to compare counters from two different points in time. Since each key is unique, you can create a dictionary (object) of the counter values as follows:
Sample1:={};
foreach Counter in (SELECT Key FROM RuntimeCounter) do
	Sample1[Counter]:=GetCounter(Counter);
At a later time you similarly do:
Sample2:={};
foreach Counter in (SELECT Key FROM RuntimeCounter) do
	Sample2[Counter]:=GetCounter(Counter);
To get the differences of samples, you simply do:
Sample2-Sample1
Here, each object does not have to have the same propery values. If a property does not exist in one of the samples, but exists in the other, it is treated as having the zero element (in the underlying group, here being Integers).
Note: Once a set of counters is converted into a dictionary, as shown above, it can be persisted as a property itself in an object by itself in the database. The reports repsented below has this feature to save snapshots from the counters collection using labels that can be retrieved later for comparison purposes.
If many of the counters are the same between snapshots (i.e. there are many zeroes), we can remove all zeroes and create a reduced difference set as follows. First, we convert the dictionary into a vector, and then use the subset construction to create a smaller vector consisting of only objects whose values are not zero. By transposing this result, we get the result in tabular form.
Diff:=[foreach P in Sample2-Sample1 : P];
[P in Diff:P.Value!=0]T
In our example above, if Sample1 and Sample2 are made in relative close proximity, only a few counters have been modified. The result could look something like:
[[[XMPP.Server.Set.pubsub, 1]],
 [[XMPP.Server.Get.ping, 221]],
 [[E2EE.Counter, 11]]]
The example above shows 1 XMPP Publish/Subscribe operation, 221 XMPP ping operations to maintain connectivity and 11 End-to-End Encrypted stanzas communicated between samples.
Counter Labels
Samples in counter-reports described below are stored using Labels. These labels are stored in two different collections, depending on report: CounterLabels and BillableLabels. To get available labels, you can execute simple SELECT statements:
select Label from CounterLabels
or:
select Label from BillableLabels
Counter Reports
File-based reports make working with script easier. They allow you to parametrize script, and present the results in a more user-friendly manner (meaning, you don’t have to know script to know the results). There are two reports available that can be used to extract information from runtime counters. From Sources & Nodes in the administrative portal, you find the reports here:
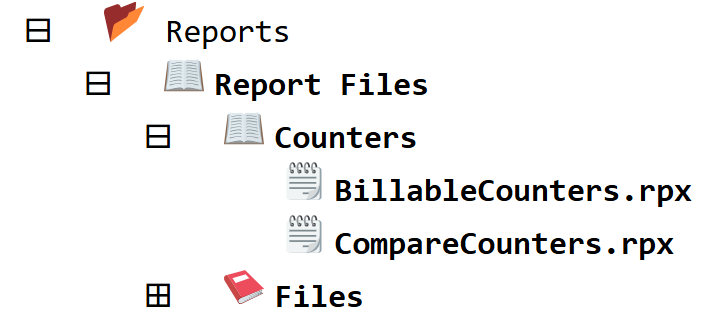
Compare Counters Report
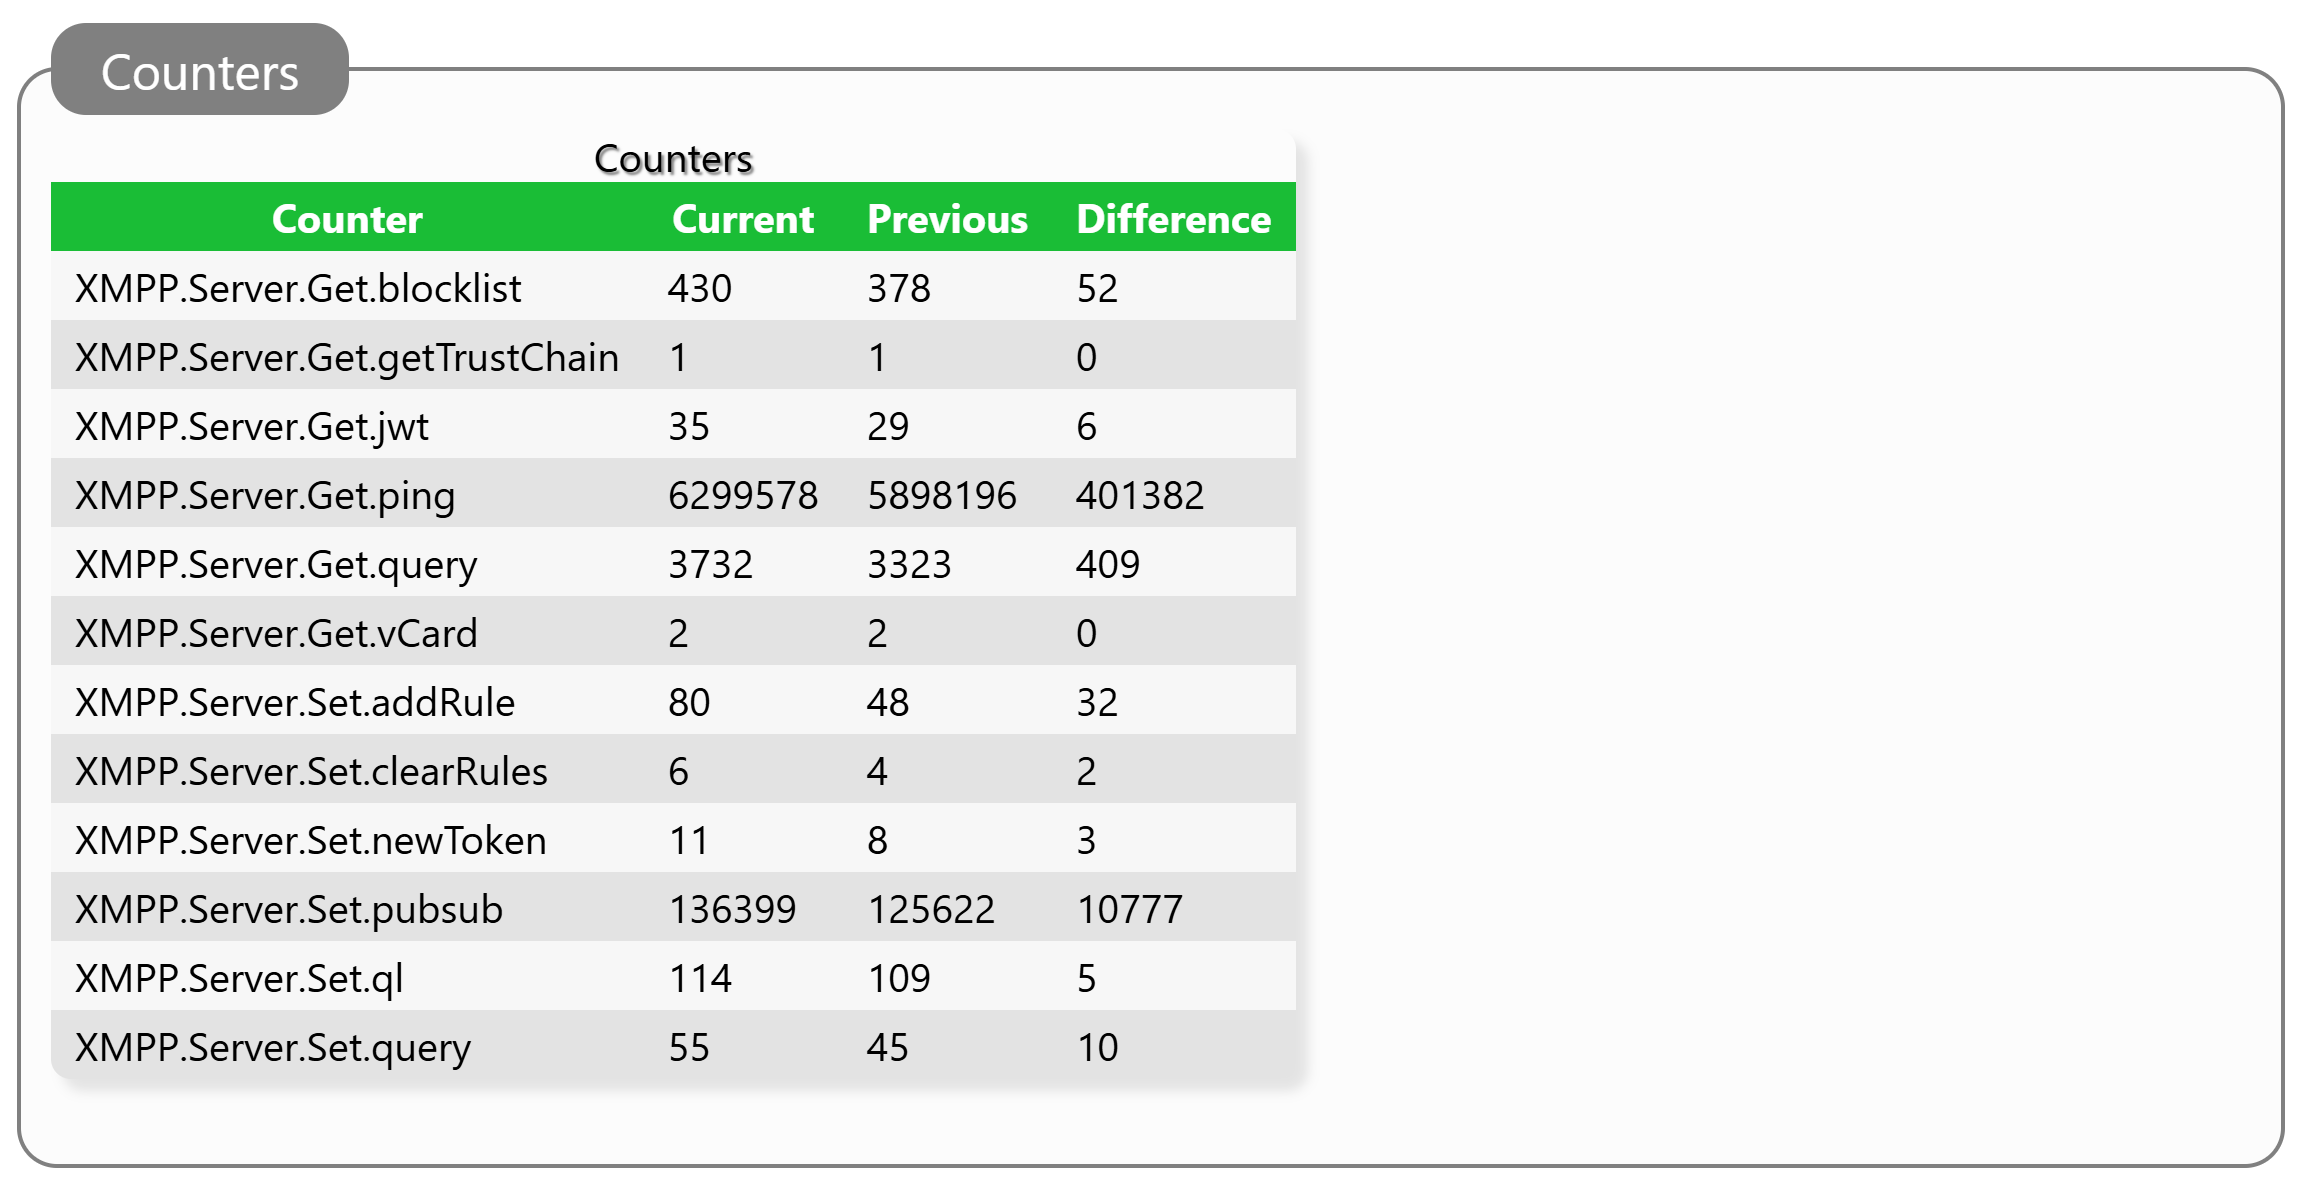
The Compare Counters report lets you compare two sets of samples with each other, taken at separate times. It also lets you label each sample. You select the counters you wish to compare by providing a Counter Key Prefix, which may or may not use a wildcard, which you can also specify. In the following example XMPP-related counters will be compared:
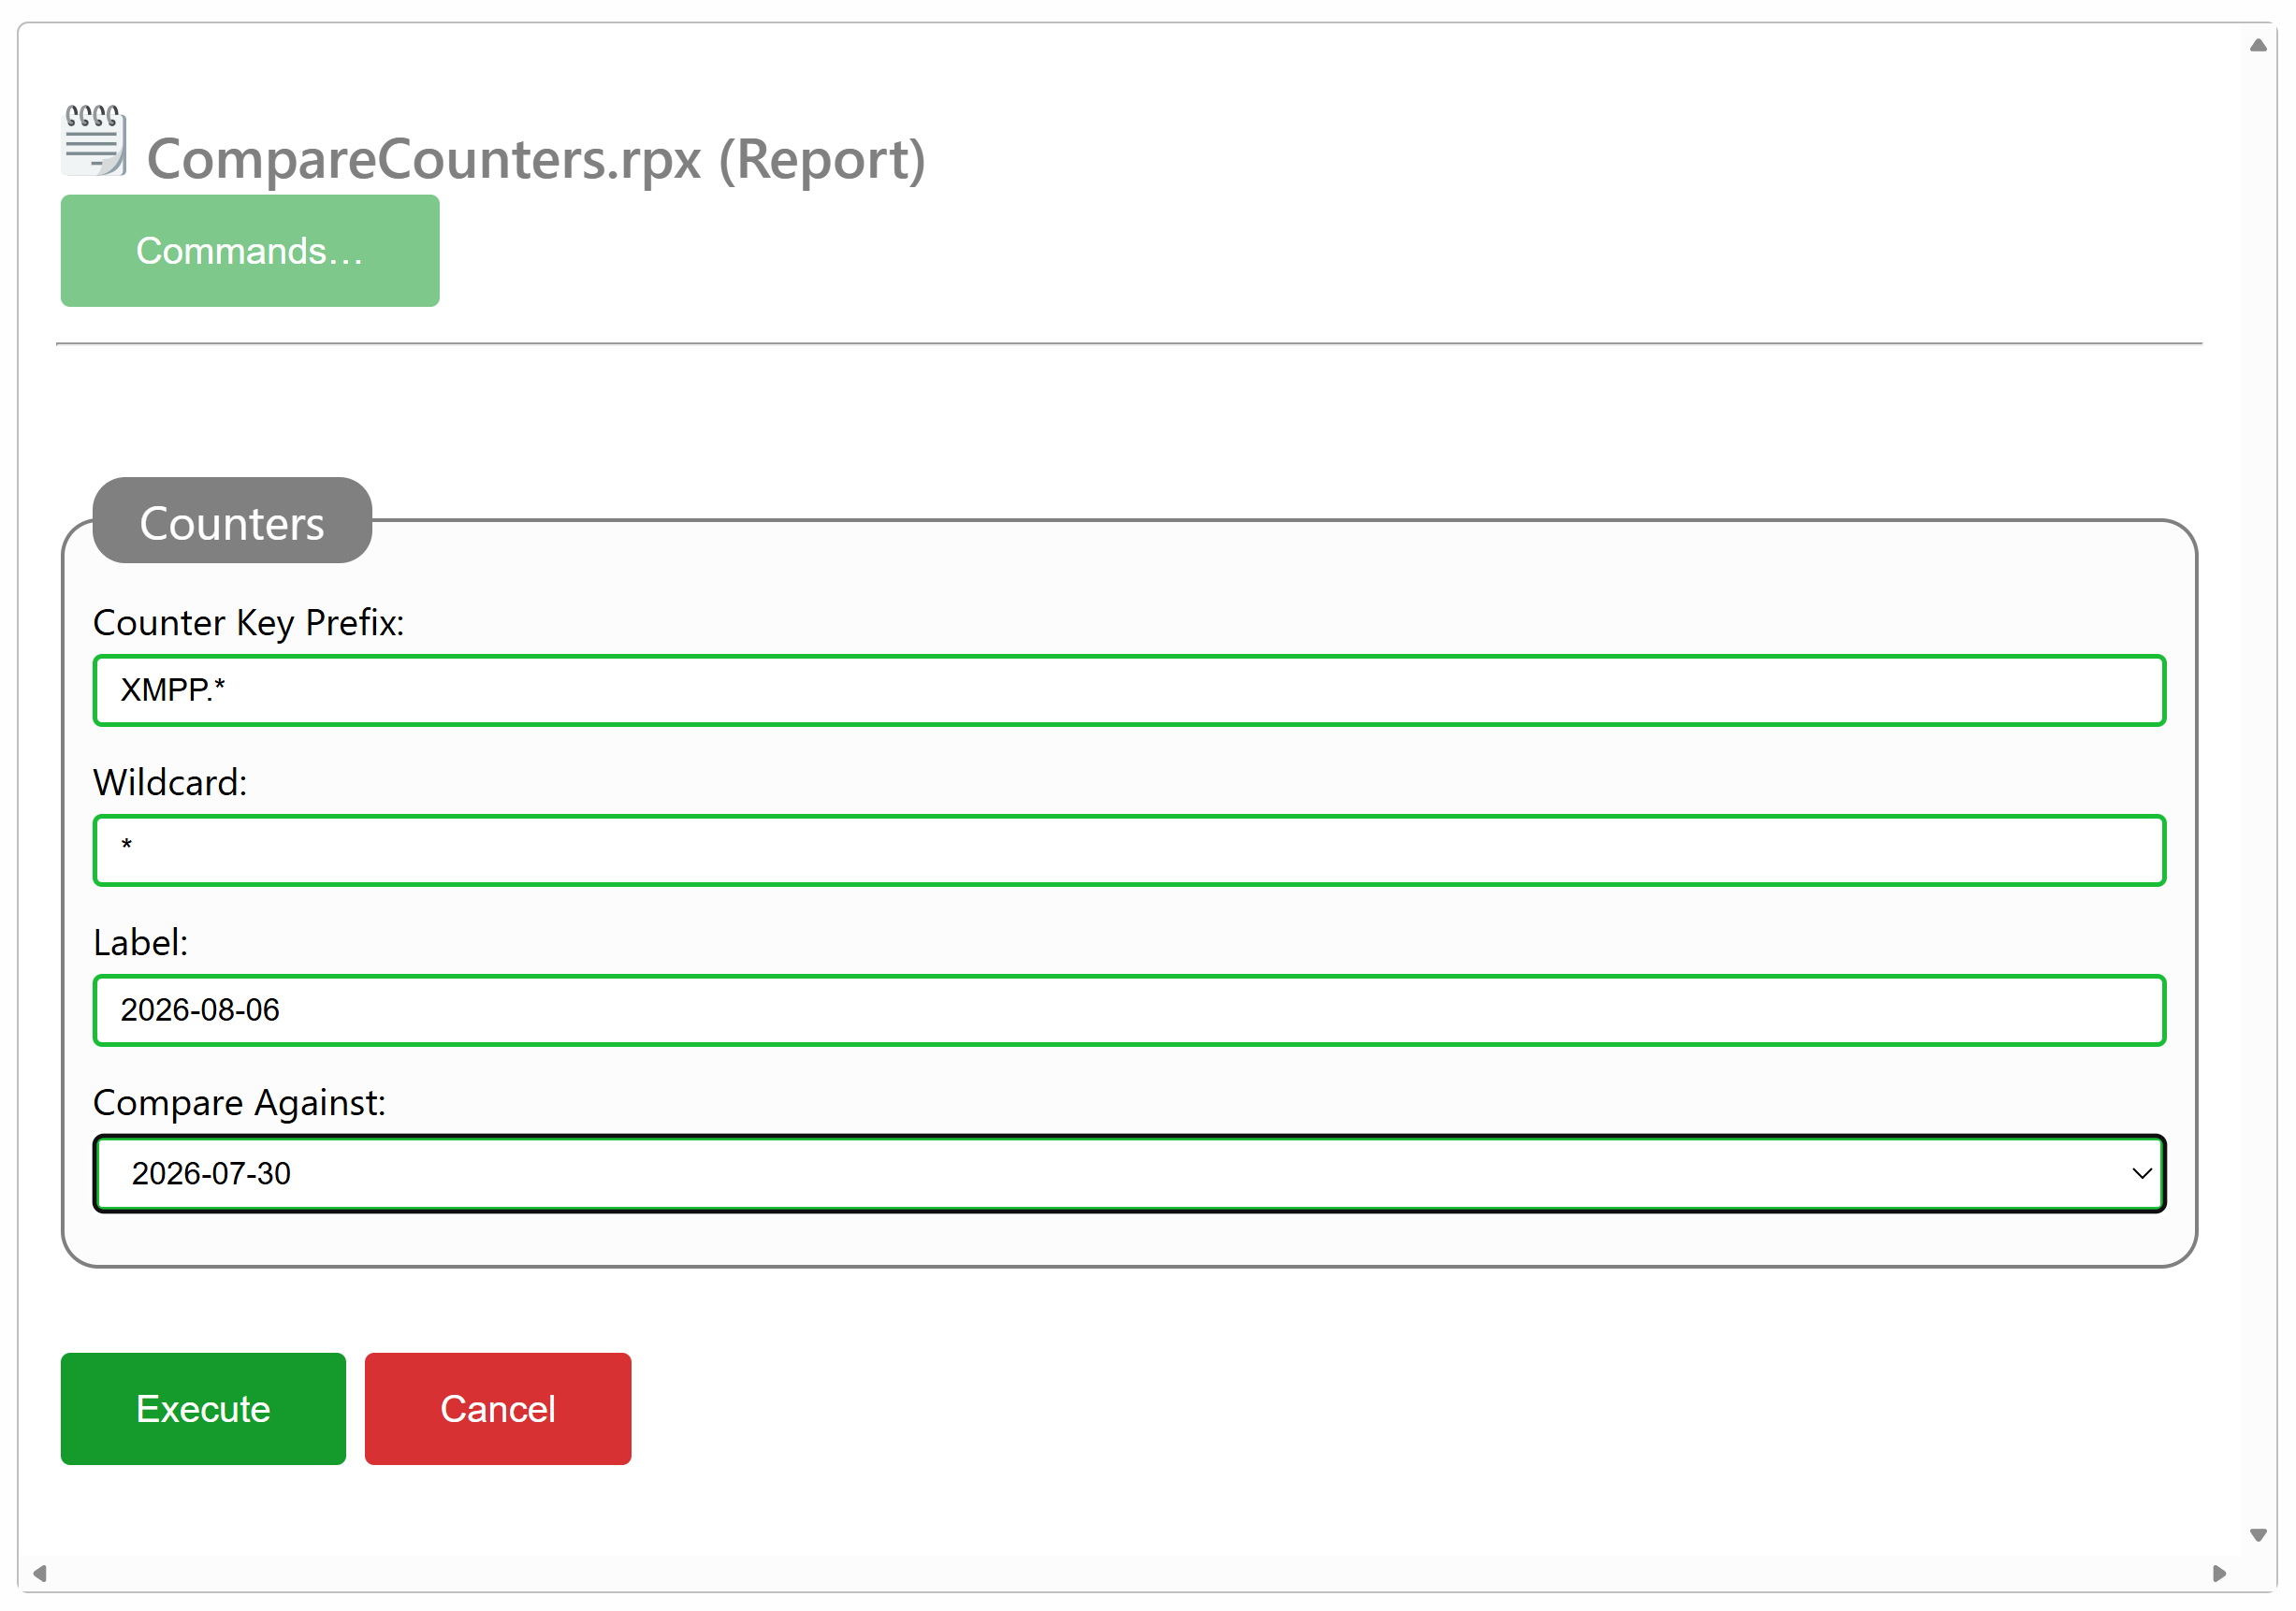
For our example, a brief reduced result set might look as follows:
Billable Counters Report
Certain counters could be referred to as billable counters, meaning, that some operators might base billing on server usage based on these counters. A special counter-comparison report exists that selects these counters automatically. All the operator needs to do is provide label names, to get suitable comparisons.
Example of what counters are included in the billable counters report, see the following report result comparing two snapshots close to each other (leaving results as zero):
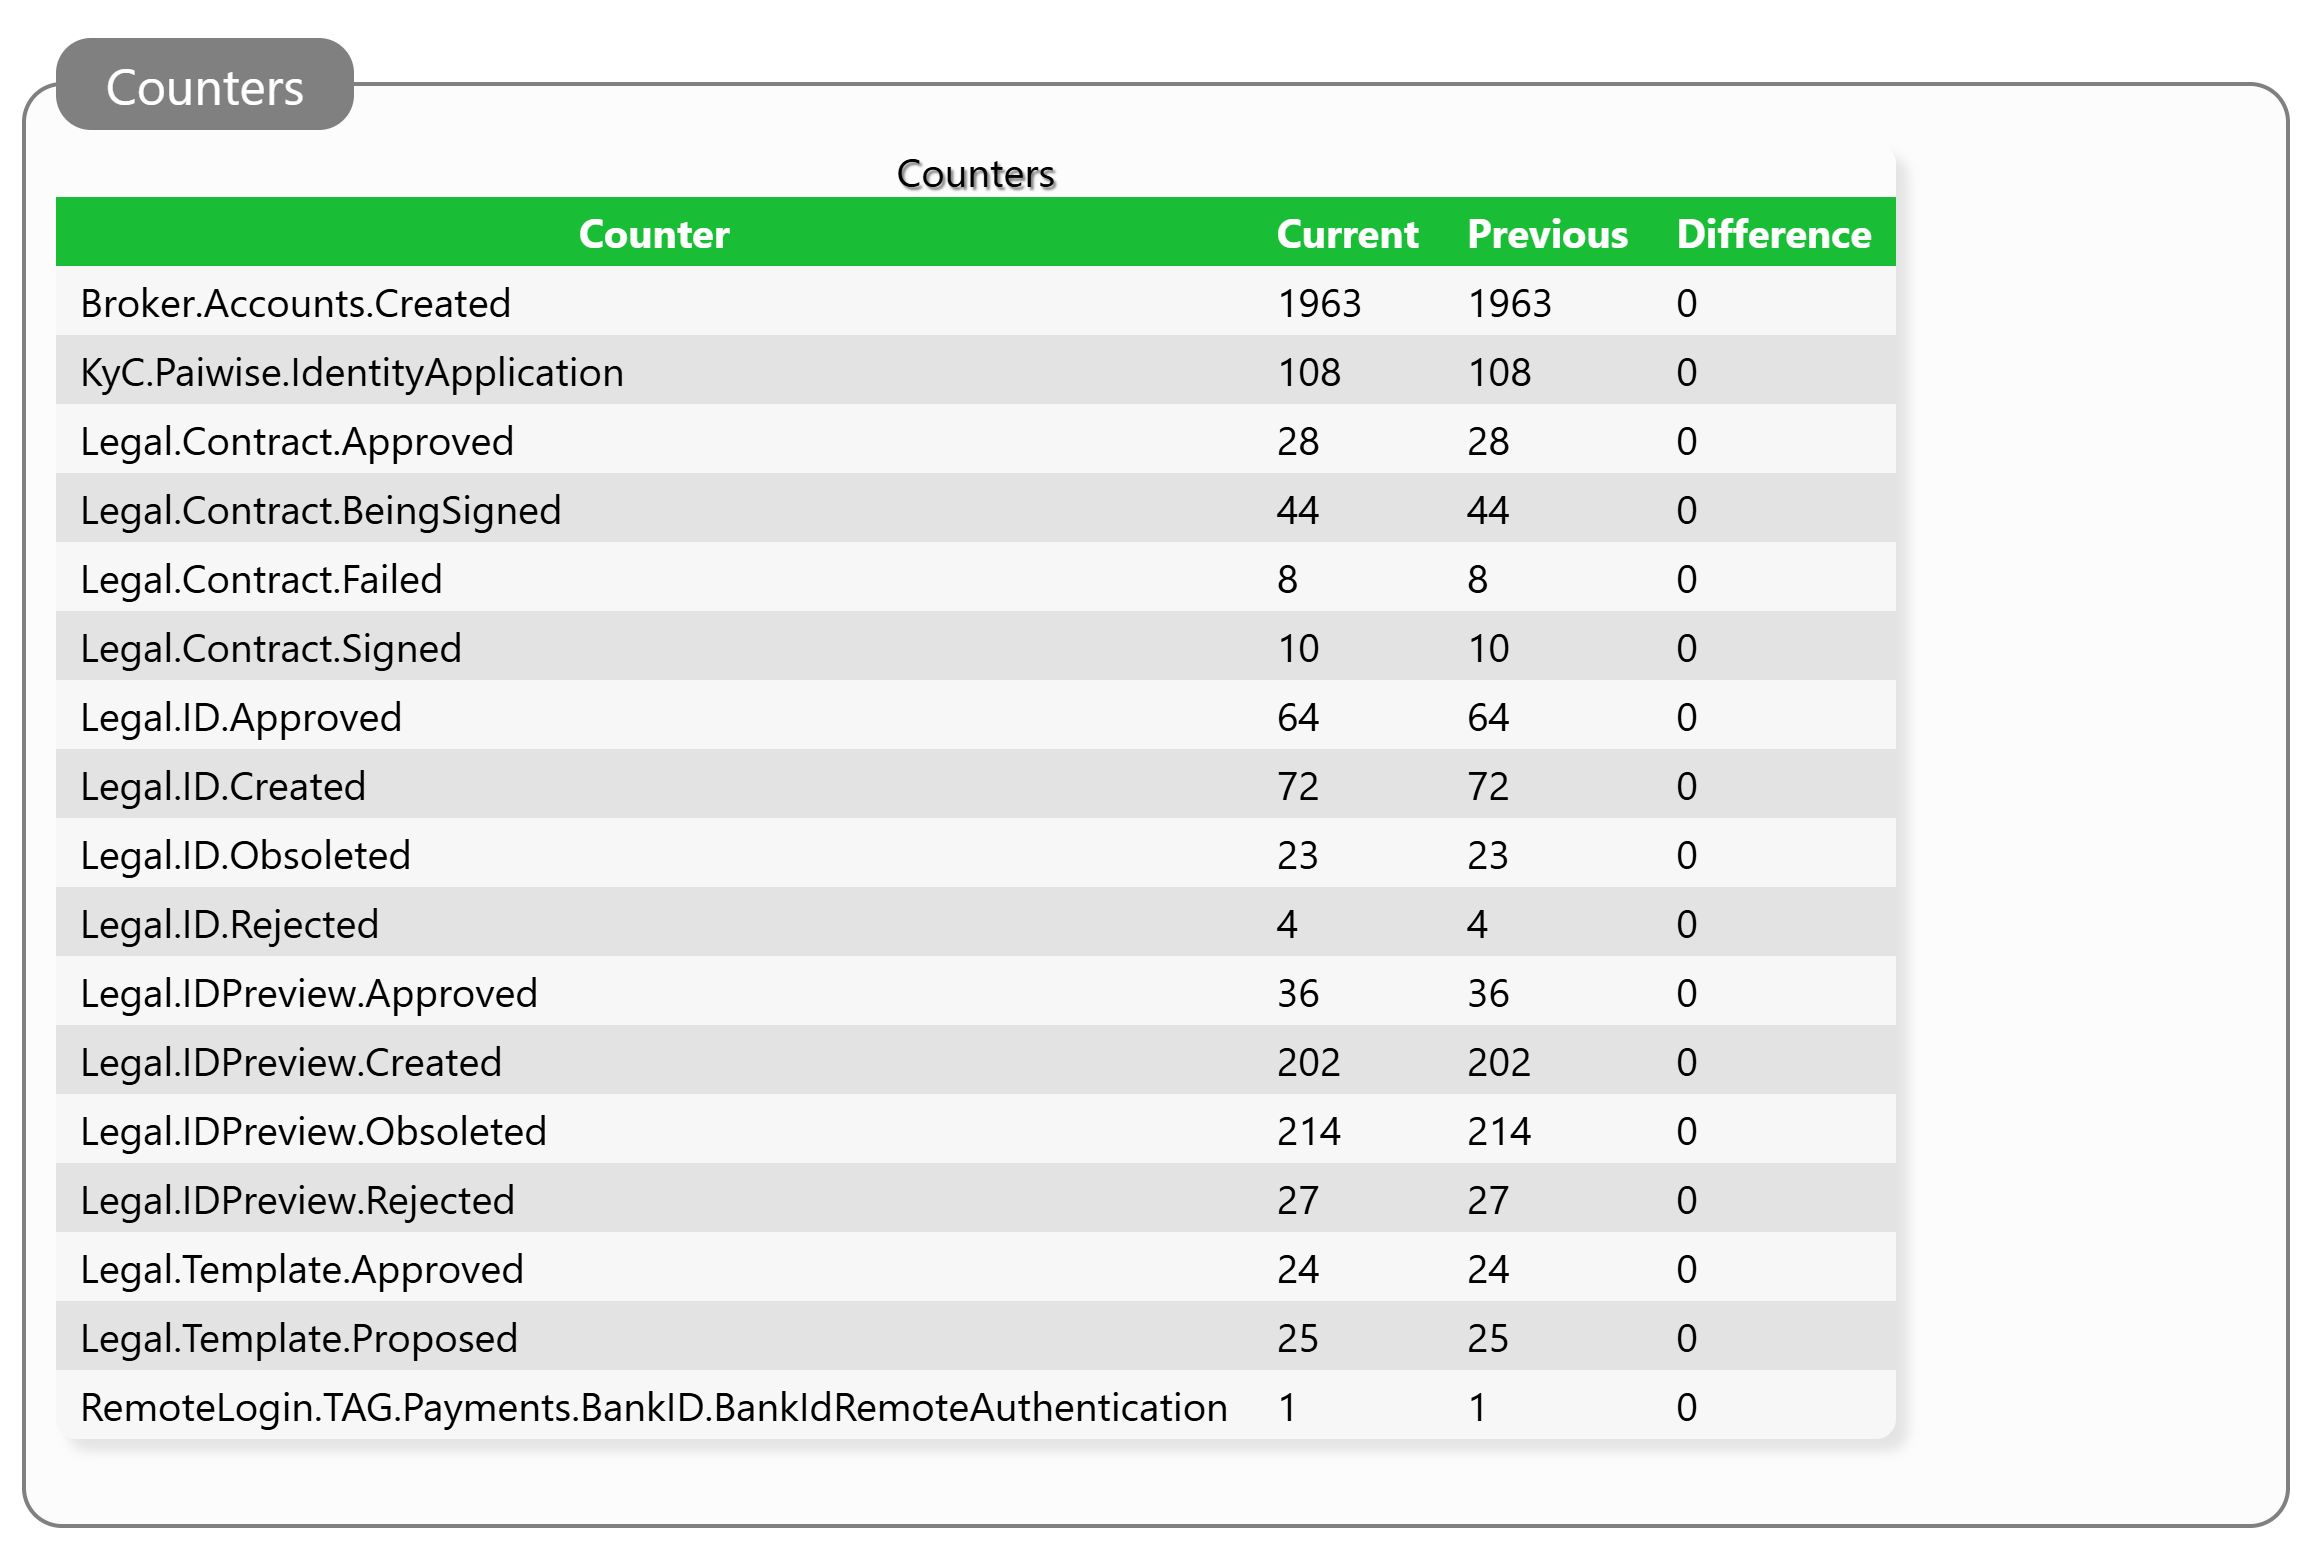
The counters that appear have the following meaning:
| Counter | Description |
|---|---|
Broker.Accounts.Created |
Number of XMPP accounts created. |
KyC.*.IdentityApplication |
Number of identity applications analyzed by KyC service * |
Legal.Contract.Approved |
Number of smart contracts approved. |
Legal.Contract.BeingSigned |
Number of contracts receiving digital signatures. |
Legal.Contract.Failed |
Number of contracts that failed. |
Legal.Contract.Signed |
Number of contracts reaching the signed state. |
Legal.ID.Approved |
Number of Identity Applications that were approved. |
Legal.ID.Created |
Number of Identity Applications that were created. |
Legal.ID.Obsoleted |
Number of Identity Applications that were obsoleted. |
Legal.ID.Rejected |
Number of Identity Applications that were rejected. |
Legal.IDPreview.Approved |
Number of Identity Preview Applications that where approved. |
Legal.IDPreview.Created |
Number of Identity Preview Applications that where created. |
Legal.IDPreview.Obsoleted |
Number of Identity Preview Applications that where obsoleted. |
Legal.IDPreview.Rejected |
Number of Identity Preview Applications that where rejected. |
Legal.Template.Approved |
Number of smart contract templates that were approved. |
Legal.Template.Proposed |
Number of smart contract templates that were proposed. |
RemoteLogin.* |
Number of Remote Login API authentication initiations made using authentication service *. |
Custom Reports in Operations using Script
In operations it is common to extract information from the system using script from the script prompt, either for trouble-shooting purposes or for statistical purposes. Often, these tasks are done many times, and script may be customized for each Neuron®, depending on tasks being performed and services run. While creating services or custom content pages can be a way to formalize these script into working reports accessible from the web admin interface, you can also create custom reports on the Neuron® using script nodes and command queries, via the web administration page directly. Such reports can then be easilly deployed across Neurons in the network, using simple copy and paste operatios using the Simple IoT Client in the IoT Gateway repository. This article will give an example of this process.
Creating nodes
You can create nodes on a Neuron® using any application or interface that supports the Neuro-Foundation interfaces. This includes the Simple IoT Client, and also the Node Explorer available in the web administrative interface, under Data and Sources & Nodes. In this article, we assume you use the Simple IoT Client, and that you are connected to some Neuron® or broker, and are friends with the Neuron® on which you want to create the report nodes. You also need to be an administrator on the Neuron®, which you can become by adding your JID to the list of recipients of notifications on the Neuron®. Once an administrator, you get access privileges to execute script on the Neuron®, and to create the necessary nodes.
You begin by expanding the Neuron® node. You will se a list of available data sources. Expand the Metering Topology, which is the source where you will be able to add virtual nodes and script nodes. On the Root node, you can add a Virtual Node to host your reports. In this example, we will create a report that displays the information about a legal identity that is hosted by the Neuron® itself, and therefore accessible to administrators of the Neuron®. So, we can create a Script Node under the Reports node and call it Legal. Under the Legal node, we can add a Script Query node and call it Get Local ID. This will be the command that executes the report. Under the Get Local ID node, we need to add parameter nodes. For our example, it is sufficient to add a string-valued parameter, which we will call LegalID. The report will only take one input parameter. The setup may look something like shown in the following image.

Sensor Readout script
To the script node, you can add read-out script. This will make the node readable as a sensor. Here you can add some basic script providing simple access to data you may be interested in often. In this example, you can add the following example script to the node named Legal. It will read-out some basic statistics about number of legal objects on your Neuron®:
if Request.IsIncluded(Waher.Things.SensorData.FieldType.Status) then
(
	preview([Field(this,NowUtc,"#Identities",
		(select count(*) from "LegalIdentities"),"Status")]);

preview([Field(this,NowUtc,"#Attachments",
	(select count(*) from "LegalAttachments"),"Status")]);

preview([Field(this,NowUtc,"#Identity References",
	(select count(*) from "LegalIdentityReferences"),"Status")]);

preview([Field(this,NowUtc,"#Contracts",
	(select count(*) from "Contracts"),"Status")]);

preview([Field(this,NowUtc,"#Contract Signatures",
	(select count(*) from "ContractSignatures"),"Status")]);
);

[Field(this,NowUtc,"Domain",
	Waher.Service.IoTBroker.XmppServerModule.Legal.MainDomain.Address.Value,
	"Identity")]
Reading the Legal node (reading all fields and field types), may look as follows. Note that the preview function used in the script, makes the information available in the client as soon as it is available, instead of letting the user having to wait until the entire script has completed before showing the information.

Custom Report script
While sensor data readout script may be useful, it is not sufficiently versatile for reporting requirements. Apart from readout script, you can add any number of commands to a script node. Commands exist of three types:
Simple Commands are just commands that are not parametrized. Examples may be clear cache, toggle switch, etc. They are just activated, by pressing a button, or selecting the command from a context menu.
Parametrized Commands are commands that receive input from one or more command parameters. You add as many parameters as you like. The parameter values will be available in script using variables names equal to their parameter names. When a user wants to execute a parametrized command, the user is first presented with a parameter dialog, where the user needs to provide sufficient information to execute the command. Once completed (and passing validation checks), the command can be executed.
Parametrized Queries work like parametrized commands, except they return information to the user in the form of a report. This information is returned asynchronously via a Query object that is passed to the script. A typical progression when returning information in a report include:
- Setting a title.
- Beginning sections (and subsections)
- Creating tables
- Reporting records
- Completing tables.
- Reporting objects (any object that is Internet encodable, using a codec understood by the Neuron®)
- Ending sections
You do not excplicitly need to start and stop the query. That is done by the Neuron®. Refer to the reference documention to see what methods are available on the Query object, and how to pass information back to the user as the script executes.
As for our example, we can add the following script to the script query node Get Local ID. It refers to the string-valued query parameter LegalID to get the identifier of the Legal ID to include in the report. You can try parts of the script in the script prompt, to see what it does, if unsure.
Q:=Waher.Things.Queries;
Column:=Q.Column;
Alignment:=Q.ColumnAlignment;
Record:=Q.Record;
Type:=Q.QueryEventType;
Level:=Q.QueryEventLevel;
Binary:=System.Byte[];
EncodedObject:=Waher.Content.Binary.EncodedObject;
Legal:=Waher.Service.IoTBroker.Legal.LegalComponent;

Query.SetTitle("Get Legal ID");

Query.BeginSection("Input Parameters");
Query.NewTable("Input","Input Parameters",[
	Create(Column,"Name","Parameter",null,null,null,null,Alignment.Left,null),
	Create(Column,"Value","Value",null,null,null,null,Alignment.Left,null)
]);
Query.NewRecords("Input",[
	Create(Record,["Legal ID:",LegalID])
]);
Query.TableDone("Input");
Query.EndSection();

Properties:=null;
Attachments:=null;

Query.BeginSection("General Information");
ID:=select top 1 * from Waher.Service.IoTBroker.Legal.Identity.LegalIdentity where Id=LegalID;
if !exists(ID) then
	Query.LogMessage(Type.Error,Level.Major,"Legal ID not found on this machine.")
else
(
	Query.NewTable("GeneralInformation","General Information",[
		Create(Column,"Name","Parameter",null,null,null,null,Alignment.Left,null),
		Create(Column,"Value","Value",null,null,null,null,Alignment.Left,null)
	]);

Records:=[foreach P in properties(ID) do
(
	if P[0]="Properties" then
		Properties:=P[1]
	else if P[0]="Attachments" then
		Attachments:=P[1]
	else
	(
		if P[1] is Binary then P[1]:=Base64Encode(P[1]);
		Create(Record,P)
	)
)];
Query.NewRecords("GeneralInformation",[x in Records:x is Record]);
Query.TableDone("GeneralInformation");
);
Query.EndSection();

if exists(Properties) then
(
	Query.BeginSection("Encoded Properties");
	Query.NewTable("Properties","Identity Properties",[
		Create(Column,"Name","Parameter",null,null,null,null,Alignment.Left,null),
		Create(Column,"Value","Value",null,null,null,null,Alignment.Left,null)
	]);
	Query.NewRecords("Properties",[foreach P in Properties do Create(Record,[P.Name,P.Value])]);
	Query.TableDone("Properties");
	Query.EndSection();
);

if exists(Attachments) then
(
	Index:=0;
	foreach Attachment in Attachments do
	(
		Index++;
		AttachmentId:="Attachment" + Index;
		AttachmentName:="Attachment " + Index;
		Query.BeginSection(AttachmentName);

Query.NewTable(AttachmentId,AttachmentName,[
	Create(Column,"Name","Parameter",null,null,null,null,Alignment.Left,null),
	Create(Column,"Value","Value",null,null,null,null,Alignment.Left,null)
]);
Query.NewRecords(AttachmentId,[foreach P in properties(Attachment) do
(
	if P[1] is Binary then P[1]:=Base64Encode(P[1]);
	Create(Record,P)
)]);
Query.TableDone(AttachmentId);

AttachmentObj:=select top 1 * from Waher.Service.IoTBroker.Legal.Attachments.Attachment where Id=Attachment.Id.Value;

if exists(AttachmentObj) then
(
	Query.BeginSection("Decoded object");
	Query.NewObject(Create(EncodedObject,
		Legal.LoadEncryptedFile(AttachmentObj.LocalFileName,AttachmentObj.Salt),
		AttachmentObj.ContentType))
		??? Query.LogMessage(Exception);
	Query.EndSection();
)
else
	Query.LogMessage(Type.Error,Level.Major,"Attachment ID not found on this machine: " + Attachment.Id);

Query.EndSection();
)
);
Query Execution
Once the script is added, we can execute the command. The command is available on the Legal node. In the Simple IoT Client you will find it in the context menu:
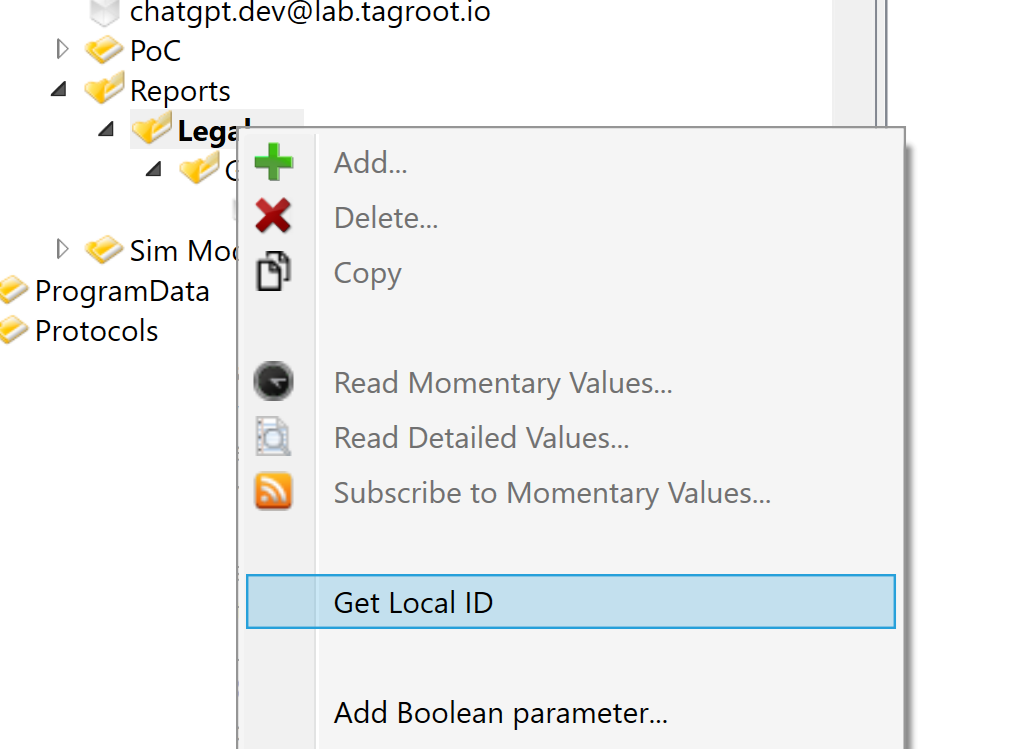
Select the command, and a parameter dialog with your command parameters appear. In this example, only one parameter is listed, the Legal ID we want to display.
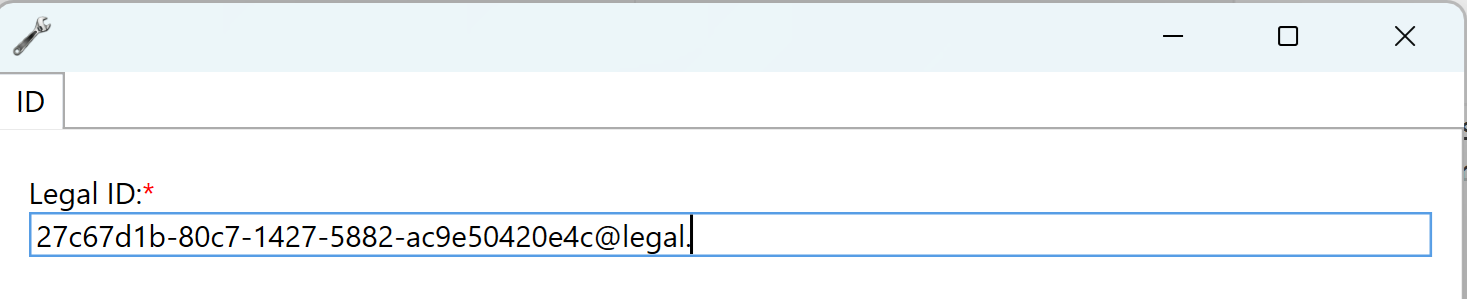
Once valid parameters have been provided, the command can be executed. In our example, the identity is displayed as follows:

You can scroll down to see the Internet-encoded objects you have included (in this example, an image):

Web Administrative Interface
All nodes and command are available in the administrative interface of the Neuron® as well. The same procedures as described above, can be performed via the web interface as well. You can find the node in the Metering Topology, under Root and Reports. Clicking on the Legal node, shows available options. By pressing the Commands button you see available commands on the node.

Press the Get Local ID command, and the parameter dialog appears:
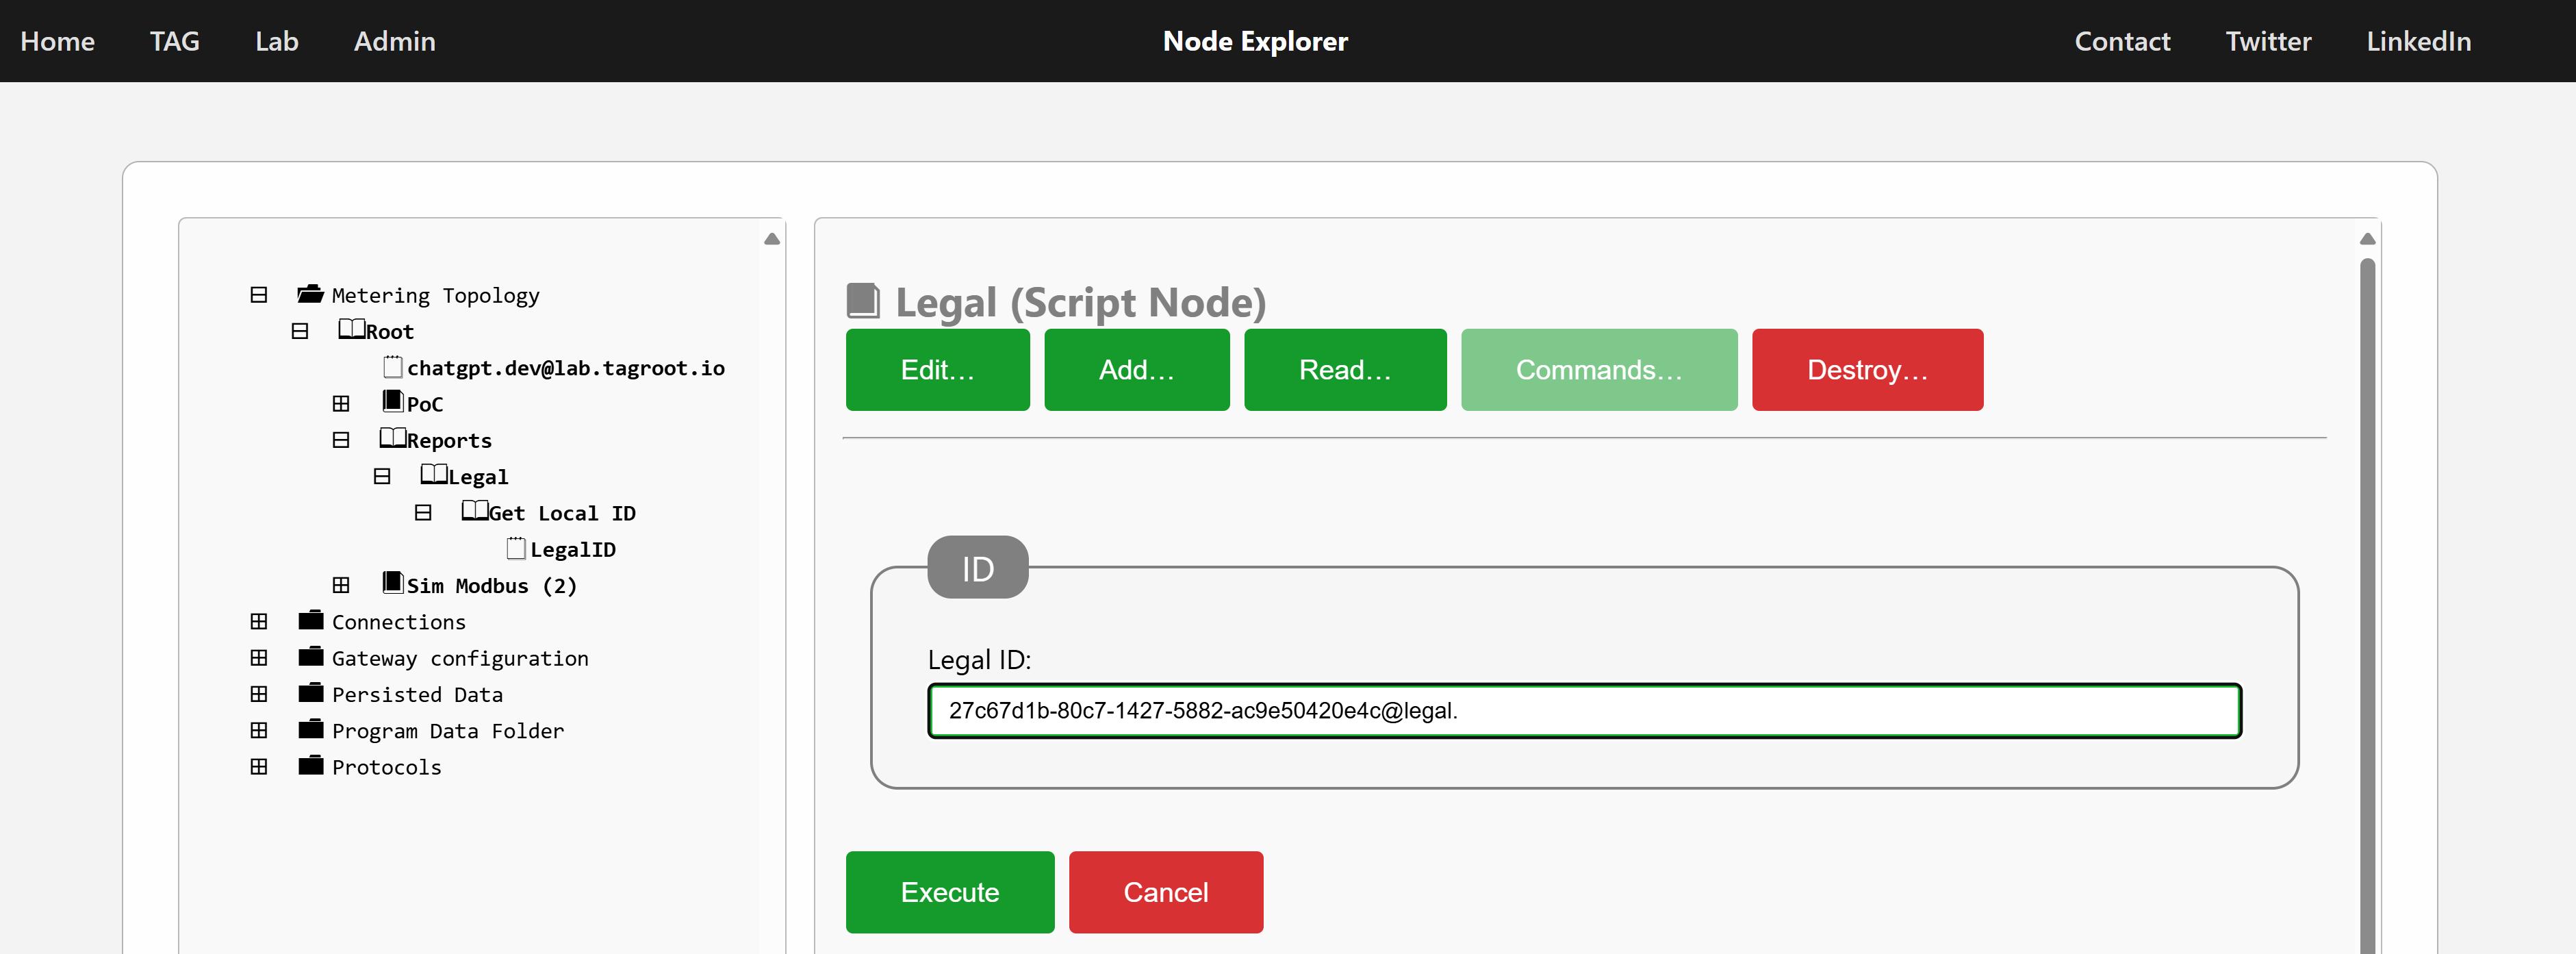
Once parameter dialog is completed, execute the command query, and the report will be displayed accordingly:

Simplified Reports
If you are only going to execute a parametrized query, for instance, against the internal database, you don’t have to setup and transmit the result to the client using the Query object variable available in the script explicitly. You can just make sure the script returns the result set. If nothing has been reported in the script, the result of the script is returned by itself. If the result is a table, the table will be returned as a table directly to the client. For instance, creating a query script node with the following script returns some simple statistics in the form of a table to the client requesting the information.
select
		LocalName,
		Namespace,
		count(*) Nr
	from
		Waher.Service.IoTBroker.WebServices.Agent.Crypto.AgentKey
	group by
		LocalName,
		Namespace
	order by
		LocalName,
		Namespace
Deploying reports across Neurons
The Web Administrative interface on the Neuron® lets you operate the Neuron® itself, but not other Neurons. The Simple IoT Client however, can connect and administer multiple neurons at the same time. It also has a feature where it can copy node hierarchies from anywhere (which basically reads out the selected nodes, and their information it has access to) and paste it to anywhere (which basically creates new nodes and edits them accordingly). You can also copy the information and paste it into any editor, edit the corresponding XML to customize it, and reselct and copy the edited document and paste it to the desired recipient.
Posts tagged #reports
No more posts with the given tag could be found. You can go back to the main view by selecting Home in the menu above.